Sometimes the instrument specialists give us new calibrations. Usually just a dead strip list for TKR, 3 (asym, MeV/DAC, peds) at a time for CAL. They need to be put in a standard place, registered in the calibration DB, and set active. This requires picking a time when validity switches from the previous set to the new one. We want this to happen between runs. The gaps between non-SAA runs are short, and CALDB doesn't do leap seconds, so I put the transitions near the middle of an SAA passage - the first one after the last run that we have data for.
Step-by-step guide
- Make sure your environment is setup correctly:
- Log into a SLAC machine. You will need to have X11 forwarding enabled (the -X or -Y option if not enabled by default).
- If one is not already sourced in your .bashrc or .cshrc then:
- bash: source /afs/slac.stanford.edu/g/glast/ground/scripts/group.sh
- (t)csh: source /afs/slac.stanford.edu/g/glast/ground/scripts/group.cshrc
- This will set environment variables like $GLASTROOT and the path to the GUI you will use below.
- Make sure that you have write permissions to the $LATCalibRoot directory.
- If not, ask Tom Glanzman
 .
.
- If not, ask Tom Glanzman
- Log into a SLAC machine. You will need to have X11 forwarding enabled (the -X or -Y option if not enabled by default).
- Copy files to the "normal" place (if the instrument people haven't already):
- TKR: $LATCalibRoot/TKR
- CAL: $LATCalibRoot/CAL/p7repro
- Figure out the transition time:
- Go to the data processing page.
- Find the most recent run. It will be at the top, unless deliveries have arrived out of order.
- Click on the run number.
- Note the start time.
- Go to the mission planning timeline
- Find the first SAA passage that is still in the future processing wise.
- Pick a time that is in the middle of the SAA passage. That is when we will start the new calibration.
- Go to the data processing page.
- Start the
rdbGUI. - Go to the
Filemenu and select 'Open DB Schema'. - Navigate to the directory
/afs/slac/g/glast/applications/dbSchemas/calib- You can paste this into the
File Namebox. - You can bookmark this location for future session by clicking on the flag icon.
- You can paste this into the
- Open the calib.xml file and click on
metadata_v2r1under the Tables box. - Under the
Sessionmenu, click onOpen connection. This will open a pop up box. - Fill in the box like the image below. The
profile nameandprofile descriptionboxes can be anything. The password is "calibr8tor".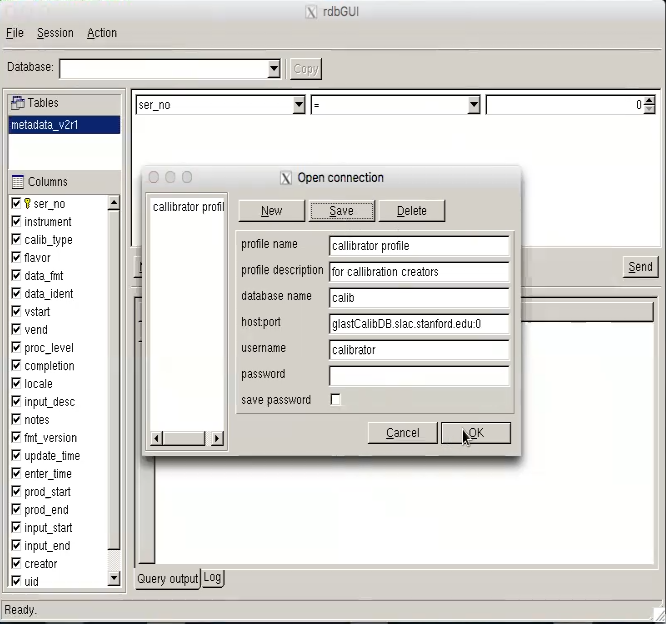
Overview
Content Tools