SLAC End Station A (ESA) Test Beam (ESTB)
The SLAC End Station A Test Beam (ESTB) was re-establishing in 2014 to take small fraction of SLAC LCLS beams into End Station test beam line. The operation is largely parasitic to the LCLS operations with electron beams in the 5-13 GeV range depending on the LCLS operation energy. From the FACET/ESTB portal, you can navigate to info on proposals, new user registrations, as well as ESTB schedules etc. The CALADIUM EUDET telescope owned by Carleton University has been installed at the end of ESTB as a precision tracking telescope with 6 planes of CMOS/MIMOSA sensors with ~3 micron spatial resolution. User Device Under Test (DUT) can be mounted on a movable stage in the middle of the telescope. For ATLAS pixel test beam users, a HSIO2/RCE based DUT readout will be provided as a standard readout utility.
Telescope operation
0. In ESA:
- Start chiller: 18 Celsius
- Switch on power supply: 8V constant --> check 2.0 A
- Switch on NI crate and TLU

1. Start sensors

- Remote access to NI crate:
-- Open Terminal
-- source access_NI_crate.sh
-- Login: telescope PWD: telescope+

- Start MI26.exe (upper icon on the NI crate Desktop)
-- Open .mcf threshold file, typically 6 (CALADIUM config files are in C:\opt\mimosas\config_files)
-- Press "Reset" --> 2.0 Amps
-- Press "All" --> 2.8 Amps
-- Press "Read" --> 2.8 Amps
-- Press "Start" --> check 3.6 Amps

2. Open Labview FPGA interface on NI crate, if not already open
- Double click MimosaDAQ (second upper icon on the Desktop)

3. Start EUDAQ on AR-EUDAQ:

- Open a second Terminal
- cd eudaq (points to /opt/install/eudaq/eudaq-1.5-dev)
- ./STARTRUN
- wait approx. 20 sec. until all Connections are green (OK)

4. Open TLUproducer on NI crate
- Double click start_EUDAQ_tlu (fourth icon on the Desktop), a blank terminal pops up
--> check in eudaq Run Control, that Produce TLU is connected

5. Configure EUDAQ in eudaq Run Control
- select Config file
- Press Config
- wait till all Connections are green (OK)

6. Start Run
- Press Start (wait till all green)
--> check, that Trigger and Event Built numbers are increasing
--> check OnlineMonitor, and reset (upper left x-button)

7. Stop
- Re-configure (5.) and Re-Run (6.)
OR
- Terminate and press "Reset" in MI26.exe at NI crate to stop sensors --> check 2.0
 Amps
DUT RCE Readout
While the DUT readout can be of variety of ways, the RCE readout setup is provided for at least ATLAS pixel users as a standard utility. As of Jan/2016, the DUT RCE readout is still the Gen-1 TCE + HSIO setup, with the dedicated esa-user02 Sun sever next to the EUDET area for the DUT RCE readout.
DUT Readout Computer Login
If you ar not running the system from the ESA console next to the EUDET, but from some public nodes at SLAC, you need to first hop onto an ESA public machine on the 172.27.100 subnet and login as yourself e.g.
ssh -Y ar-esaux2
At least calibration actions will need X window displays so that the -Y qualifier through out is necessary. Then continue to hop the DUT readout node as dedicated user tbslac:
ssh -Y esa-user02 -l tbslac
RCE DAQ Cold Start
tcsh
cd ~/daq/rce
source scripts/setup_rce-04-00-01.csh
unsetenv LC_CTYPE [ mainly relevant for MAC - see explanation ]
rce_killall [ wipe clean any existing partitions ]
ipc_server & [ inter-process-server on Linux server side for host-RCE communication ]
rce_ipc_server & [ IPC server on the RCE side ]
rce_is_server & [ IS (Information Server) on RCE for gathering histograms ]
rce_load rce20 [ Get DAQ process to run RCE - current Gen-1 RCE used has a node name rce20 ]
rceOfflineProducer -r 0 -d 172.27.100.8 [ Announcing RCE DAQ as a data producer to EUDAQ run control node ar-eudaq ]
If everything is run smoothly, once you brought up the overall DAQ with EUDET through EUDAQ run control node ar-eudaq, you should see the race data producing show up in the producer list. If the RCE seems to be stuck at the rce_load step (can also verify by trying to ping rce20), the simplest remedy for the moment is just to do a remote controlled power cycle on the RCE ATCA shelf (see below for remote power control through EPICS: "AC power 7", outlet 5).
Resets
Soft reset: Just use the command "rebootHSIO" followed by "race load rce20" without relaunching the various servers can sometime work.
Hard resets: Most often it just needs to power cycle the RCE ATCA shelf as described above would be sufficient to recover, although all servers need to be restarted. Very occasionally, you need to power cycle the HSIO also.
Calibrations
Before taking an serious beam runs, it is advisable check the modules through calibration. The most commonly used are DIGITAL_TEST and THRESHOLD_SCAN. Following the same steps as DAQ until after the rce_load step, one can start the calibration GUI with the command on esa-user02:
calibGui &
The operations steps of calibrations are explained briefly in the RCE maul page of 2014/Oct test Beam Twiki, while the functionality details of the calibrations are described in the ATLAS pixel calibration manual. The default calibration/config directory on esa-user02 (as of Jan/2016) is /home/tbslac/testbeam20160112 where DUT modules have their calibration constants under the folders with module names.
DUT DAQ Configuration
The DUT integration is controlled through setup of EUDAQ configuration files with names like ni_coins.cfg etc. residing in a Desktop folder on the EUDAQ console node ar-eudaq. The data logging also goes to the datadir in the same folder. These configuration info are not only passed on to the RCE producer to configure the DUT, but also interpreted by the EUDAQ to derive online monitoring for the DUT together with the telescope. A general example of telescope + DUT configration can be found here (not SLAC ESTB), while some explanations of the various configuration items related to the RCE produce can be found here.
Infrastructure Utilities
EPICS Control Interface
The ESTB EPICS control/monitoring interface that provides some important general utilities, such as the XY stage remote control to align the telescope and DUT to the beam, and remote controlled individual power strip socket on/off that can come handy for remotely powering off detectors and rebooting stuck DAQ components and computers inside ESA, To access the ESTB EPIC panel:
(if you are using the ar-esaux3 console in the ESA control room locally, it's likely that it was already logged in as tfuser with this setup already done)
(this last command should bring up the ESTB EPICS panel on the right) | 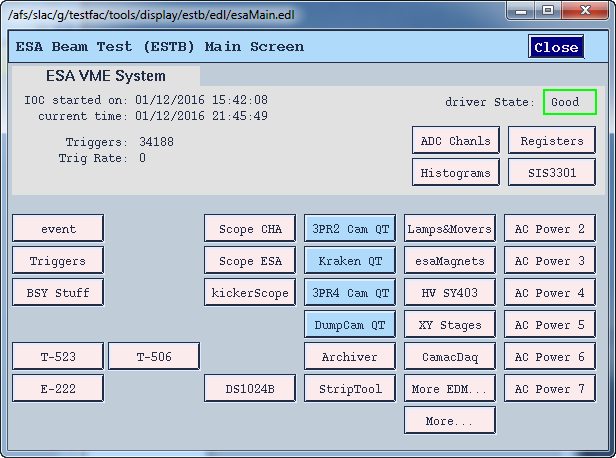 |
|---|
XY Stage Beam Alignment
The telescope + DUT assembly are mounted on a remote controllable XY stage (X=horizontal transverse to beam; Y=vertical) to align to the beam. During new test beam periods, this is typically done initially using alignment lasers in conjunction with fiducial markers to center to expected beamline within ~5mm. The vertical position is easier while horizontal centering is still somewhat awkward. Once positioned close enough, the refined alignment is done with the beam data in telescope. For both laser alignment and beam alignment, the position adjustments for the whole telescope (including DUT mounted within it) is done with the "XY Stages" EPICS panel that is accessible from the ESTB main panel shown above. The vertical adjustments are somewhat slow to complete while horizontal adjustments are faster.
Beam Trigger
The "Triggers" panel on the ESTB EPICS GUI brings up the Experimental Triggers panel where channel 10 (Silicon Tracker) controls the beam trigger LEMO signal going into the TLU Chan 0 PM in trigger port. The Delay value is the critical control of timing that DUT is very sensitive to, while EUDET seems to work with a wide range of delays automatically. The Trigger width parameters didn't appear to have much effect on anything.
Beam Dump Monitor
The beam dump monitors, Lead Glass (LGdump) dump, and Front/Read dumps are a key monitoring tool to give direct look at the beam intensity. ESTB GUI "Scope ESA" panels is particulary useful as a standard monitor for instantaneous beam status as scope pulses. "ADC Chanls"/"Histograms" panel displays the instantaneous values and distributions of energy measurements of various dumps. "HV SY403" can be used to adjust HV values for different intensity measurements.
Remote Power Strip Control
The "AC Power 7" sub panel accessible from the main panel above contains the individual socket controls for the power strip sitting on the large tall bench at the entrance to the test beam tunnel next to the telescope. Most ATLAS pixel DUT setup powering are using the sockets on this strip. Clicking on individual channel channel's "Reboot" button will recycle power on that channel. Some channels may automatically flip the state to green after a brief moment, others may need deliberate push on the state button to reenable. Some relevant outlet numbers on this AC Power 7" strip (IP: sioc-esa-acsw7) for the ATLAS pixel FE-I3 test setup (Jan/2016):
| Outlet | Power Function |
|---|---|
| 4 | RCE DAQ Linux server esa-user02 (172.27.104.28) |
| 5 | GEN-1 RCE ATCA shelf |
| 16 | Spare RCE DAQ Linux server esa-user04 |
| 19 | Power supplies (AVDD/DVDD/HV) for pixel DUT (one can power off remotely, but power on still needs physical button push at PSU to enable power) |
| 21 | HSIO |
| 22 | CALADIUM telescope power |
| 24 | Web cam showing telescope power supply voltage/current. |
Useful links
SLAC FACET/ESTB portal | ESTB portal (including beam schedule) | ESTB new user registration | ESTB photos
EUDET Telescope User Manual | DESY EUDET support page
ESTB web cams: EUDET power supply / chiller / HSIO | DUT power supply | Telescope overhead | Upstream beampipe |
ATLAS test beam / pixel documentations: ATLAS pixel test beam Twiki | Pixel calibration manual
Test Periods: 2016-Jan-SLAC | ITk 2015-Sep5 | ITk 2014-SLAC |