SLAC End Station A (ESA) Test Beam (ESTB)
The SLAC End Station A Test Beam (ESTB) was re-establishing in 2014 to take small fraction of SLAC LCLS beams into End Station test beam line. The operation is largely parasitic to the LCLS operations with electron beams in the 5-13 GeV range depending on the LCLS operation energy. From the FACET/ESTB portal, you can navigate to info on proposals, new user registrations, as well as ESTB schedules etc. The CALADIUM EUDET telescope owned by Carleton University has been installed at the end of ESTB as a precision tracking telescope with 6 planes of CMOS/MIMOSA sensors with ~3 micron spatial resolution. User Device Under Test (DUT) can be mounted on a movable stage in the middle of the telescope. For ATLAS pixel test beam users, a HSIO2/RCE based DUT readout will be provided as a standard readout utility.
Telescope operation
0. In ESA:
- Start chiller: 18 Celsius
- Switch on power supply: 8V constant --> check 2.0 A
- Switch on NI crate and TLU

1. Start sensors

- Remote access to NI crate:
-- Open Terminal
-- source access_NI_crate.sh
-- Login: telescope PWD: telescope+

- Start MI26.exe (upper icon on the NI crate Desktop)
-- Open .mcf threshold file, typically 6 (CALADIUM config files are in C:\opt\mimosas\config_files)
-- Press "Reset" --> 2.0 Amps
-- Press "All" --> 2.8 Amps
-- Press "Read" --> 2.8 Amps
-- Press "Start" --> check 3.6 Amps

2. Open Labview FPGA interface on NI crate, if not already open
- Double click MimosaDAQ (second upper icon on the Desktop)

3. Start EUDAQ on AR-EUDAQ:

- Open a second Terminal
- cd eudaq (points to /opt/install/eudaq/eudaq-1.5-dev)
- ./STARTRUN
- wait approx. 20 sec. until all Connections are green (OK)

4. Open TLUproducer on NI crate
- Double click start_EUDAQ_tlu (fourth icon on the Desktop), a blank terminal pops up
--> check in eudaq Run Control, that Produce TLU is connected

5. Configure EUDAQ in eudaq Run Control
- select Config file
- Press Config
- wait till all Connections are green (OK)

6. Start Run
- Press Start (wait till all green)
--> check, that Trigger and Event Built numbers are increasing
--> check OnlineMonitor, and reset (upper left x-button)

7. Stop
- Re-configure (5.) and Re-Run (6.)
OR
- Terminate and press "Reset" in MI26.exe at NI crate to stop sensors --> check 2.0
 Amps
Infrastructure Utilities
EPICS Control Interface
The ESTB EPICS control/monitoring interface that provides some important general utilities, such as the XY stage remote control to align the telescope and DUT to the beam, and remote controlled individual power strip socket on/off that can come handy for remotely powering off detectors and rebooting stuck DAQ components and computers inside ESA, To access the ESTB EPIC panel:
(if you are using the ar-esaux3 console in the ESA control room locally, it's likely that it was already logged in as tfuser with this setup already done)
(this last command should bring up the ESTB EPICS panel on the right) | 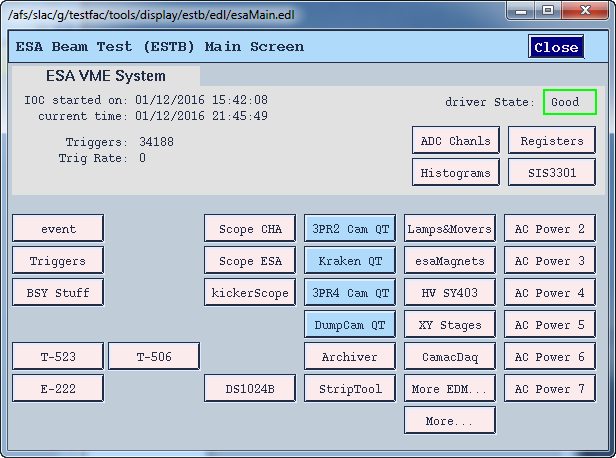 |
|---|
XY Stage Beam Alignment
The telescope + DUT assembly are mounted on a remote controllable XY stage (X=horizontal transverse to beam; Y=vertical) to align to the beam. During new test beam periods, this is typically done initially using alignment lasers in conjunction with fiducial markers to center to expected beamline within ~5mm. The vertical position is easier while horizontal centering is still somewhat awkward. Once positioned close enough, the refined alignment is done with the beam data in telescope. For both laser alignment and beam alignment, the position adjustments for the whole telescope (including DUT mounted within it) is done with the "XY Stages" EPICS panel that is accessible from the ESTB main panel shown above. The vertical adjustments are somewhat slow to complete while horizontal adjustments are faster.
Remote Power Strip Control
The "AC Power 7" sub panel accessible from the main panel above contains the individual socket controls for the power strip sitting on the large tall bench at the entrance to the test beam tunnel next to the telescope. Most ATLAS pixel DUT setup powering are using the sockets on this strip. Clicking on individual channel channel's "Reboot" button will recycle power on that channel. Some channels may automatically flip the state to green after a brief moment, others may need deliberate push on the state button to reenable. Some relevant outlet numbers on this AC Power 7" strip (IP: sioc-esa-acsw7) for the ATLAS pixel FE-I3 test setup (Jan/2016):
| Outlet | Power Function |
|---|---|
| 4 | RCE DAQ Linux server esa-user02 (172.27.104.28) |
| 5 and 6 | GEN-1 RCE ATCA shelf |
| 16 | Spare RCE DAQ Linux server esa-user04 |
| 19 | Power supplies (AVDD/DVDD/HV) for pixel DUT (one can power off remotely, but power on still needs physical button push at PSU to enable power) |
| 21 | HSIO |
| 22 | CALADIUM telescope power |
| 24 | Web cam showing telescope power supply voltage/current. |
Useful links
SLAC FACET/ESTB portal / ESTB portal (including beam schedule) / ESTB new user registration