Application for ROI mask construction / conversion
Application which works with ROI mask is located in CalibManager/app/roicon. Launching this app with -h option gives enough information about its functionality. In this note we demonstrate graphical content of the files generate in examples for this procedure.
Command
sit_setup
roicon -h
print help message with detailed description of three commands, brief command examples, and the list of optional parameters:
Usage: roicon [options]
Examples:
1) Construct 2-d image (or mask-of-segments) from ndarray with image shaped as data using appropriate geometry file
       roicon -p1 -g <geometry-file> [-a <ndarray-with-image-(input)file>] [-i <image-(output)file>] [-c <control-bitword>]
  ex1: roicon -p1 -g /reg/d/psdm/CXI/cxitut13/calib/CsPad::CalibV1/CxiDs1.0:Cspad.0/geometry/0-end.data
  ex2: roicon -p1 -g /reg/d/psdm/CXI/cxitut13/calib/CsPad::CalibV1/CxiDs1.0:Cspad.0/geometry/0-end.data -a /reg/neh/home1/dubrovin/LCLS/CSPadAlignment-v01/calib-cxi-ds1-2014-03-19/cspad-ndarr-ave-cxii0114-r0227.dat
2) Create ROI mask using mask editor "med" (DO NOT FORGET to save mask in file!)
       roicon -p2 [-i <image-(input)file>] [-m <roi-mask-(output)file>]
   ex: roicon -p2
3) Convert ROI mask to ndarray with mask shaped as data
       roicon -p3 -g <geometry-file> [-m <roi-mask-(input)file>] [-n ndarray-with-mask-(output)-file] [-c <control-bitword>]
   ex: roicon -p3 -g /reg/d/psdm/CXI/cxitut13/calib/CsPad::CalibV1/CxiDs1.0:Cspad.0/geometry/0-end.data
Optional input parameters.
Options:
  -h, --help            show this help message and exit
  -g GFNAME, --gfname=GFNAME
                        geometry file name, default = /reg/d/psdm/CXI/cxitut13
                        /calib/CsPad::CalibV1/CxiDs1.0:Cspad.0/geometry/0-end.
                        data
  -a AFNAME, --afname=AFNAME
                        input ndarray file name, default = None
  -i IFNAME, --ifname=IFNAME
                        image file name, default = mask-img.txt
  -m MFNAME, --mfname=MFNAME
                        ROI mask file name, default = mask-roi.txt
  -n NFNAME, --nfname=NFNAME
                        ndarray mask file name, default = mask-nda.txt
  -c CBITS, --cbits=CBITS
                        mask control bits, =0-none, +1-edges, +2-middle,
                        etc..., default = 65535
  -p PROC, --proc=PROC  process number: 1-construct image, 2-run mask editor
                        on image, 3-convert image mask to ndarray; default = 1
  -v, --verb            verbosity, default = False
Produce file with 2-d image
Commands
roicon -p1 -g /reg/d/psdm/CXI/cxitut13/calib/CsPad::CalibV1/CxiDs1.0:Cspad.0/geometry/0-end.data
or
roicon -p1 -g /reg/d/psdm/CXI/cxitut13/calib/CsPad::CalibV1/CxiDs1.0:Cspad.0/geometry/0-end.data -a /reg/neh/home1/dubrovin/LCLS/CSPadAlignment-v01/calib-cxi-ds1-2014-03-19/cspad-ndarr-ave-cxii0114-r0227.dat
with default options produce 2-d image from ndarray of sensors' data and save it in the file mask-img.txt, Fig.1. In the 1st command the ndarray file name (option -a) is omited and the mask of sensors is created. Option -c sets the bit control word to remove edge, central, non-bound, etc. pixels in the mask.
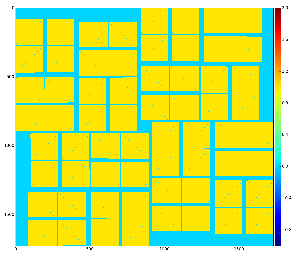
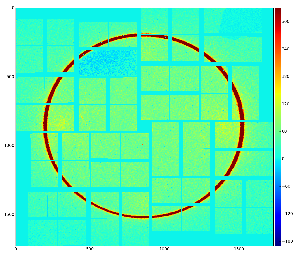
Fig.1: Graphical content of the file mask-img.txt for the 1st and 2nd command, respectively.
Use mask editor to draw ROI
Command
roicon -p2
invokes the mask editor med with default input file mask-img.txt and open GUI, as shown in Fig.2.
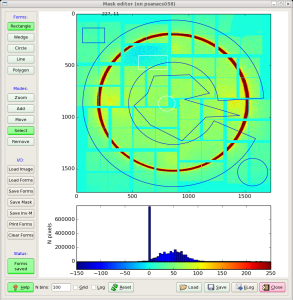
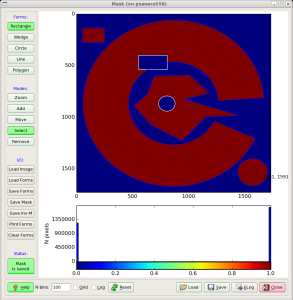
Fig.2: Mask editor GUI for drawing the ROI (left) and when the mask is saved (right).
Then, use mouse and buttons to draw the mask and, when it is ready, click the button "Save Mask". By default the file mask-roi.txt is saved with content shown in Fig.3.
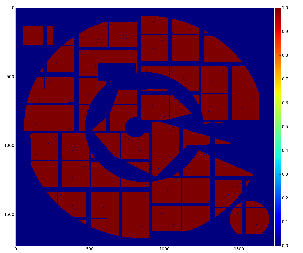
Fig.3: Graphical content of the file mask-roi.txt.
Convert ROI mask to ndarray with mask shaped as data
Command
roicon -p3 -g /reg/d/psdm/CXI/cxitut13/calib/CsPad::CalibV1/CxiDs1.0:Cspad.0/geometry/0-end.data
by default converts the file mask-roi.txt to mask-nda.txt
![]()
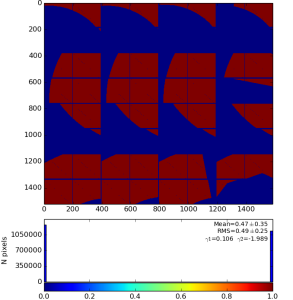
Fig.4: Mask on the top of enumerated (color) pixels (left) and result of the mask conversion to the ndarray (right).
Usage of ndarray with ROI mask
ROI mask for ndarray can be used in any stand-alone applications. Our particular goal was to make this mask for module ImgAlgos::NDArrCalib, which can be included in the psana configuration file:
[ImgAlgos.NDArrCalib]
source = DetInfo(:Cspad.0)
...
do_mask    = yes
fname_mask = mask-nda.txt
References
Overview
Content Tools