Mask Editor is intended for interactive selection of good and bad regions on 2D image and preparation of output files with direct and inversed masks. It works as a basic graphical editor with specific input of the image and output for masks.
Content
User Interface
User interface of the Mask Editor works in a single window containing three panels; graphical window, left-hand, and bottom control bars. Content and functionality of these panels is described below. Most of control buttons have tool tip hints; when cursor stops on control button, a pop-up window with explanation of functionality of this button appears for a few seconds .
Graphical window
Graphical window contains image and spectrum. When cursor moves on image or spectrum, its coordinates are displayed near cursor. Cursor pattern is changed from "cross" to "pointing-finger" when it is located on active form boarder.
Left control bar
Left control bar consists of stack of buttons, which are functionally split for four groups; Forms, Modes, I/O, and Status, which content and functionality is explained in this section.
Forms
Forms are represented by the geometry objects Rectangle, Circle, Polygon, Wedge, and Line, which can be used to compose the mask positive and negative regions. All forms, except Polygon, are presented by two 2D points each in image coordinate system. Polygon is presented by the N 2D points, where N is a number of vertexes. All forms behave about the same way depending on Mode, as explained below.
Modes
Panel of modes contain Zoom, Add, Move, Select, and Remove buttons with functionality literally explained by their names.
- Zoom
Mode Zoom works for image and spectral limits.
Zoom-in image: left mouse button click-drug-release for desired region of image.
Set limits for spectrum: left/right mouse button click on desired min/max limit on spectrum.
Reset to full size: middle mouse button click on image or spectral box or "Reset" button. - Add
Add is an input mode for forms.
Input method for Rectangle, Circle, Wedge, and Line: in mode Add click-drug-release the left mouse button. Two points for each form are defined by the click and release positions of the mouse.
Input method for Polygon: the N-1 points are entered by the left mouse button click, while the Nth point is indicated by the right mouse button click, which closes the polygon. - Move
Each form can be moved or edited in this mode;
in mode Move choose the form, then use left/right mouse button click-drug-release on form boarder to move/edit the form. - Select
Forms can be used as regular "positive" for ROI, and inversed "negative" for blemish mask.
Select button serves to switch between regular and inversed forms.
In the Select mode choose the form, then use left mouse button click on form boarder. Form color is changed at selection/deselection. - Remove
In the Remove mode choose the form, then use any mouse button click on form boarder.
As an alternative option, currently active form can be removed by the middle mouse button click on its boarder. The "Clear Forms" button from I/O section removes all forms.
I/O
I/O panel contains a stack of buttons for input/output files and other global procedures as listed below.
- Load Image
Loads and displays image from text file. The file name is selected through the standard pop-up dialog window. - Load Forms
Loads and displays forms from text file. The file name is selected through the standard pop-up dialog window. - Save Forms
Saves forms in text file. The file name is selected through the standard pop-up dialog window. - Save Mask
Saves "ROI" (positive) mask in text file. The file name is selected through the standard pop-up dialog window. - Save inv-M(ask)
Saves "blemish" (negative) mask in text file. The file name is selected through the standard pop-up dialog window. - Print Forms
Prints current forms from the list. - Clear Forms
Removes forms from image and from the list.
Status panel
Status panel is a single button-like panel, displaying short status messages. Click on any button potentially may change the status panel info. Messages are enforced by colors; green/yellow/red, corresponding to normal/attention/warning status. For "Wait ..." messages, it would be wise not clicking on buttons until the procedure is completed.
Mask evaluation for Polygon and Wedge forms may take up to 5-10s/form. Just wait calm!
Bottom control bar
Bottom control bar contains "Help", "Reset", "Save", "ELog", "Close" buttons, "N bins" editable field, "Grid", and "Log" check boxes.
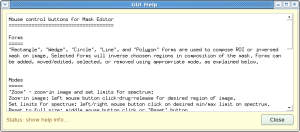
- Help
Shows pop-up windows with help info about navigation. Use scroll bar to read entire help message. - Reset
Restores original image size and spectral limits. - Save
Saves content of graphical window in png file. The file name is selected through the standard pop-up dialog window. - ELog
Serves to submit message in ELog. The content of graphical window will be added as attachment. Destination of the message is selected through the custom pop-up dialog window. - Close
Closes the Mask Editor application. - Grid
On/Off coordinate grid on image and spectrum. - Log
Serves as a switch between linear and log scale. - N bins
"N bins" field can be used to change a number of bins in spectrum. Spectrum will redraw, when edition is ended (press Enter on keyboard or change focus on other field).
How to run Mask Editor
Mask Editor is developed as a part of the integrated data processing environment for XCS time correlation experiments. In this project the Mask Editor is integrated as one of the system GUIs. Also it can be executed as a stand-alone application named med. Stand-alone version of the Mask Editor can launched on any of psana or psexport node using command-line interface, for example, for all default parameters:
med
List of optional parameters
> med -h
Usage: med [options]

Optional input parameters.

Options:
  -h, --help            show this help message and exit
  -i IFNAME, --ifname=IFNAME
                        input image file name, default = ./roi-img
  -m MFNAME, --mfname=MFNAME
                        common path to I/O files with mask, default = ./roi-
                        mask
  -o OFNAME, --ofname=OFNAME
                        output png file name for current canvas, default =
                        ./fig.png
  -t TITLE, --title=TITLE
                        initial title of the garphical window, default = Mask
                        editor
  -x XC, --xc=XC        x coordinate of the center for Wedges, default = None
  -y YC, --yc=YC        y coordinate of the center for Wedges, default = None
  -p PICKER, --picker=PICKER
                        distance in pix, where object responce on mouse,
                        default = 8
  -w LW, --lw=LW        object line width, default = 1
  -c COL, --color=COL   color of the form lines "b"-blue, "k"-black, etc.,
                        default = b
  -v, --verbose         allows print on console, default = True
  -q, --quiet           supress print on console, default = False
  -f, --fexmod          file exchange mode on/off (True/False), default = False
Data format for geometrical forms
Forms can be saved in file, loaded from file and displayed on image, printed on console monitor, and cleared/removed from image. This can be done using simple data representation for each form, which is quite self-explained in case of print or text-file format:
Form parameters for composition of the mask
Rectangle   48.00   50.00  262.00  380.00 1 b False False
Rectangle  987.00  853.00  255.00  380.00 1 w True False
Wedge  716.76  674.72  541.18  197.61 -171.39  174.59 1 b False False
Wedge  674.48  667.64  585.84  386.69  174.75  186.99 1 b False False
Circle  712.00  674.00  262.00 1 b False False
Circle 1068.00  180.00  112.00 1 b False False
Circle  191.00  898.00  117.00 1 b False False
Circle  752.00 1098.00   53.00 1 w True False
Line  689.79 1252.80  624.50  223.22 1 w True False
Line  829.99 1252.80  244.47  388.46 1 b False False
Line  836.67 1303.98  268.07  541.89 1 w True False
Line  692.02 1315.11  669.35  827.50 1 b False False
Polygon 1 w True False 10     400     373     620    ...
Polygon 1 b False False 6     329     674     683    ...
File exchange mode
2014-06-12, CorAna V00-00-19, in release ana-0.11.6
In order to interactively communicate between Mask Editor and other application(s) Marcin Sikorski requested to introduce the file exchange mechanism for image and mask. It is assumed that external event processing application periodically supplies averaged image, Mask Editor can load it and use for interactive ROI mask correction, and submit in response the mask, which will be used by the external application. This asynchronous data exchange mechanism was implemented in CorAna.ArrFileExchange class. This algorithm uses numpy arrays with np.save(fname,arr) and arr=np.load(fname) methods. In order to get rid of collisions between reader and writer the "ring-buffer" (a.k.a. "round-robin") exchange mechanism is implemented. Data producer writes files with names enumerated in the ring buffer. During writing data is saved in the file with temporary name. When the file is written, it is renamed to indexed name. This eliminates probability of the read/write collision. Data consumer checks availability of the new data and loads numpy array from the latest file if necessary.
Interface for class CorAna.ArrFileExchange
    #-----------------------
    # code in array producer
    #-----------------------
    afe = ArrFileExchange(prefix='./my-numpy-arr') # one call per object
    arr = ...                                      # supply array here
    afe.save_arr(arr)                              # as many times as you need

    #-----------------------
    # code in array consumer
    #-----------------------
    afe = ArrFileExchange(prefix='./my-numpy-arr') # one call per object
    arr = afe.get_arr_latest()                     # as many times as you need

    # optional method:
    status = afe.is_new_arr_available()            # returns True/False if the new array IS/IS NOT available
                                                   # since last call to arr = afe.get_arr_latest()
Two ArrFileExchange objects for image reader and mask writer are incorporated in the Mask Editor. File exchange mode in the med application can be launched by the command:
med -f -i work/my-roi-img -m work/my-roi-mask
assuming that path to the file directory work/ already exists. Options in this example provide functionality as follows;
- option
-fturns on the file exchange mode, - files with images are expected to have names work/my-roi-img-rbn-00#.npy and can be loaded by clicking on the GUI button "Load Image",
- and files with mask will be saved with names work/my-roi-mask-rbn-00#.npy by clicking on GUI button "Save Mask" or "Save Inv-M".
External application may communicate with launched med through the code pattern shown below
from CorAna.ArrFileExchange import *
...
        # create reader/writer objects with file name prefixes
        # exactly like in the med command line for opposite party:
        afe_rd = ArrFileExchange(prefix='work/my-roi-mask')
        afe_wr = ArrFileExchange(prefix='work/my-roi-img')
        ...
	    # image writer
	    image = np.array(...)               # supply numpy array for image
        afe_wr.save_arr(image)              # image writer
        ...
	    # mask reader
        if afe_rd.is_new_arr_available() :  # check that the new data is available
            mask = afe_rd.get_arr_latest()  # mask reader
Mask Editor can be tested with toy image producer application, for example, launch two applications from different xterm windows:
test_img_gen -n 50 -o work/roi-img;
med -f -i work/my-roi-img -m work/my-roi-mask;
then, click on buttons "Load Image", "Save Mask", or "Save Inv-M" in the MaskEditor GUI.
Image exchange with psana
The CorAna.ArrFileExchanges file exchange algorithm is used in psana module imgalgos.image_save_in_file to generate image files within ring buffer.
Other file browser application
In addition to med, there is a file/image browsing application plims, which options can be seen by the command
plims -h
[pyimgalgos.image_save_in_file]
source     = DetInfo(MecTargetChamber.0:Cspad2x2.3)
key_in     = cspad2x2_image
ofname     = ./roi-img
mode       = 3
delay_sec  = 1
print_bits = 255
Demonstration of features
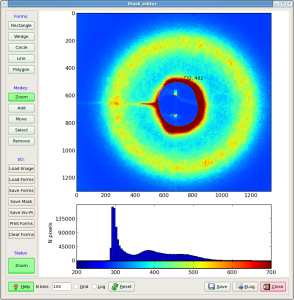
Plots for
- Input image
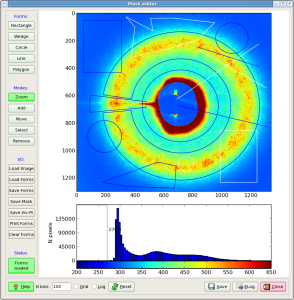
- Image with drawn forms on it
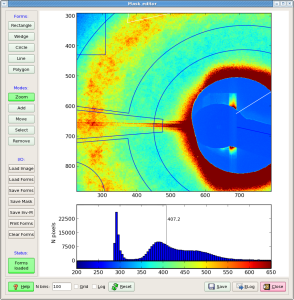
- Image for mask with forms on it
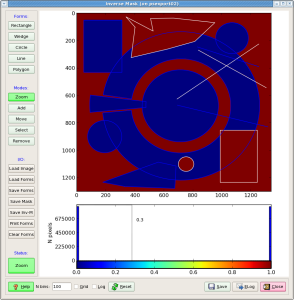
- Image for inversed mask with forms on it
- Help window

References
- imgalgos.image_save_in_file- ring-buffer image source in psana
plims -h- Image browsing application
Overview
Content Tools