Goal of this procedure: Enter oven mode and reach desired oven profile
Instructions: To keep track of changes to the procedure - copy this page, date it, and add execution notes in red. Remember to save changes.
Table of Contents:
Link to elog summary:
enter here
Procedure
Checkout and setup
| Procedure | Execution notes | |
|---|---|---|
| 1 | Record goal density and helium buffer pressure | |
2 | Set 10 Torr gauge set points to plus and minus 1 Torr of desired pressure
| |
| 3 | Set the 1000 Torr gauge setpoint to 20 Torr | |
4 | Confirm helium gas bottle is connected to fill line #1, regulator set to 5-10 psig. Record gas type, starting bottle pressure, and regulator pressure | |
| 5 | Confirm that the fill line #2 is closed, and that the IOTA controller in rack FKG20-24 is turned off. | |
| 6 | If using DPS, confirm it is operating nominally. |
Procedure for oven turn on
| Procedure | Execution notes | |
|---|---|---|
| 1 | Verify vacuum conditions approximately 1e-6 Torr or better - Record pressure | |
2 | Zero the 10 and 1000 Torr gauges | |
| Purge fill line by running a small amount of He through the fill valve and then stopping and pumping out the IP - Record final pressure | ||
| 3 | Set EPS EXPERT Mode to be “ON” by turning the interlock key in the EPS box in Rack 20-27 in the gallery.
| |
| 4 | Unlock oven gate valves (switch to CAMAC mode) | |
| 5 | Open oven gate valves 3183 and 3187. (there might be a small amount of helium between the valves). Continue pump down to 1e-6 Torr - Record pressure | |
| 6 | Close angle valve VV3201 isolating the plasma beamline from the plasma turbo | |
| 7 | Check Beryllium window valve VV3208 is closed- close if not! | |
| 8 | Set up strip-tool of pressure in the plasma oven:
| |
| 9 | Set all gauge gas types to "Helium". There is a button on the gas jet control panel that does this automatically for all gauges. Bypass US1, US2, US3 and DS1 CC gauges. | |
| 10 | Fill IP with He to goal IP pressure. If using DPS then follow: How to perform a static fill with DPS | |
| 10 | Hit EPS Reset to clear the low pressure fault | |
| 11 | Set EPS EXPERT Mode to be “OFF” by turning the interlock key in the EPS box in Rack 20-27 in the gallery. (Note: EXPERT mode is “OFF” if the LED light is OFF and EXPERT mode is “ON” if the red light is ON) . | |
| 12 | While at the racks, Turn valve control for the beryllium window valve to local only and remove key. Note: the EPICS controls for this valve are also password protected so this will be very well configuration controlled. | |
| 13 | Back at the computer, perform an EPS reset (this is needed to enable the heater) | |
| 14 | Set up striptool of oven thermocouples plus the thermocouples on the bypass line, cooling water jackets, base-plate and air.
| |
Turn on the oven heater power supply. Open the "Genesys Expert..." panel and select "PS On" to ON | ||
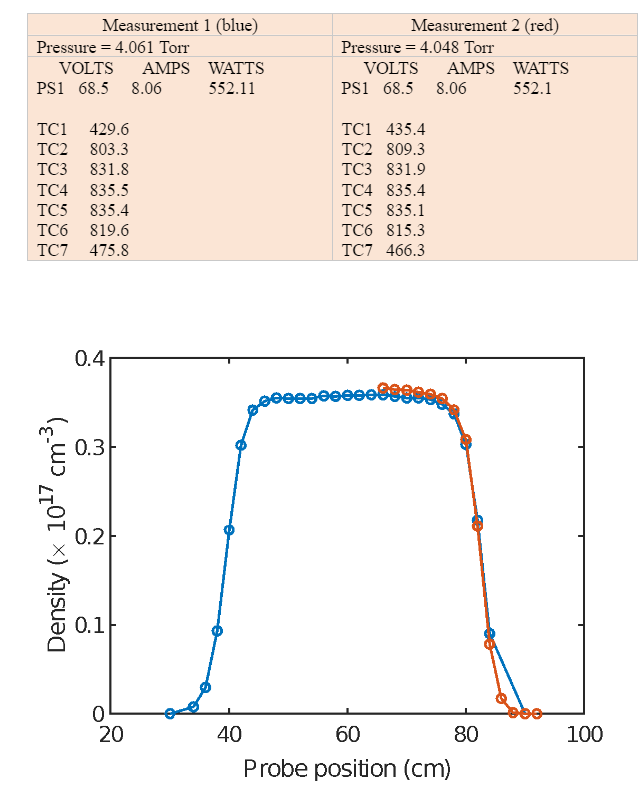
| 15 | Raise heater power (Upstream Heater PS1) slowly (~ 100 Watts per hour) while monitoring the oven pressure and temperature until desired operating conditions and are reached at approximately 550 W (table and plot in next column)- we probably need 10% higher than UCLA to match the profile so don’t be scared to push it up a bit to 600 W.
| Notes from June 2023:
|
| 16 | Check that the oven thermocouple readings are nearly the same as those shown on the profile plot. Ambient conditions may vary, so fine tune the pressure and heater power as needed.
|
Procedure for oven shut down
9 hours turning down by hand- 11 hours until valves can be closed
| Procedure | Execution notes | |
|---|---|---|
| 1 | Turn off heater supply slowly (~ 100 Watts per hour) to reduce thermal stress to the oven tube and wick. | Previous notes
|
2 | After the heater power is turned down to 0, wait until oven thermocouples indicate the oven is near room temperature (less than 50°C). Lithium is liquid at 180°C. Takes about 11 hours to reduce to 50C | |
| 3 | Write down the buffer pressure for the record in the facet elog | |
4 | Close oven gate valves 3183 and 3187. Turn the key to “CLOSE VALVE” in the PLC valve controller in rack FKG20-22 and remove the key. This will disable the valves from opening. Set the Be window valve 3208 back to CAMAC. | |
| 5 | Drain all helium gas and open valves to restore pumping. If using DPS then follow: How to perform a static fill with DPS | |
| 6 | Open the Be window valve, remove bypasses, and reset gas types on the gauges to nitrogen. |
Emergency shut down procedure
If possible the oven should be cooled slowly using the above procedure to reduce thermal stresses on the oven. But in an emergency situation the oven may be put into a safe-mode to prevent loss of lithium using the following procedure. Note that depending on the situation, some of these steps are automatically taken by the EPS.
| Procedure | Execution notes | |
|---|---|---|
| 1 | Close oven gate valves 3183 and 3187. If there is an EPS fault then this happens automatically. | |
2 | Turn off the oven heater power. If there is an EPS fault then this happens automatically. | |
| 3 | Secure the helium gas source – either drain the IP or ensure DPS is operating in the nominal static fill state: How to perform a static fill with DPS | |
4 | Log the details of the fault and shutdown: type of fault, reason if known, IP pressure, oven temp, and any other relevant information. | |
| 5 | Turn the key to “CLOSE VALVE” in the PLC valve controller in rack FKG20-22 and remove the key. This will disable the oven gate valves from opening. | |
| 6 | Do not attempt to restart the oven until you investigate, find, and fix the source of the failure. |
Figures:
Useful material
How to perform a static fill with DPS
TDK-Lamdba GEN100-15 oven heater power supply manual
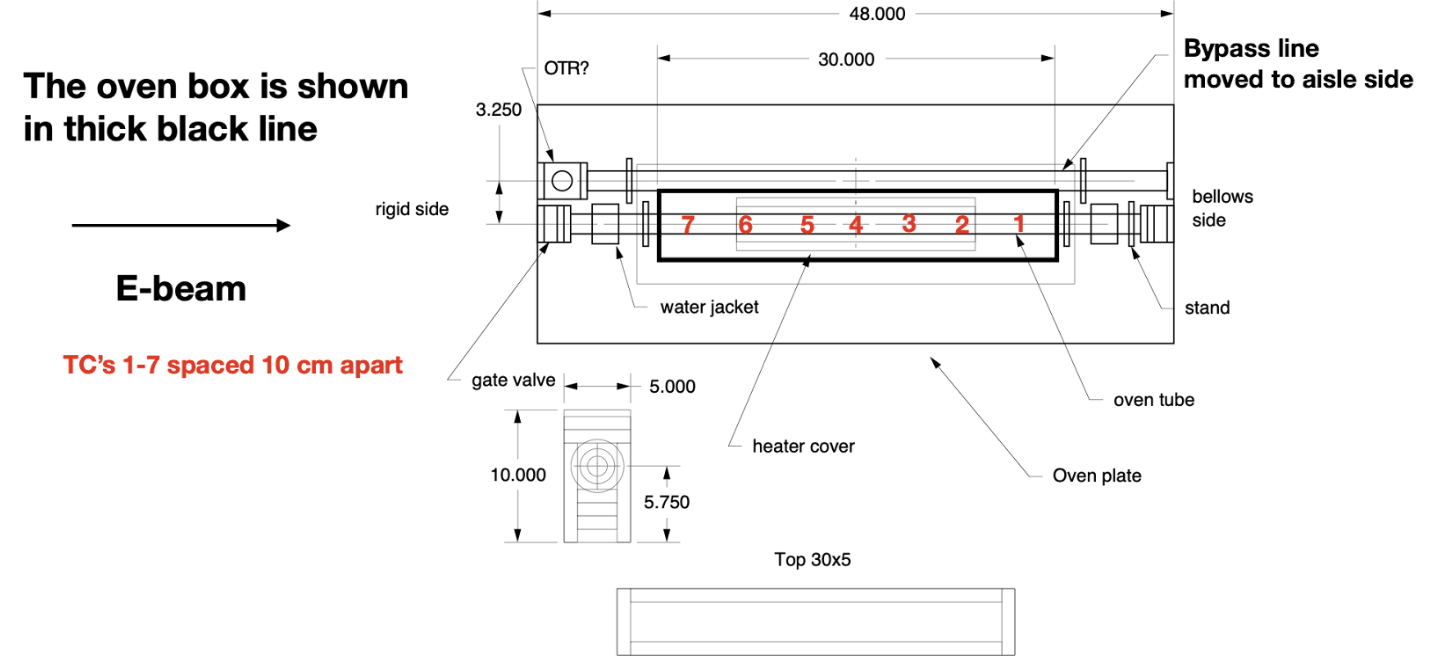
Li oven sketch with TC locations
Li density profiles
From: Summary of FACET II lithium oven measurements - June 3, 2021
More profiles available in doc (3 Torr, 4 Torr, 6 Torr, 8 Torr