Introduction
Currently at SLAC there are multiple FELIX readouts possible. The other twiki, shows the Direct-FELIX readout.
This one is dedicated to LpGBT based FELIX readout using Felix712 Board. With the instruction on this page you can readout out the following LpGBT boards:
| VLDB+ Board |
|
| OptoBoard (Currently Not Available At SLAC and will be skipped in this confulance page) |
|
| RCE Aggregator Readout (LpGBT Emulator) |


This documentation will be split into sections of:
- Felix712 Setup, Configuration and Software Installation
- LpGBT board specific setup.
- Running the Hardware and Making Scans
FELIX Software Configuration and Setup
In order to use/setup FELIX, the following instructions needs to be executed at each individual FELIX PC. (PC that holds a FELIX712 board). Currently at SLAC there is only one FELIX PC, but this number might change in the future.
The FELIX PC setup is comprimised of following steps steps: Installing Felix Drivers, Installing FELIX software, Installing FELIX firmware, Configuring the FELIX software, Installing YARR.
Installing FELIX Drivers:
Drivers can be found here: https://atlas-project-felix.web.cern.ch/atlas-project-felix/user/dist/software/driver/
We are currently using the following driver: tdaq_sw_for_Flx-4.7.0-2dkms.noarch.rpm
You can install the driver following the instruction here: https://atlas-project-felix.web.cern.ch/atlas-project-felix/user/felix-user-manual/versions/4.0.6/5_software_installation.html#_5_2_1_driver_rpm_installation_instructions
We don't need to update the FELIX driver regularly, and I don't recommend doing it unless there is a need due to FW changes.
Installing FELIX Software:
There are two ways of installing FELIX software, the easy and the hard way. The easy way is the recommended way, but currently we need to do the hardway setup as well due to some patch needed on felixcore (Feb 2022), whcih hopefully would be merged into master branch soon.
The currently installed felix sofware in itkpix@felix account is at: /home/itkpix/felix-sw/felix-05-00-xx-stand-alone
Easy Way (Pre-Compiled Packages):
Download the pre-complied FELIX library for centos7 from the website: https://atlas-project-felix.web.cern.ch/atlas-project-felix/user/dist/software/latest/
You should download a reg 5.0 version which looks like: felix-05-00-xx-stand-alone-x86_64-centos7-gcc8-opt.tar.gz
Un-tar the download file, and you should be able to use FELIX out of the box.
Hard Way (Compiled By Your Self) (Required to have the FLX-1613 patch applied):
Download the Felix software following the instructions at the git site. https://gitlab.cern.ch/atlas-tdaq-felix/software/blob/master/README.md
The instructions as of Feb 2022 Goes as:
git clone ssh://git@gitlab.cern.ch:7999/atlas-tdaq-felix/software.git <Directory Name for FELIX>
cd <DIRNAMEFELIX>
./clone_all.sh
export REGMAP_VERSION=0x0500  ###Most important step , you might want to add this information inside the source setup.sh to prevent calling it everytime
source setup.sh
cmake_config x86_64-centos7-gcc8-opt
cd x86_64-centos7-gcc8-opt
make -j4
To Apply the FLX-1613 Patch that is required for running perfect scans with the latest firmware follow these steps: (These steps are required for nicer scans but is not mendetory for making scans)
cd <DIRNAMEFELIX>/felixcore
git checkout FLX-1613
cd <DIRNAMEFELIX>/x86_64-centos7-gcc8-opt
make
Installing FELIX Firmware:
To install felix-fw you need to download the latest felix-fw: The current felix-fw's can be found:
- Get the latest firmwares from the Jira Ticket : https://its.cern.ch/jira/browse/FLXUSERS-433
- Directly getting from gitlab artifacts https://gitlab.cern.ch/atlas-tdaq-felix/firmware/
For this project we use FELIX Pixel firmware. There are 4CH and 24CH firmwares. 4CH Firmware has 1 Command and 4 Data Fibers available. On felix pc in building 84. The firmwares can be found under /home/itkpix/felix-fw/ directory
The 24CH firmware should have 4 Command 24 Data Fibers available. (Not confirmed)
There are two ways to install the downloaded felix-fw:
Easy Way (Recommended)
cd <DIRNAMEFELIX>/
source setup
cd <felixfwdirectory> ## you can use /home/itkpix/felix-fw/FLX712_PIXEL_4CH_CLKSELECT_GIT_phase2-master_rm-5.0_2030_211118_20_23
fflashprog -f 2 ${FELIXFWDIR}/${FELIXFW}.mcs prog ###This sshould be enough, but depending on the hardware the next one could be needed so I recommend doing both
fflashprog -f 3 ${FELIXFWDIR}/${FELIXFW}.mcs prog
sudo reboot now
Important note, in the felix PC in Bldg84, rebooting the felix-pc is not enough. To install the new FW, the felix-pc requires a complete power cycle and to do that, you need to shutdown the pc. pull the power cables out of the pc wait few seconds, re-plug them in and reboot. This wasn't needed on other setups we had, and probably due to how the FELIX board is powered in the SLAC setup.
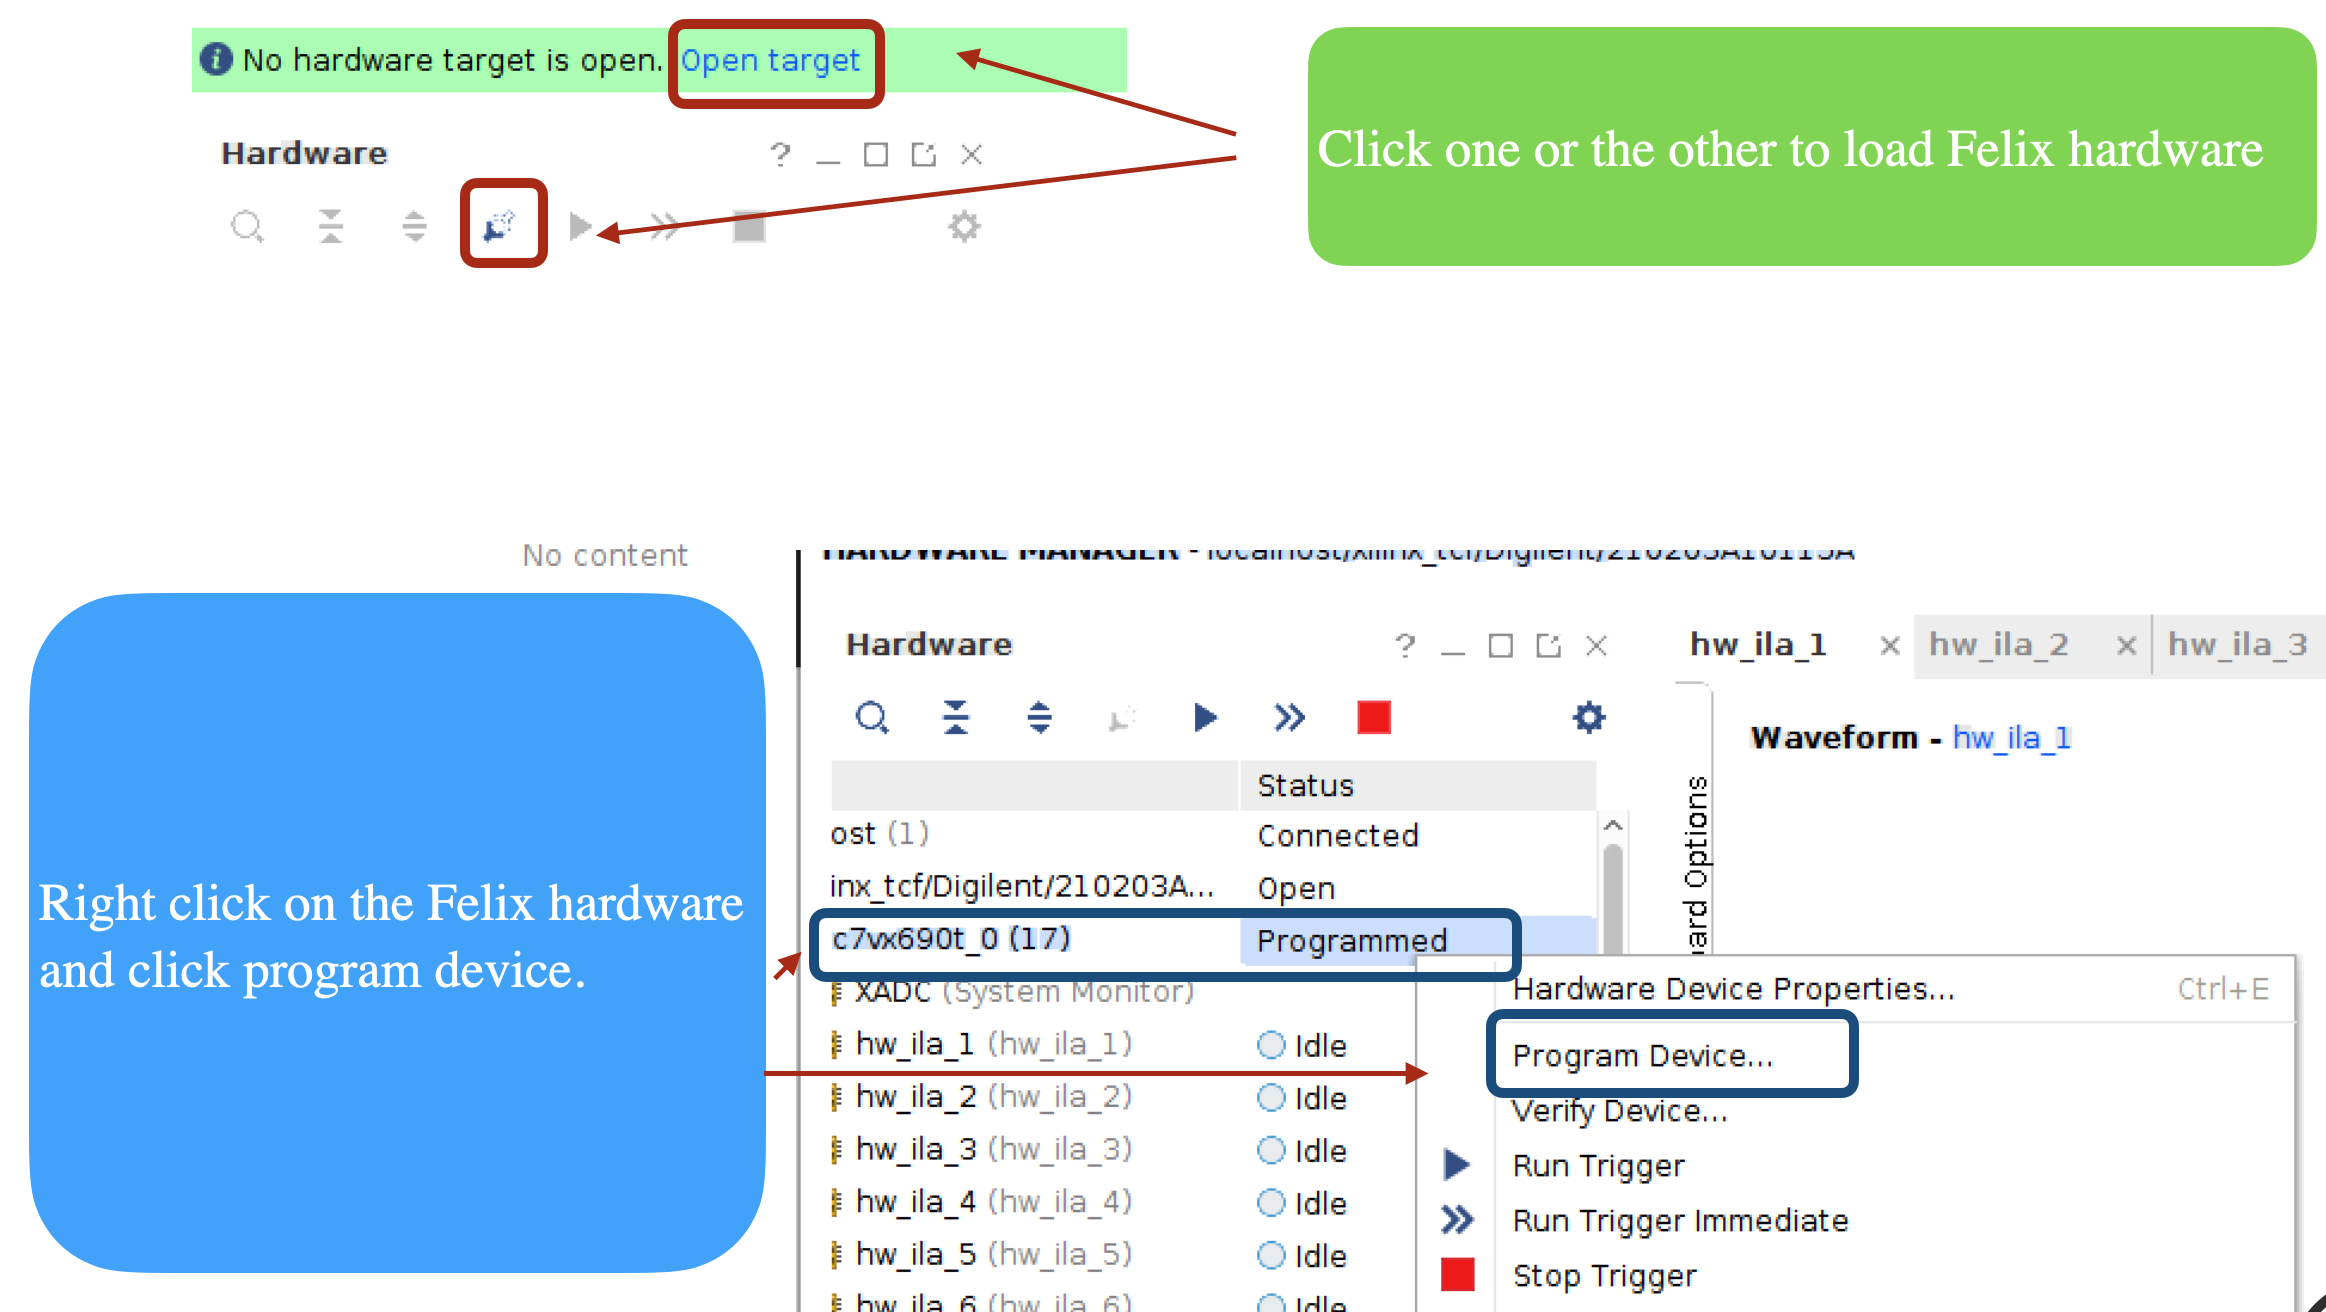
Hard Way (Using Vivado)
Run Vivado, and follow the diagrams shown below

Important note, in the felix PC in Bldg84, rebooting the felix-pc is not enough. To install the new FW, the felix-pc requires a complete power cycle and to do that, you need to shutdown the pc. pull the power cables out of the pc wait few seconds, re-plug them in and reboot. This wasn't needed on other setups we had, and probably due to how the FELIX board is powered in the SLAC setup.
Configuring FELIX Hardware/Software:
After each PC restart, the FELIX hardware needs to be primed and configured. These setups shouldn't be repeated This is an easy process but requires some external scripts.
The scripts can be downloaded from here (Only Scripts directory is needed): https://cernbox.cern.ch/index.php/s/jUKu6ayuPVqD5qB
At felix-pc in Bldg84, the scripts can be found at: /home/itkpix/felix-sw/MarcoScripts/
cd <DIRNAMEFELIX>/
source setup.sh
flx-init -c X
cd <MarcoScriptsDir> # cd /home/itkpix/felix-sw/MarcoScripts/
. ./config_encoding_decoding.sh 0
. ./config_encoding_decoding.sh 1
Installing YARR:
To install YARR, we need to first checkout YARR from the following DIR https://gitlab.cern.ch/YARR/YARR.git
Then follow the following instructions to install YARR.
git clone https://gitlab.cern.ch/YARR/YARR.git YARR_FELIX
cd YARR_FELIX
git checkout devel_rd53a_felixNetio_multichip_rebase # We are currently using the following branch
mkdir build
cd build
echo source scl_source enable devtoolset-7 > setup.sh
source setup.sh
cd build
cmake3 -DYARR_CONTROLLERS_TO_BUILD="Spec;Emu;NetioHW" ..
make install -j 4
LpGBT Board Specific Setups
As mentioned above, there are 3 different LpGBT hardware available that acts as a fiber to electronic signal converter for the RD53A hardware. Only VLDB+ and RCE based hardwares will be covered for now as optoBoard is currently not available at SLAC.
VLDB+ Hardware
Setup VLDB+ Hardware
The VLDB+ has single LpGBT chip without a GBCR chip. So it means it has 1 CMD lane fiber and 1 Data fiber lane. This means on paper it can a quad but currently out-of the box the BoB of VLDB plus can only support 1 Data and 1 CMD lane. (A hack is possible to improve this)

For Fiber connection currently FELIX uses a MPO24 connector. We connect to the port away from the motherboard. (Closer to the black petrusion) Then from the MPO24 we use only channels 12,24 (At BLDG 24 We have a 24 MPO to 12x2 MPO to 12LP connected. In this setup fibers are Fiber Bundle 1 , Fiber 1, Fiber Bundle 2, Fiber2) . The VLDB+/OptoBoard uses a MT12 connector where only two channels are used. (6,7) The way we connect is we use channel 12/24 of coming from Felix 712 to channel 6,7 of the OptoBoard fibers. You need to match the dark fibers to the ones with lights. (Input/output). The grand schema is shown below.

Configuring VLDB+ Softwware
The VLDB+ hardware is configured via the Raspeberry Pi programmer piGBT. The progmmer at Bldg 84 can be connected at: http://192.168.4.120:8080/#/Core at Bldg84 server.
Follow the folloiwng steps to configure VLDB+ in thr web-page.
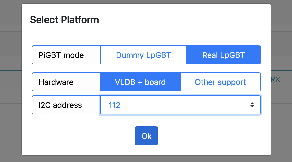
| Select Real VLDB, select VLDB+ , select IC and connect |
|
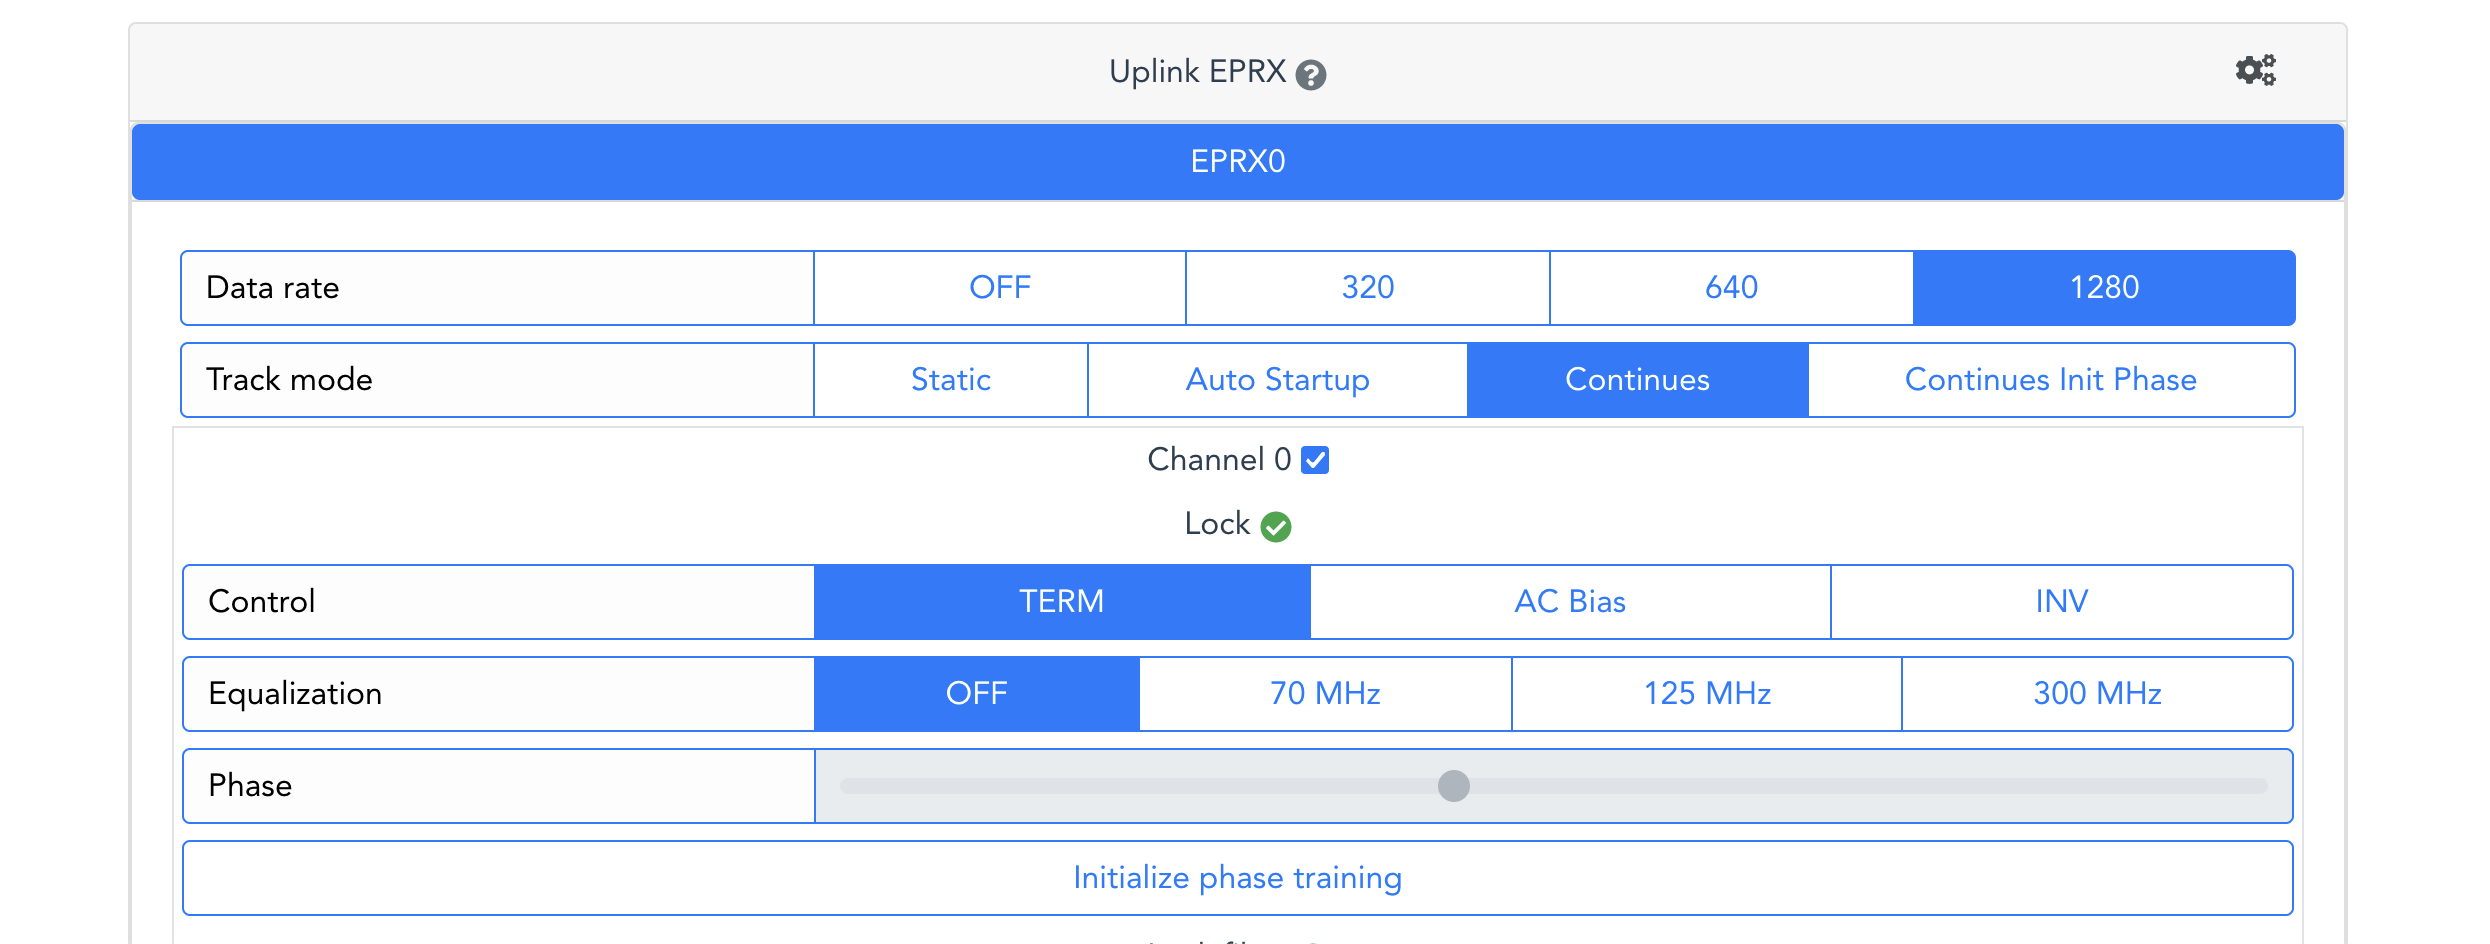
Click TRK, Select: TXdata rate = 10 Gbps, TX encoding = FEC5 Then Click the gears next to EPRX and set the following confings EPRX0 Data Rate = 1280 Track Mode = Continues Control TERM Equalization OFF EPRX1-6 is off |
|
For Uplink EPTX: Data Rate 160 Mpbs Drive strength 4.0 mA |
|
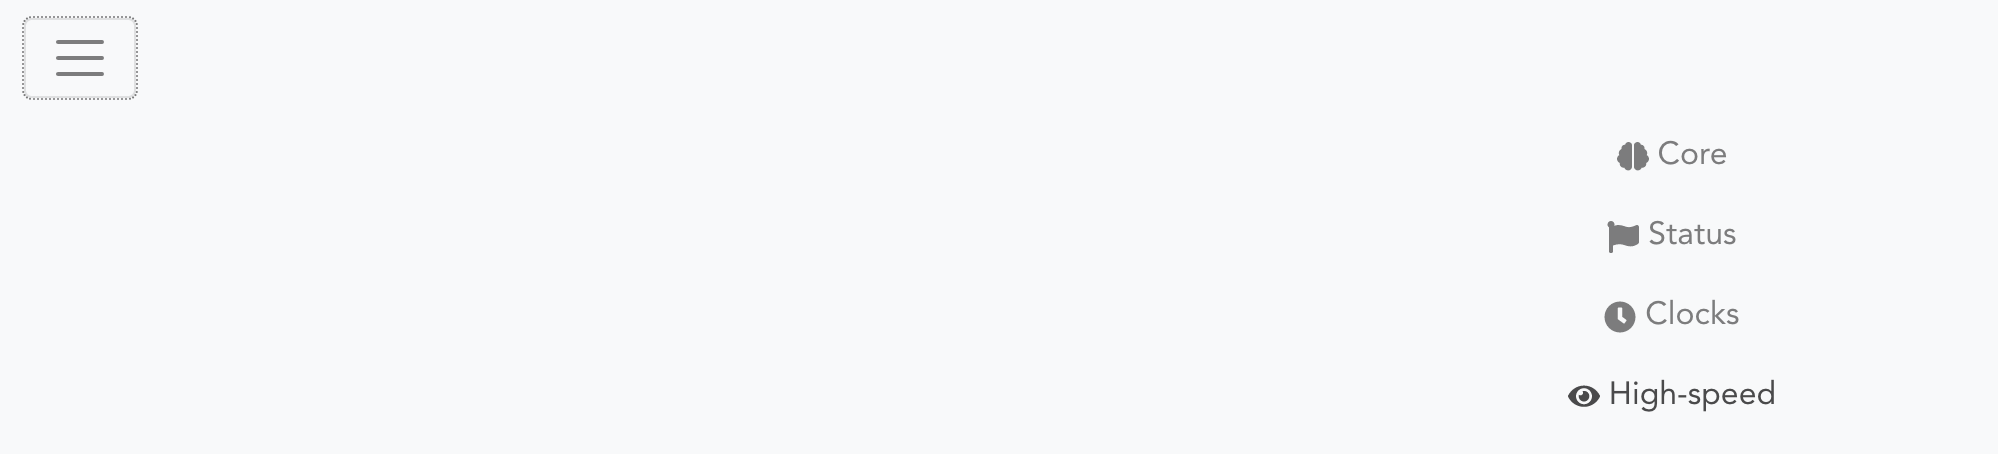
| Last but not least, click on the menu→ high speed and then Invert high speed data output enabled (Invert polarity uplinks) |
|