Application for ROI mask construction / conversion
Application which works with ROI mask is implemented in CalibManager/app/roicon. All work with mask is split for 3 stages:
- Produce file with 2-d image or image-mask for sensors.
Use mask editor to draw ROI on the top of the image.
Convert ROI mask to ndarray with mask shaped as data.
- Stages 1 and 3 should use the same
geometryfile in the option -g. This will guarantee that image production and mask conversion algorithms work on the same pixel maps. - Stage 2 may be omitted if the mask for geometry-dependent bad pixels (edge, central column, non-bound pixels) is needed only. Then command for Stage 3 should have appropriate name for input mask file.
- Since ana-0.13.14 all
roiconprocedures work with numpy (*.npy) files to I/O ndarrays (see examples in commandroicon-h).
Launching this app with -h option gives enough information about its functionality. In this note we demonstrate graphical content of the files generate in examples for this procedure.
Command
roicon -h
print help message with detailed description of three commands, brief command examples, and the list of optional parameters:
Usage: roicon [options]
Examples:

1) Construct 2-d image (or mask-of-segments) from ndarray with image shaped as data using appropriate geometry file
         roicon -p1 -g <geometry-file> [-a <ndarray-with-image-(input)file>] [-i <image-(output)file>] [-c <control-bitword>]
  ex1:   roicon -p1 -g /reg/d/psdm/CXI/cxitut13/calib/CsPad::CalibV1/CxiDs1.0:Cspad.0/geometry/0-end.data
  ex2:   roicon -p1 -g /reg/d/psdm/CXI/cxitut13/calib/CsPad::CalibV1/CxiDs1.0:Cspad.0/geometry/0-end.data -a /reg/neh/home1/dubrovin/LCLS/CSPadAlignment-v01/calib-cxi-ds1-2014-03-19/cspad-ndarr-ave-cxii0114-r0227.dat
  ex3:   roicon -p1 -g /reg/d/psdm/CXI/cxitut13/calib/CsPad::CalibV1/CxiDs1.0:Cspad.0/geometry/0-end.data -a /reg/neh/home1/dubrovin/LCLS/CSPadAlignment-v01/calib-cxi-ds1-2014-05-15/cspad-arr-cxid2714-r0023-lysozyme-rings.npy -i image.npy
2) Create ROI mask using mask editor "med" (DO NOT FORGET to save mask in file!)
         roicon -p2 [-i <image-(input)file>] [-m <roi-mask-(output)file>]
  ex1,2: roicon -p2
  ex3:   roicon -p2 -i image.npy -m roi-mask.npy
3) Convert ROI mask to ndarray with mask shaped as data
         roicon -p3 -g <geometry-file> [-m <roi-mask-(input)file>] [-n ndarray-with-mask-(output)-file] [-c <control-bitword>]
  ex1,2: roicon -p3 -g /reg/d/psdm/CXI/cxitut13/calib/CsPad::CalibV1/CxiDs1.0:Cspad.0/geometry/0-end.data
  ex3:   roicon -p3 -g /reg/d/psdm/CXI/cxitut13/calib/CsPad::CalibV1/CxiDs1.0:Cspad.0/geometry/0-end.data -m roi-mask.npy -n ndarray-mask.npy

Optional input parameters.
Options:
  -h, --help            show this help message and exit
  -g GFNAME, --gfname=GFNAME
                        geometry file name, default = /reg/d/psdm/CXI/cxitut13
                        /calib/CsPad::CalibV1/CxiDs1.0:Cspad.0/geometry/0-end.
                        data
  -a AFNAME, --afname=AFNAME
                        input ndarray file name, default = None
  -i IFNAME, --ifname=IFNAME
                        image file name, default = mask-img.txt
  -m MFNAME, --mfname=MFNAME
                        ROI mask file name, default = mask-roi.txt
  -n NFNAME, --nfname=NFNAME
                        ndarray mask file name, default = mask-nda.txt
  -c CBITS, --cbits=CBITS
                        mask control bits, =0-none, +1-edges, +2-middle,
                        etc..., default = 65535
  -p PROC, --proc=PROC  process number: 1-construct image, 2-run mask editor
                        on image, 3-convert image mask to ndarray; default = 1
  -v, --verb            verbosity, default = False
Produce file with 2-d image
Commands
roicon -p1 -g /reg/d/psdm/CXI/cxitut13/calib/CsPad::CalibV1/CxiDs1.0:Cspad.0/geometry/0-end.data
or
roicon -p1 -g /reg/d/psdm/CXI/cxitut13/calib/CsPad::CalibV1/CxiDs1.0:Cspad.0/geometry/0-end.data -a /reg/neh/home1/dubrovin/LCLS/CSPadAlignment-v01/calib-cxi-ds1-2014-03-19/cspad-ndarr-ave-cxii0114-r0227.dat
with default options produce 2-d image from ndarray of sensors' data and save it in the file mask-img.txt, Fig.1. In the 1st command the ndarray file name (option -a) is omited and the mask of sensors is created. Option -c sets the bit control word to remove edge, central, non-bound, etc. pixels in the mask.
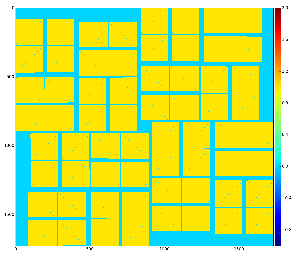
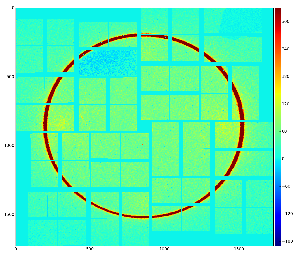
Fig.1: Graphical content of the file mask-img.txt for the 1st and 2nd command, respectively.
Use mask editor to draw ROI
Command
roicon -p2
invokes the mask editor med with default input file mask-img.txt and open GUI, as shown in Fig.2.
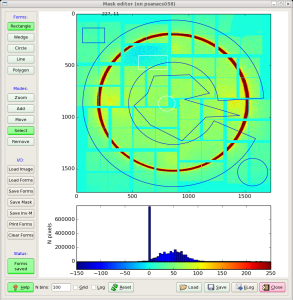
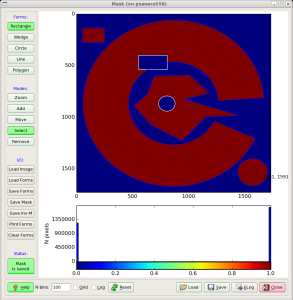
Fig.2: Mask editor GUI for drawing the ROI (left) and when the mask is saved (right).
Then, use mouse and buttons to draw the mask and, when it is ready, click the button "Save Mask". By default the file mask-roi.txt is saved with content shown in Fig.2 (right).
Convert ROI mask to ndarray with mask shaped as data
Command
roicon -p3 -g /reg/d/psdm/CXI/cxitut13/calib/CsPad::CalibV1/CxiDs1.0:Cspad.0/geometry/0-end.data
by default converts the file mask-roi.txt to mask-nda.txt.
Algorithm loops over pixel index ndarrays iX and iY and saves the mask-image status in the output ndarrsy:
mask_nda = np.array( [mask_roi[r,c] for r,c in zip(iX, iY)] )
ROI mask content saved in the ndarray is presented in Fig.4 (right) in specific for CSPAD shape.
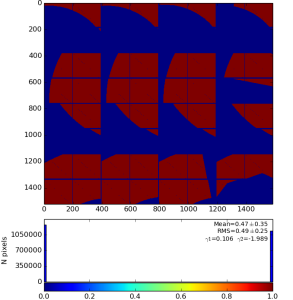
Fig.3: Mask on the top of enumerated (color-coded) pixels (left) and result of the mask conversion to the ndarray (right).
As a cross-check this ndarray can be converted back to the image using geometry file, as shown in Fig.4.
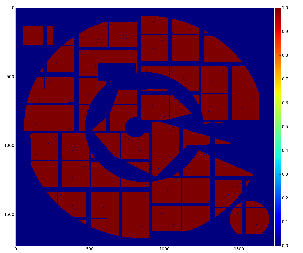
Fig.4: Cross-check: ndarray with mask is converted to the image using geometry file.
Usage of ndarray with ROI mask
Our particular goal was to make this mask for module ImgAlgos::NDArrCalib, which can be included in the psana configuration file:
[ImgAlgos.NDArrCalib]
source = DetInfo(:Cspad.0)
...
do_mask    = yes
fname_mask = mask-nda.txt
ROI mask for ndarray (or numpy array) can also be used in any stand-alone application, for example in python code. To apply the mask in python code the data numpy array should be multiplied by the mask numpy array.
Examples
Mask for CSPAD2x2
Let us to produce mask for CSPAD2x2 with discarded edge, middle columns, unbounded pixels:
cd <some-directory>
cp /reg/g/psdm/detector/alignment/cspad2x2/calib-cspad2x2-01-2013-02-13/calib/CsPad2x2::CalibV1/MecTargetChamber.0:Cspad2x2.1/geometry/0-end.data geo2x2.data
roicon -p1 -g geo2x2.data -c 15 -i mask-img.npy
roicon -p3 -g geo2x2.data -m mask-img.npy -n mask-nda.txt
Popping up monitoring images should be closed by pressing on ![]() in the right window corner. This lets script to run until the end. Resulting file with CSPAD2x2 mask array in text format will be in the file
in the right window corner. This lets script to run until the end. Resulting file with CSPAD2x2 mask array in text format will be in the file mask-nda.txt (with 0/1 ordered the same way like in data of size 185*388*2 ). To check content use command:
plims -v mask-nda.txt
where plims converts CSPAD2x2 (185,388,2) ndarray in naturally looking 2-d image adding extra-columns and rows in the middle.
Implementation of the ROI mask conversion algorithms in calibman
The same algorithms are implemented in the Calibration Management Tool as a GUI under the tab "ROI". The files with ndarray and geometry constants should be selected as input parameters. The names of other intermediate output files are optional. Three procedures for image reconstruction, mask editor, and mask conversion can be performed sequentially by clicking on relevant buttons. All files and images can be "Plot"-ted and "View"-ed. For now, mask file is saved in the work directory and is not deployed. In stead, its path could be used in the ImgAlgos.NDArrCalib module.
References
- Mask Editor
- Calibration Management Tool
- Detector Geometry
- CSPAD Alignment
- CSPAD2x2 Alignment
- Module ImgAlgos::NDArrCalib
Overview
Content Tools