Mask Editor is intended for interactive selection of good and bad regions on 2D image and preparation of output files with direct and inversed masks. It works as a basic graphical editor with specific output.
User Interface
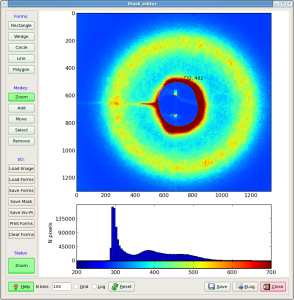
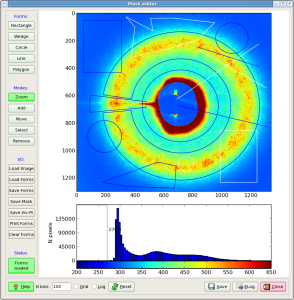
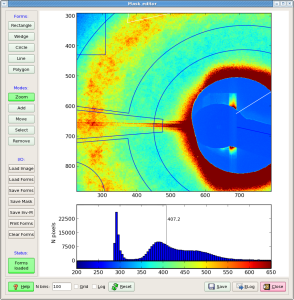
Mask Editor's user interface is working in a single window containing three pannels; graphical window, left-hand and bottom side control bars. Content and functionality of these panels is described below. Most of control buttons have tool tip hints; when coursor stops for a few seconds on control button, a pop-up window uppears with explanation of functionality of this button.
Graphical window
Left control bar
Left control bar consists of stack of buttons, which are functionally splitted for four groups; Forms, Modes, I/O, and Satus, which content and functionality is explained in this section.
Forms
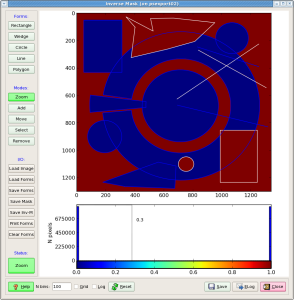
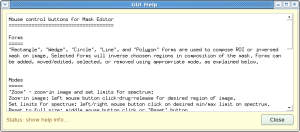
Forms can be used as non-selected - "positive" for ROI, and selected - "inversed" for blemish mask.
Modes
Section of modes contain Zoom, Add, Move, Select, and Remove buttons with functionality literally explained by their names.
I/O
Masks
Masks can be saved as
- ROI - positive
- Blemish - inversed
Satus pannel
Satus pannel is a single button-like pannel, displaying short status messages.
Bottom control bar
How to run Mask Editor
Mask Editor is developed as a part of the integrated data processing environment for XCS time correlation experiments. In this project the Mask Editor is integrated as one of the system GUIs. Also it can be executed as a stand-alone application named med. Stand-alone version of the Mask Editor can launched on any of psana or psexport node using command-line interface, for example, for all default parameters:
sit_setup
med
List of optional parameters
> med -h
Usage: med [options]

Optional input parameters.

Options:
  -h, --help            show this help message and exit
  -i IFNAME, --fname_img=IFNAME
                        input image file name
  -o OFNAME, --fname_fig=OFNAME
                        output png file name for current canvas
  -m MFNAME, --path_mask=MFNAME
                        common path to I/O files with mask
  -t TITLE, --title=TITLE
                        initial title of the garphical window
  -x XC, --xc=XC        x coordinate of the center for Wedges
  -y YC, --yc=YC        y coordinate of the center for Wedges
  -p PICKER, --picker=PICKER
                        distance in pix, where object line can be reaced by
                        mouse
  -w LW, --lw=LW        object line width
  -c COL, --color=COL   color of the form lines "b"-blue, "k"-black, etc.
  -v, --verbose         allows print on console
  -q, --quiet           supress print on console
I/O of forms
Forms can be saved in file, loaded from file and displayed on image, printed on console monitor, and cleared/removed from image. This can be done using simple data representation for each form, which is quite self-explained in case of pront or text-file format:
Form parameters for composition of the mask
Rectangle   48.00   50.00  262.00  380.00 1 b False False
Rectangle  987.00  853.00  255.00  380.00 1 w True False
Wedge  716.76  674.72  541.18  197.61 -171.39  174.59 1 b False False
Wedge  674.48  667.64  585.84  386.69  174.75  186.99 1 b False False
Circle  712.00  674.00  262.00 1 b False False
Circle 1068.00  180.00  112.00 1 b False False
Circle  191.00  898.00  117.00 1 b False False
Circle  752.00 1098.00   53.00 1 w True False
Line  689.79 1252.80  624.50  223.22 1 w True False
Line  829.99 1252.80  244.47  388.46 1 b False False
Line  836.67 1303.98  268.07  541.89 1 w True False
Line  692.02 1315.11  669.35  827.50 1 b False False
Polygon 1 w True False 10     400     373     620    ...
Polygon 1 b False False 6     329     674     683    ...
Demonstration of features

Overview
Content Tools