To initiate the project, please submit a project creation request to the administrator via the provided form. Upon approval, the administrator will grant access to a Git repository hosted on GitHub. Authorized users will then have the capability to create branches within this repository, facilitating collaborative development and version control.
Remember: the 'main' branch cannot be modified directly, each developer need to use branches and create a github Pull Request(PR) to merge desidere branches into main
Project Overview
The cloned repository will have a structure like this:
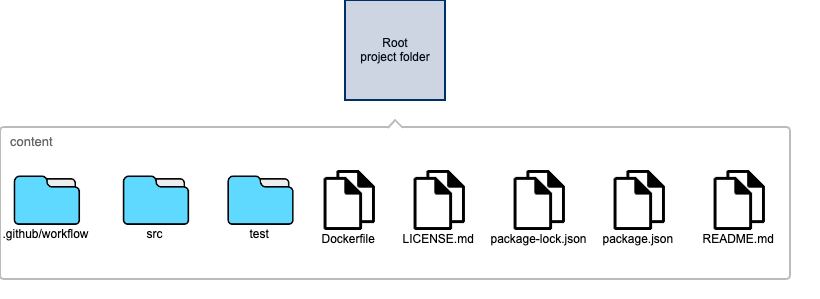
This document provides a detailed description of the organizational structure of the project, including directories and files, along with their respective purposes:
.github/workflow: This directory contains the GitHub workflow configurations that are integrally linked to the 'deployment project', as established by the project administrator in conjunction with the development project. These workflows are critical for automating and managing the project's deployment processes.src: Thesrcdirectory serves as the repository for the project's source code. It includes a demonstrationindex.jsfile, which is designed to output the "Hello World" string in response to each request made to the root URI (/). This directory is essential for housing the core logic and functionality of the application.test: This directory is dedicated to housing the project's test files. It includes tests specifically for theindex.jsfile located within thesrcdirectory, ensuring the reliability and correctness of the application's main functionality.Dockerfile: This file provides a predefined Dockerfile that serves as an exemplary starting point for developers. It is crafted to facilitate the containerization of the application, enabling consistent deployment and runtime environments. this file is principally used by the predefined github workflow that use it to build the docker image that will be deployed on EED kubernetes cluster.LICENSE.md: This file contains the standard SLAC (Software License Agreement for Collaboration) license, which governs the use and distribution of the project's software. It is crucial for defining the legal framework under which the project operates.package.jsonandpackage-lock.json: These files are standard to Node.js projects and contain the initial library dependencies required to create the demo. They play a vital role in managing the project's dependencies and ensuring consistent environments across different setups.The
package.jsonfile in the repository created for your project includes a"homepage": "/<your-demo-uri>"entry. This configuration instructs the application that upon deployment, its base URL path, following the hostname, will correspond to the value specified in<your-demo-uri>.README.md: As the primary documentation file for the application, theREADME.mdis pre-configured with the standard SLAC logo and is intended to be filled with comprehensive information about the project, including its purpose, setup instructions, and usage guidelines.
Each component of the project's structure is designed to support its development, deployment, and documentation, ensuring a streamlined workflow for contributors.
Initial file content
here we are going to give an overview of the file that has been created for the startup project:
src/index.js
const express = require("express");
const app = express();
const port = 3000;

app.get("/", (req, res) => {
  res.send("Hello World!");
});


const server = app.listen(port, () => {
  console.log(`Example app listening at http://localhost:${port}`);
});

module.exports = { app, server }; // Export both app and server
Overview
This file is a demo that uses the express framework to create route that can be accessible via HTTP
Key Components
- express: The framework used to create the web server.
- app: An instance of Express, used to define middleware, routes, and start the server.
- port: The port number on which the server listens.
- app.get("/"): Defines a route for the root URL that sends back a "Hello World!" response.
- server: The variable that stores the HTTP server instance. It's useful for closing the server during testing or integrating with other services.
Expanding the Application
To build upon this demo, consider adding more routes, middleware for handling various HTTP methods, static files, or even integrating with a database. Express makes it easy to scale applications from simple demos to full-featured web applications.
Conclusion
This demo application provides a basic introduction to creating web servers with Node.js and Express. By understanding how to set up a simple server and respond to HTTP requests, you can begin to explore more complex applications and APIs using Express.
Exporting
The application exports both the app and server objects, allowing for easy integration and testing within larger applications or microservices. This practice is beneficial for unit testing or when importing the application as a module in other parts of a project.
Additional services needed by the application during the test
Probably the NodeJS backend in development would need to talk with other service like database, s3 storage or others. For this reason use docker to help bringing up a development environment. Create a docker-compose.yaml file with all the needed service, ad example to integrate a PostgreSQL database could be used this docker-compose.yml file content:
version: '3.8'
services:
  db:
    image: postgres:latest
    environment:
      POSTGRES_DB: demodb
      POSTGRES_USER: demo_user
      POSTGRES_PASSWORD: demo_pass
    volumes:
      - ./init-db:/docker-entrypoint-initdb.d # Mount the directory containing demo_schema.sql
    ports:
      - "5432:5432"
    restart: unless-stopped
demo_schema.sql is a file contained into the init-db folder that can contains somenitng like:
-- Create a simple table named 'demo_table'
CREATE TABLE demo_table (
    id SERIAL PRIMARY KEY,
    name VARCHAR(255) NOT NULL,
    email VARCHAR(255) UNIQUE NOT NULL,
    created_at TIMESTAMP WITH TIME ZONE DEFAULT CURRENT_TIMESTAMP
);
to startup the docker compose service run the following command:
docker-compose up -d
at this point the PostgreSQL service is accessible from the localhost:5432 tcp address. To create more comples docker-compose file read the official documentation.
test/index.test.js
const { server } = require("../src/index"); // Adjust the path as necessary
const request = require("supertest");

describe("index.js", function () {
  after(function () {
    server.close(); // Close the server after tests
  });

  it("Test echo root path", function (done) {
    request(server).get("/").expect(200, done);
  });
});
Overview
The test uses supertest, a popular testing library for HTTP assertions, allowing us to test the response of our Express application without starting the server manually. This file contains a single test suite that verifies the server's response to a GET request at the root URL.
Dependencies
- supertest: Used for making HTTP requests and asserting the response in tests.
- server: Imported from the
index.jsfile, this is the Express application server we're testing.
Test Suite: index.js
After Hook
- after(): This hook runs after all tests in this suite complete. It's used to close the server, ensuring that the test process exits cleanly without leaving the server running in the background.
Test Cases
- Test echo root path: This test sends a GET request to the root path (
/) and expects a 200 OK response. If the server responds as expected, the test passes. Thedonecallback is used to handle asynchronous testing, ensuring that the test waits for the server's response before completing.
Initiating Application Development
With the preparatory steps completed, you are now ready to embark on the development of your application. To ensure a smooth and efficient workflow, it is recommended to adhere to the following guidelines:
Branch Creation:
- Begin by creating a new branch off the main branch or any other branch as appropriate for your new feature. Aim for a descriptive name for your branch, utilizing prefixes such as
feature/,fix/, orimprovement/to provide clear context. The name of the branch will be incorporated into the PR (Pull Request) merge message and will be recorded in the source code history.
- Begin by creating a new branch off the main branch or any other branch as appropriate for your new feature. Aim for a descriptive name for your branch, utilizing prefixes such as
Commit and Push:
- Following each commit, push your changes to the main repository. This serves as a backup and facilitates collaboration.
Testing:
- It is imperative to include tests for your application. Testing ensures that as your application evolves, previously tested features continue to function correctly. Early detection of issues through testing is preferable to discovering them at a later stage. Put all your test into the test folder, will be automatically discovered and executed during the workflow.
Pull Request and Merge:
- Upon completing development, push your final commit and initiate a PR to merge your changes into the main branch. The process involves:
The execution of a merge workflow upon PR creation or modification, which includes running all tests located in the test folder. Should any issues arise, the PR will be blocked until these are resolved. This workflow acts as a critical checkpoint.
Check the log for each github action job in case of errors
- Once the workflow concludes successfully without errors, the PR is eligible for merging.
- Upon completing development, push your final commit and initiate a PR to merge your changes into the main branch. The process involves:
Deployment Workflow:
- Merging into the main branch triggers an automatic deployment workflow, comprising:
- A build and test phase akin to the PR workflow. Any problems encountered will halt progress.
- Upon successful completion of the previous step, a Docker image is created using the Dockerfile located at the root of the project. Should issues occur, the workflow is halted.
- The final step involves triggering a workflow in the deployment project, managed by the administrator, which includes:
- Automatic updating of the kubernetes test deployment configurations with the newly generated Docker image and subsequent deployment to the K8S test environment after a short delay.
- The workflow pauses, awaiting action from authorized personnel to initiate deployment to the K8S production environment.
- Merging into the main branch triggers an automatic deployment workflow, comprising:
Following these steps not only ensures a systematic approach to application development but also fosters a culture of testing and continuous integration, thereby enhancing the quality and reliability of your application. Upon completion, the cycle can recommence with the creation of a new branch for additional features, returning to the beginning of this guide.