Trigger setup
The trigger for the AD and CU acquisition is a combination of signals coming from the accelerator cycle, several scintillators and cerenkov counters placed in the experimental area, AD-DAQ induced deadtime.
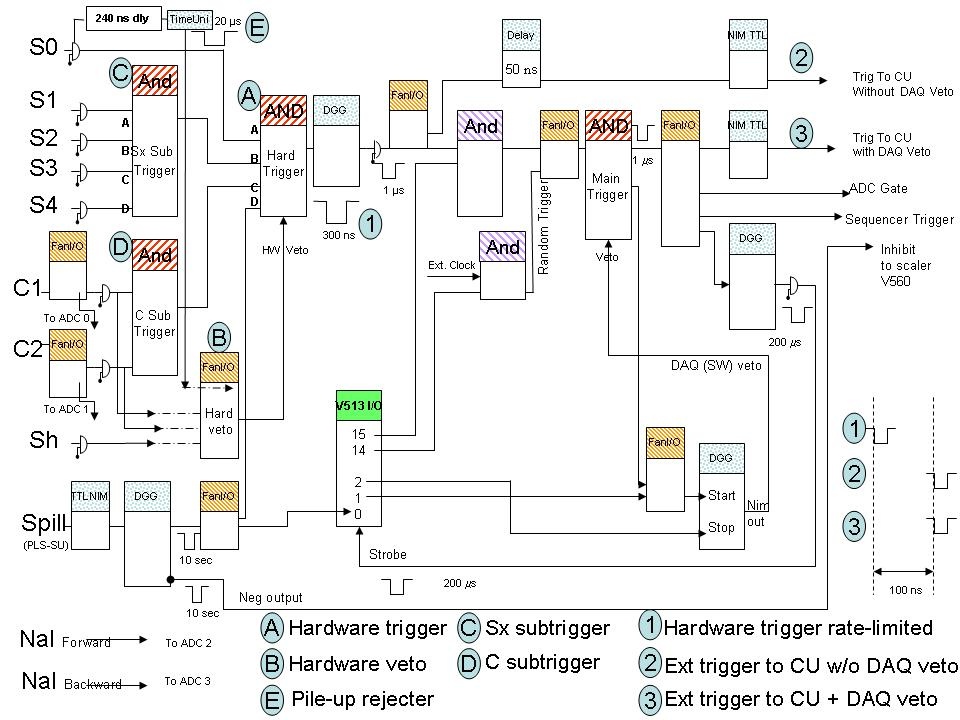
Below is a picture of the trigger logic and a description of the elements needed to set the trigger. A description of the experimental setup can be found here
Trigger control:
The following pictures should help locating the trigger modules in the T9 control room.
A - Hardware trigger:
s0 (switch A) = 150x300x10 mm whole beam scintillator
Sx (switch B) = combination of smaller scintillaros (see below)
C (switch C) = C1 AND C2
Sp (switch D) = DAQ spill gate (super-spill obtained superimposing all spills in the cycle, 2 or 3)
module operation: press each switch in to enable the corresponding signal in the coincidence
1- Rate limited Hardware trigger:
hardware trigger rate (output signal from A) can be limited through a double gate generated currently set to 300ns (current setting limit the output signal to a duration of 30% of the knob end of scale, now set to 1microsec - should hot be changed unless instructed by an expert)
B - Hardware Veto - possible input that the use must plug in the module:
Sh = halo veto (large counter with 2.4cm hole aligned with beam)
C1 = upstream cerenkov
C2 = upstream cerenkov
Pile-up rejecter (signal labelled as S0 delay 10 us): an adjustable window (currently set to 10 us) is generated by each S0 trigger and when plugged in the hardware veto prevents pileup from events crossing S0 in the same time window before each trigger (label E in the drawing, installed on 7 august).
module operation: logical fan-in/fan-out, just plug desired signal (cables clearly labelled) in the module
Subtrigger modules:
C - Sx subtrigger:
S1 (switch A) = 10x40x2 mm vertical finger counter
S2 (switch B) = 40x40x2 mm square counter
S3 (switch C) = 100x100x10 mm downstream counter (NB not always in the beam line - moved back as a veto to Sh lightguide from august 11)
S4 (switch D) = 100x100x10 mm photon-tagging counter (overlapping last SSD)
module operation: press each switch in to enable the corresponding signal in the coincidence
D - Cerenkov subtrigger:
C1 (switch A) = upstream cerenkov
C2 (switch B) = upstream cerenkov
module operation: press each switch in to enable the corresponding signal in the coincidence
External Trigger to CU selection:
Trigger with DAQ veto (hardware trigger + AD DAQ veto for synchronized runs)
Trigger w/o DAQ veto (hardware trigger for CU-only runs, AD can run in parallel)
selection: connect the cable labelled Ext trigger to CU to the desired output
Trigger selection:
For the PS run we used the following trigger settings:
- electrons and full-brem: S0+S2+NOTSh+NOTS3+C1+C2
- tagged photons: S0+S2+NOTSh+NOTS3+C1+C2+S4
- pions: S0+S2+NOTSh+NOTS3+C1+C2 (Note C1 and C2 with reduced pressure and high discriminator threshold)
- protons: S0+S2+NOTSh+NOTS3+NOTC1+NOTC2 (Note C1 and C2 with high pressure and low discriminator threshold)