The LCLS Control System will make use of different processors for IOCs, including Motorola processors. This document describes how to setup and configure an mvme5500 or mvme6100 processor for use with RTEMS and EPICS. We'll refer to the Motorola processor being configured as the SBC (Single Board Computer.)
The RTEMS/EPICS boot process has two stages; once the processor is setup correctly, it will execute the netBoot program that is stored in its flash memory. The netBoot program then reads the rest of the software from the network, specifically the EPICS server software that you need to run on the IOC. It loads it in memory and starts it running.
Quick Summary of Steps
- Install the SBC into a VME chassis.
- Connect the console and ethernet cables.
- Download the NetBoot software to flash memory in the SBC.
- Configure the boot parameters.
- Test the boot process.
- Set the SBC's default boot behavior.
Motorola Manuals
- MVME5500
- MVME6100
Specific Instructions
Inventory
Make sure you have the pieces that you'll need:
- Get an SBC, either a mvme5500 or mvme6100.
- Get a SLAC ID from Doug or Kristi. You will be given two stickers. Put one on the front faceplate of your SBC. Put the other on the board itself, near the serial number and ethernet MAC addresses which are typically visible on white labels attached to the top of the board, near the front faceplate.
- Get a network address for your SBC. Go to the LCLS Development Network Nodes page (SLAC-only), and you'll see a list of all reserved addresses. Click the edit button to put your name with any unused entry, then you can use the corresponding network address for your IOC. Enter the two ethernet (MAC) addresses, the serial number, and the SLAC ID number.
- A VME enclosure with power for the SBC.
- Two Ethernet cables, and an Ethernet to Serial adapter. You might also need a DB9 to USB adapter; see below.
The Ethernet to Serial Adapter physically connects the wires from the RJ45 connector of the ethernet cable to the pins of a female 9-pin serial connector, as shown in Figure 1 below. See Table 1 for pinouts.
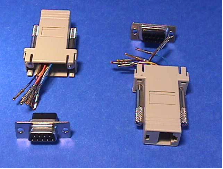
Figure 1. An RJ45 to DB9 Adapter for the SBC's Serial Console Line. Ideally, yours will be assembled!
The DB9 to USB adapter will be needed if your computer doesn't have a 9-pin male serial connection. Some computers use USB exclusively for serial communication, such as the Mac.

Figure 2. DB9 to USB Adapter; The Keyspan USA-19HS for the Mac.
Table 1. Serial cable pinouts for DB9-Female to RJ45.
RJ45 Signal |
RJ45 Socket 8 Position |
To Color |
DB9 Socket 9 Position |
DB9 Signal |
DCD |
1 |
Blue |
4 |
DTR |
RTS |
2 |
Orange |
8 |
CTS |
GND |
3 |
Black |
5 |
GND |
GND |
4 |
Yellow |
5 |
GND |
TxD |
5 |
Red |
2 |
RxD |
RxD |
6 |
Green |
3 |
TxD |
CTS |
7 |
Brown |
7 |
RTS |
DTR |
8 |
White |
6 |
DSR |
DTR |
8 |
White |
1 |
DCD |
- If you want to connect the cpu serial port to a DIGI Terminal Server you will need a cat5 cable with RJ45 connectors on both. For a cable diagram click here.
- You'll need network access to the LCLS Development server (lcls-dev1.slac.stanford.edu)
- A computer running UNIX (Linux, MacOS X, Solaris, etc.) or Microsoft Windows.
- The computer must have an available serial port. If the computer has only USB connections with no DB9-type serial ports, you'll need a serial DB9 to USB adapter. For MacOS X, we use the Keyspan model USA-19HS.
Setup
If you're using an mvme5500, you should disable the ability to overwrite the firmware monitor. If the MOTLoad software is accidentally overwritten, Motorola will charge around $90 to restore it.
Remove the J9 jumper, which is installed by default from the mvme5500 CPU, as shown in Figure 3 below.
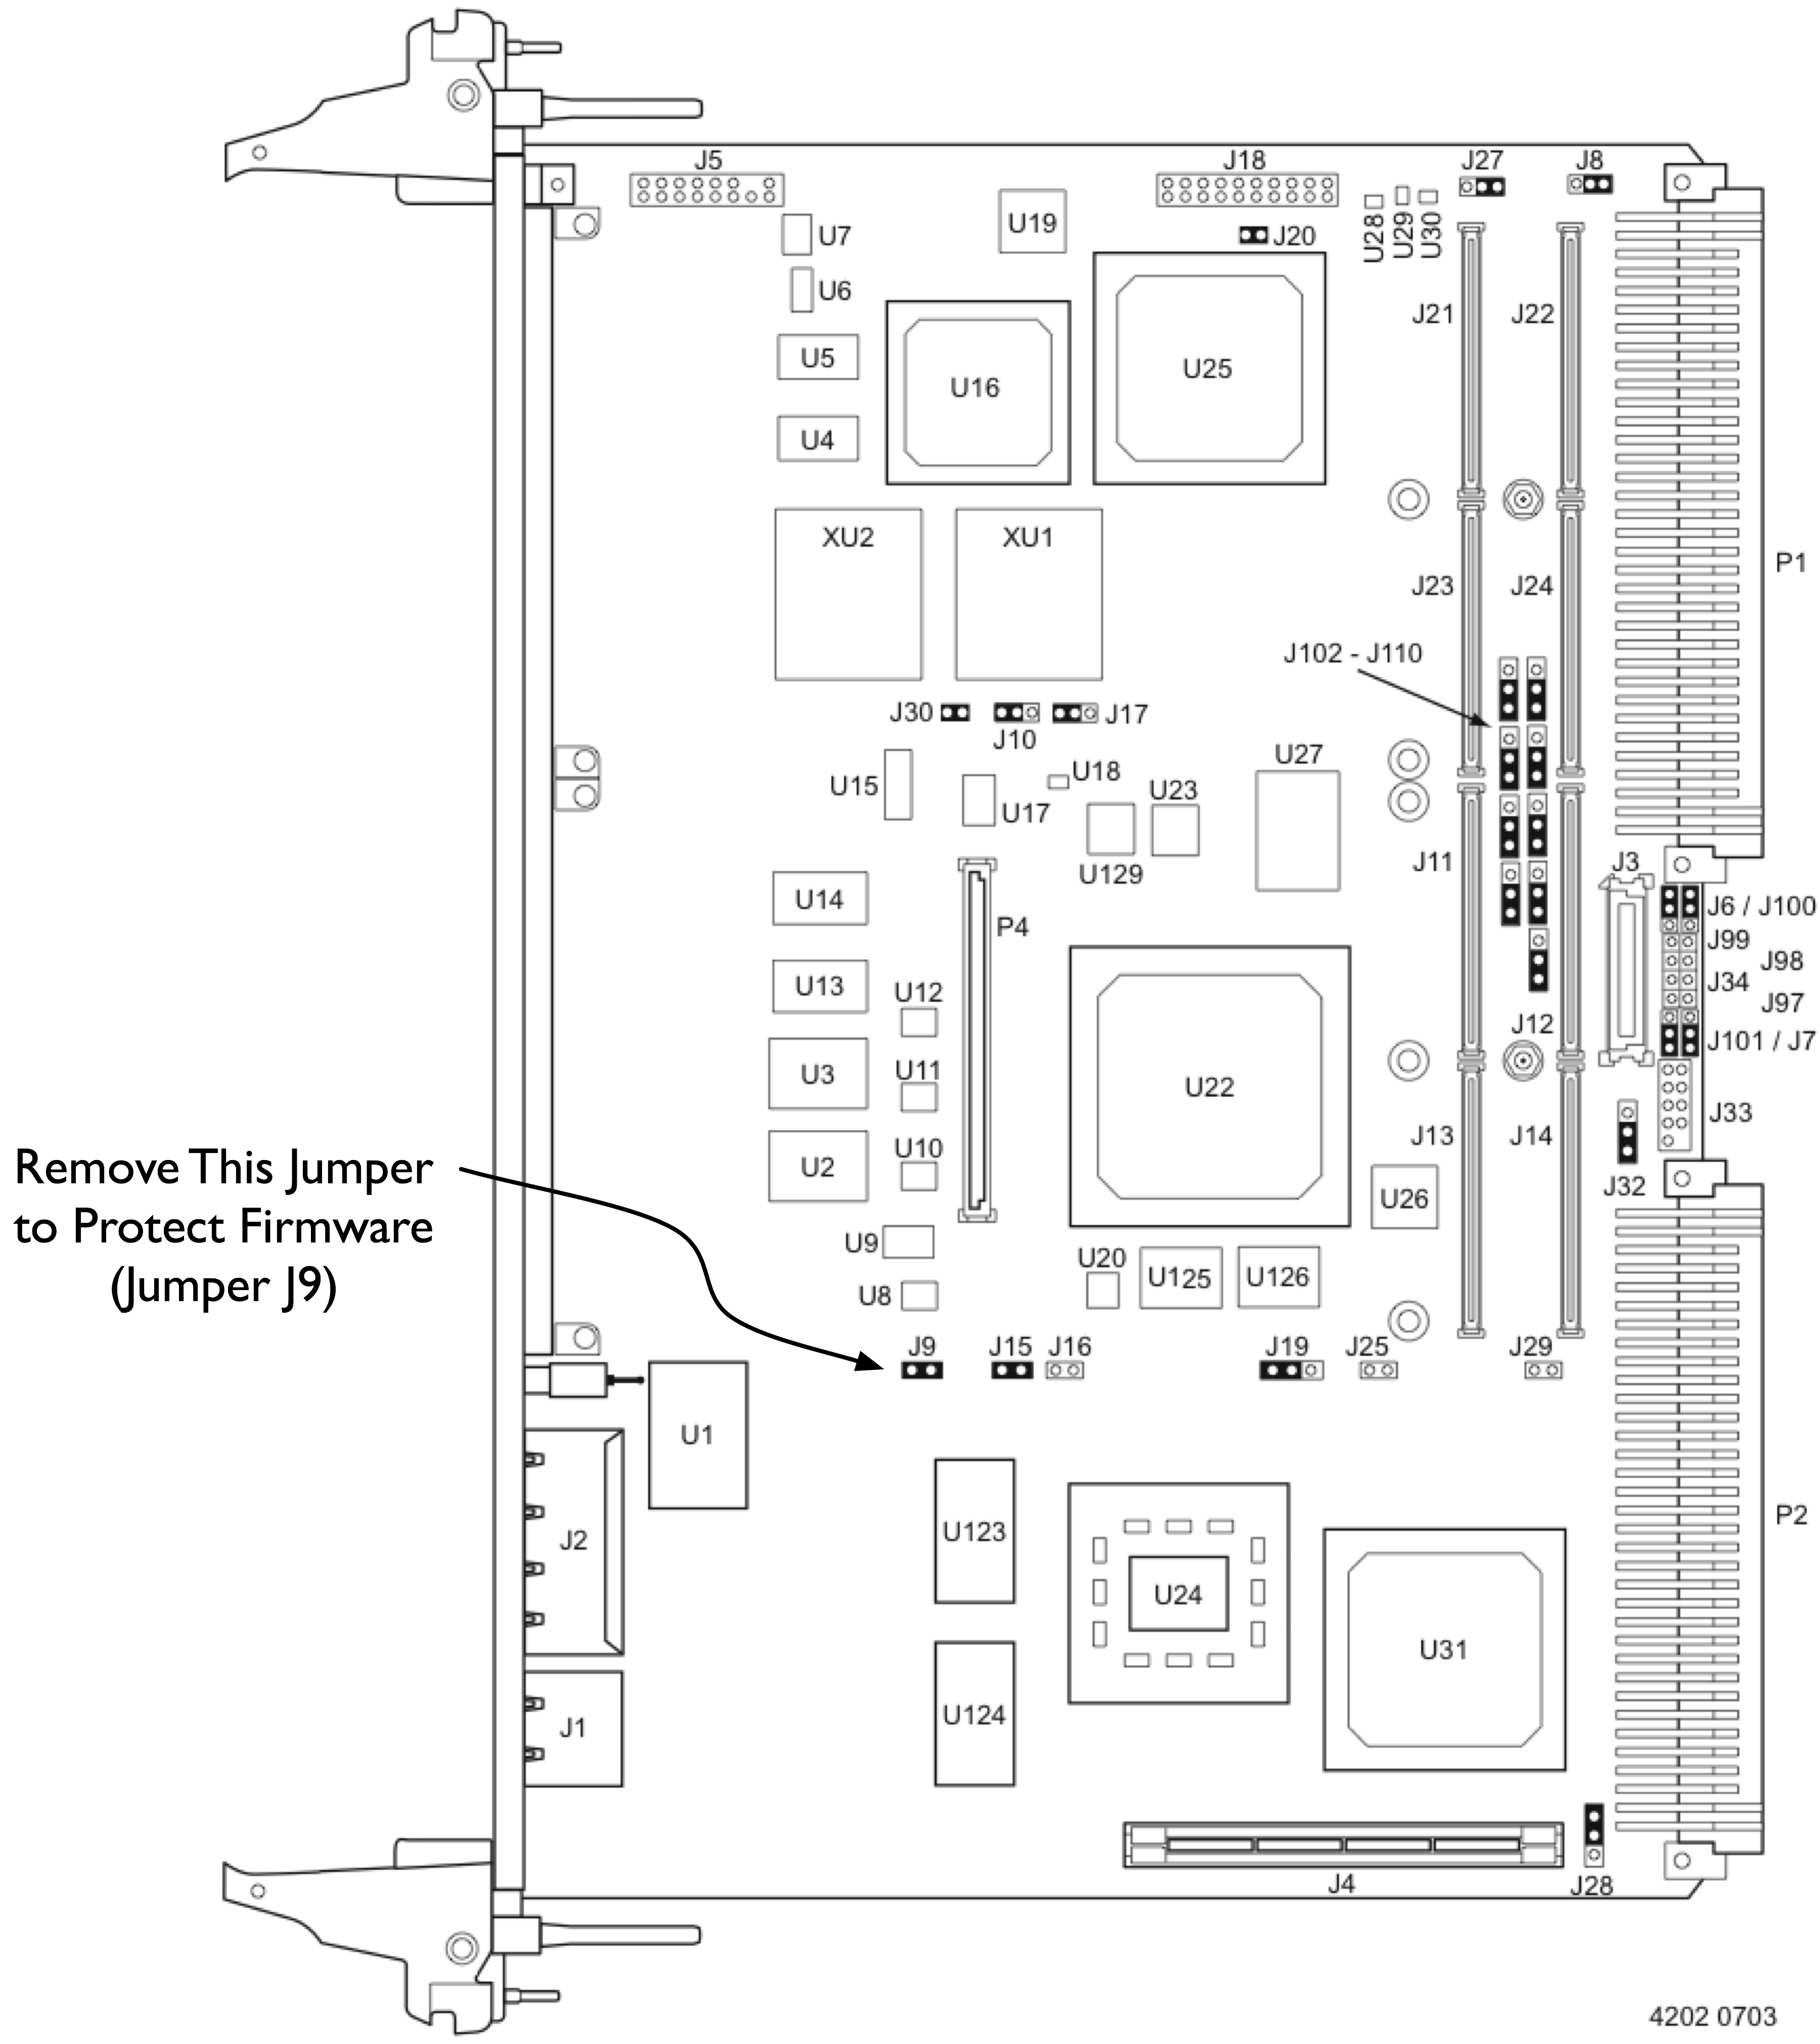 Figure 3
. Remove the J9 Jumper from the mvme550 CPU.
Assembly
The next step is to put it all together. The goal is to end up with something that looks like this:
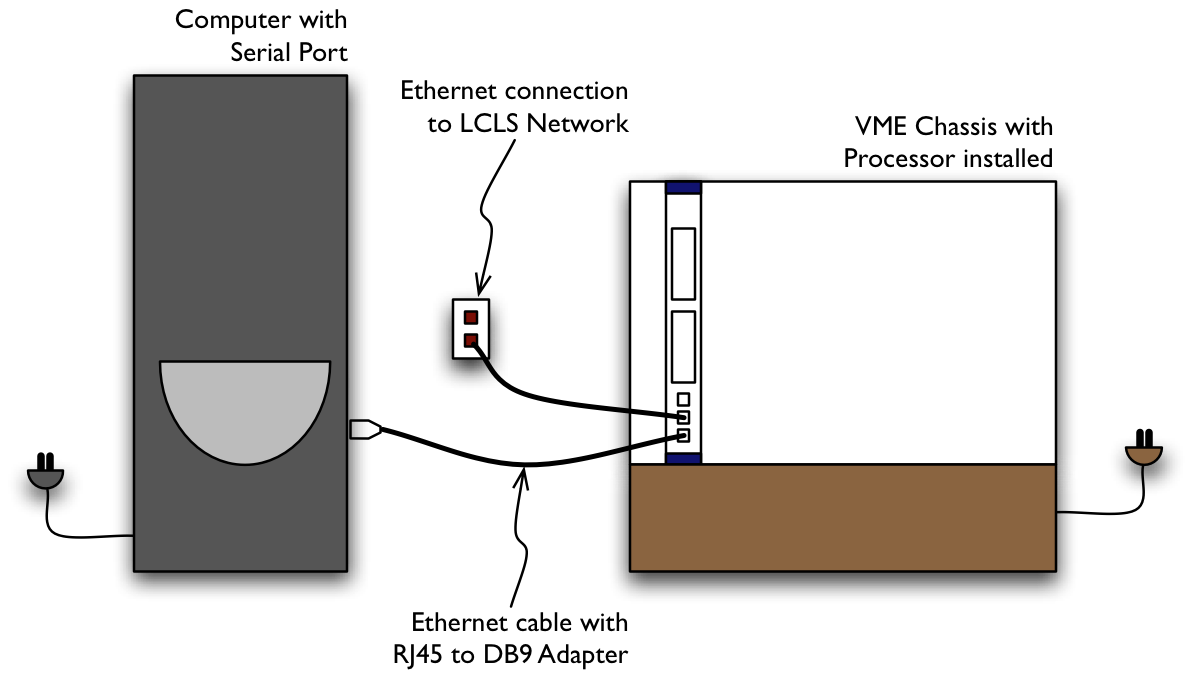
Figure 4. Basic IOC Setup for Development
- Insert the mvme5500 or mvme6100 CPU into the VME enclosure.
Connect the serial cable for the IOC Console. Figure 5 shows the bottom of the front panel of an mvme6100 SBC, and the jack labeled DEBUG is for the serial console cable. The mvme5500 looks similar, but the console jack is labeled COM1 instead of DEBUG.
 Figure 5
. SBC Front Panel Connections for the mvme6100.
Insert an ethernet cable to the bottom RJ45 connector on the CPU. Insert the other end into the RJ45 to DB9 adapter, and plug that adapter into the serial port on your computer.
- Connect the second ethernet cable to the RJ45 jack that is second from the bottom on the CPU. On the mvme6100, it is labeled LAN1; on the mvme5500, it is (incorrectly) labeled ENET2. Insert the other end into an ethernet data port in your office.
Download and Store
Now we'll get the software that the SBC will need to boot, and write it to flash memory. In the example output that follows, the text that you need to enter is highlighted and in bold . When the mvme5500 requires commands different from the mvme6100, both will be shown.
- Login to your computer, and run a terminal emulation program. If your are logged into a taylored linux node, then you will need special access to the linux box serial port. Users with sudo privledge on this particular node will have such access as will users that have ownership of the colsole port on this node. To obtain the latter type of access you can send a request to unix-admin@slac.stanford.edu asking to make taylor give the person logged in at the console ownership of the serial port via console.perms(5).
The terminal emulation software allows you to see the output from the SBC, and to type commands to the firmware monitor.
- On Linux, you can use minicom. On MacOS X use zterm. On Windows, TeraTerm is popular. You might need to have administrative privilege to use these programs on certain platforms.
- Make sure the settings for the connection are correct; 8 data bits, 1 stop bit, no parity, 9600 baud. Also make sure that you're accessing the correct serial COM port on the computer.
- Power up the crate or enclosure holding the SBC. After a few seconds, some text will appear in the terminal emulation window. You'll be prompted to enter a command, in this example "MVME5500>".
Copyright Motorola Inc. 1999-2003, All Rights Reserved
MOTLoad RTOS Version 2.0, PAL Version 1.1 RM02
Tue Jul 1 16:34:30 MST 2003
MPU-Int Clock Speed =1000MHz
MPU-Ext Clock Speed =133MHz
MPU-Number/Type = 0/MPC7455
MPU-Int Cache(L2) = 256K, Enabled, L2CR =0xC0000000
MPU-Ext Cache(L3) = 2MB, Enabled, 200MHz, L3CR =0xDF826000
Reset/Boot Vector =Flash0
Local Memory Found =20000000 (&536870912)
User Download Buffer =005C3000:007C2FFF
MVME5500>
- First, set the time of day using the set command. The time is of the format MMDDYYHHMMSS. So, November 3, 2005 at 2:27 PM would be set like this:
MVME5500> set -t110305142700
MVME5500>
MVME5500> time
THU NOV 3 14:27:01 2005
Next, download the NetBoot program into the IOC. Use the network address that you obtained during "Inventory".
It needs to be entered with the tftpGet command, after the "-c" (for client) on the command line. Note that the backslash () is put at the end of the line as a continuation marker. You can simply type the remainder of the command without the backslash.
You can also load the flash in your cpu from another configured cpu (of the same model). This is done by copying the flash in the configured cpu over the VME backplane to the cpu you intend to flash. Instructions on how to perform this operation can be found by clicking here .
The "-s" parameter allows us to specify the server address:
For development, it is 134.79.219.136, the address of the lcls-dev1 server. Note: Users are not allowed to log onto lcls-dev1.
For LCLS production, it is 172.27.8.28, the address of the lcls-srv04 server.
The "-m" parameter indicates a netmask to use to access the server.
Finally, the "-f" parameter indicates the name of the file (under /tftpboot on laci@lcls-dev1) containing the sequence of values to be loaded into memory.
It is set to /rtems/4.10.2/powerpc-rtems/beatnik/img/netboot.flashimg.bin for both production and development. Note that the mount for tftp is mapped to from the environment variable $TFTPBOOT on the development and production control systems. Therefore if you "cd $TFTPBOOT" the path following "-f" should exist.
On development for rtems 4.10.2: Host w/tftp server is lcls-dev1
MVME5500> tftpGet -c134.79.219.49 -s134.79.219.136 -g134.79.219.1 -m255.255.252.0 -f/rtems/4.10.2/powerpc-rtems/beatnik/img/netboot.flashimg.bin
On production:
For MVME6100:
Example: For a client that has an IP address 172.27.2.179:
MVME6100> tftpGet -c172.27.2.179 -s172.27.8.28 -g172.27.0.1 -m255.255.252.0 -f/rtems/4.10.2/powerpc-rtems/beatnik/img/netboot.flashimg.bin
Network Loading from: /dev/enet0
Loading File: /rtems/4.10.2/powerpc-rtems/beatnik/img/netboot.flashimg.bin
Load Address: 006B7000
Download Buffer Size = 00200000
Client IP Address = 172.27.2.179
Server IP Address = 172.27.8.41
Gateway IP Address = 172.27.0.1
Subnet IP Address Mask = 255.255.252.0
Network File Load in Progress...
Bytes Received =&780860, Bytes Loaded =&780860
Bytes/Second =&780860, Elapsed Time =1 Second(s)
MVME6100>
For the mvme5500 processor, the command is identical. The same version of the NetBoot program is downloaded, although the output on the screen will be slightly different.
At this point, we'll disable the network activity on all adapters, to ensure nothing interrupts us while we copy the image to flash memory. This is not essential, because it is not likely that any network activity would have an effect on the system at this point.
MVME6100> netShut
/dev/enet0 Disabled
/dev/enet1 Disabled
MVME6100>
Now we can actually copy the memory image that we downloaded in step 4 above from RAM into Flash. That is, we're copying it from temporary memory into a more permanent memory that will last after power failures or restarts. If you notice in the tftpGet output, it tells us the load address, in this example for the mvme5500, it was 005C3000. The load address is the location to which the file was copied.
We'll copy this file from that memory location into the Flash memory, so it won't be lost. In this example, the flashProgram command is used; the "-s" parameter indicates the source of the data to be copied, in our example 0x005C3000. The "-v" parameter tells the software to be verbose about what it's doing. It prints a few lines, then asks you to confirm.
MVME5500> flashProgram -s5C3000 -v
Source Starting/Ending Addresses =005C3000/006C2FFF
Destination Starting/Ending Addresses =F2000000/F20FFFFF
Number of Effective Bytes =00100000 (&1048576)
Program Flash Memory (Y/N)? Y
Virtual-Device-Number =00
Manufacturer-Identifier =89
Device-Identifier =18
Virtual-Device-Number =01
Manufacturer-Identifier =89
Device-Identifier =18
Address-Mask =FE000000
Flash Memory Programming Complete
MVME5500>
For the mvme6100, the load address is 006B7000. Accordingly, for that processor, the command would be:
MVME6100> flashProgram -s6B7000 -v
Source Starting/Ending Addresses =006B7000/007B6FFF
Destination Starting/Ending Addresses =F4000000/F40FFFFF
Number of Effective Bytes =00100000 (&1048576)
Program Flash Memory (Y/N)? Y
Virtual-Device-Number =00
...
At the end of the Flash program, the following lines will appear:
Program Flash Memory (Y/N)? Y
Virtual-Device-Number =00
Manufacturer-Identifier =89
Device-Identifier =03
Virtual-Device-Number =01
Manufacturer-Identifier =89
Device-Identifier =03
Address-Mask =FC000000
Flash Memory Programming Complete
MVME6100>
Test the Boot Process
You've "flashed" the processor. Now, you can emulate the boot process to test that it will work.
- First, we're going to confirm that the flash memory was written correctly, and test the boot procedure at the same time. The bmw command performs a Block Move Word request, and it ensures that the data being copied is word aligned. The idea is to do exactly what the normal boot procedure will do with each subsequent reboot of the processor; it will copy the contents of the persistent flash memory into main memory using the bmw command.
- We could easily just tell the processor to boot from the downloaded image that is still in memory, at address 5C3000 (for the mvme5500). But using bmw to copy the memory from flash will ensure that the flash memory contains the right stuff.
- If we look back to the output from the flashProgram command in a previous step, we see that the "Destination Starting/Ending Addresses" was printed out. This is the address in Flash memory that has the copy we need. This is handy, since the bmwcommand needs the start and end addresses (rather than the number of bytes, as one might expect.)
- The "-a" and "-b" parameters indicate the start and end addresses of where we want to copy from (the source of the copy.) The "-c" parameter indicates the location to which the data will be copied. In this example, we'll copy the data to location 4000000 in main memory.
- First, for the mvme5500 processor, you would type:
MVME5500> bmw -af2000000 -bf20fffff -c4000000
MVME5500>
For the mvme6100 processor, you would type:
MVME6100> bmw -af4000000 -bf40fffff -c4000000
MVME6100>
- After copying the data, we can use the go command to start executing the instructions represented by that data. Shortly after the program begins, it will attempt to load the rest of the RTEMS software into memory from the network.
- Instead of allowing that to happen, we can press any character on the keyboard to interrupt the process. You only have a couple of seconds to interrupt the process, but at that point, you will have the attention of the netBoot software, and can change its configuration parameters. Keep in mind that the prompt only stays there for a few seconds, so pay close attention and press any key when you see that prompt.
- This process is the same for the mvme5500 and 6100.
MVME5500> go -a4000000
Exception handling initialization done
Welcome to rtems 4.10.2 (PowerPC/PowerPC 7455/mvme5500) on MVME5500-0163
Build Date: 20050506PDT18:52:37
Now BSP_mem_size = 0x1FE00000
BSP_Configuration.work_space_size = 15000
Registering /dev/console as minor 0 (==/dev/ttyS0)
RTEMS bootloader by Till Straumann <strauman@slac.stanford.edu>
$Id: netboot.c,v 1.21 2005/04/26 02:05:03 till Exp $
CVS tag $Name: $
Your CPU Temperature calibration changed or was not initialized...
To calibrate the CPU TAU (thermal assist unit), you must observer the following steps:
1. Let your board stabilize to ambient temperature (POWERED OFF)
2. Measure the ambient temperature Tamb (deg. C)
3. Power-up your board and read the Temperature printed by SMON/FDIAG (Tsmon)
NOTE: use ONLY the info printed IMMEDIATELY after powerup
4. Set the calibration offset to Tamb - Tsmon
Type any character to abort netboot: <press any keyboard character here> 2
Press 's' for showing the current NVRAM configuration
Press 'c' for changing your NVRAM configuration
Press 'b' for manually entering filename/cmdline parameters only
Press '@' for continuing the netboot (BOOTP flag from NVRAM)
Press 'd' for continuing the netboot; enforce using BOOTP
Press 'p' for continuing the netboot; enforce using BOOTP
but use file and cmdline from NVRAM
Press 'm' for continuing the netboot; enforce using NVRAM config
Press 'R' to reboot now (you can always hit <Ctrl>-x to reboot)
Press any other key for this message
- At this point, you've confirmed the flash memory contains the right data. The netBoot software will recognize several commands from your keyboard, and it's listed them after you've interrupted its boot process.
- Normally when it runs, netBoot attempts to download the software that you ultimately want to use. To do so, it keeps several parameters in non-volatile memory (NVRAM.)
- Now you're going to set those various parameters and record them in NVRAM. Press "c" to change the parameters that netBoot will use to download software. Keep in mind that your own processors IP address must be entered under "My IP", just as it's name.
- Typically, only the fields marked "My IP", "My name" and "Command Line Parameters" will have values unique to your processor. All other fields should be entered as you see here. If you have questions, please ask a Controls Software Engineer from theEPICS Team.
- The field "Command Line Parameters"is set to:
- (booting from NFS): INIT=/boot/epics/iocCommon/user , followed by a path to your boot-up script. If you're using the AFS filesystem, which is common at SLAC, then your path will typically be something like /u/ <two-chars> / <login user-id> /path-to-example . If you are booting out of the shared lcls group space, the boot-up script is /boot/g/lcls/epics/iocCommon/"<your-node-name>"/startup.cmd . See the example below. Please note that the same DNS and the NTP servers for development and test-facility are used.
| Facility | TFTP Server | Boot Server | Gateway | DNS | NTP |
|---|
| Development | LCLS-DEV1 134.79.219.136 | AFSNFS 172.23.66.102 | 134.79.219.1
| 134.79.111.111 134.79.111.112 | 134.79.110.75 134.79.110.10 |
| Test-Facility | LCLS-DEV1 134.79.219.136 | AFSNFS 172.23.66.102 | 172.27.96.1 | 134.79.111.111 134.79.111.112 | 134.79.110.75 134.79.110.10 |
| LCLS | LCLS-SRV04 172.27.8.28 | MCCFS2 172.27.8.11 | 172.27.0.1 | 134.79.151.12 134.79.151.13 | 134.79.151.12 134.79.151.13 |
| FACET |
| MCCFS2 172.27.8.11 | 172.27.8.1 | 134.79.151.12 134.79.151.13 | 134.79.151.12 134.79.151.13 |
Changing NVRAM configuration
Use '<Ctrl>-k' to go up to previous field
Use '<Ctrl>-r' to restore this field
Use '<Ctrl>-g' to quit+write NVRAM
Use '<Ctrl>-c' to quit+cancel (all values are restored)
Use '<Ctrl>-x' to reboot
Boot file (e.g., '/TFTP/1.2.3.4/path', '~rshuser/path' or 'nfshost:/dir:path'):
> afsnfs:/afs/slac:/package/rtems/4.10.2/target/rtems_p3/ssrlApps_p2/powerpc-rtems/beatnik/bin/rtems.ralf
Command line parameters:
>
INIT=/boot/g/lcls/epics/iocCommon/ioc-b34-cd09/startup.cmd
Server IP: > 172.23.66.102
Gateway IP: > 134.79.219.1
My IP: > 134.79.219.49
My netmask: > 255.255.252.0
My name: > ioc-b34-cd09
My domain: > slac.stanford.edu
Loghost IP: >
DNS server 1: > 134.79.111.111
DNS server 2: > 134.79.111.112
DNS server 3: >
NTP server 1: > 134.79.110.75
NTP server 2: > 134.79.110.10
NTP server 3: > 134.79.110.9
Use BOOTP: Yes, No or Partial (-> file and
command line from NVRAM)
Y-N-P
>
N
Autoboot Delay: 0_.30secs (0==forever) > 5
CPU Temp. Calibration - (LEAVE IF UNSURE) >
NVRAM configuration updated
- Now you can continue with the boot process. When you're done setting the values in the previous step, you'll be given the list of netBoot commands again. Type "m" to continue with the boot process to make sure everything is correct.
- You'll see a very long set of messages come from the processor console, ending in a prompt that says "Cexp>". RTEMS has successfully started running on your processor.
- To get back to MOTLoad, type:
Saving an Automatic Boot Script and Recovery from "gev" errors"
Those few steps that you took before changing the NVRAM are all that are needed to reboot the computer again. These steps may need to be repeated after replacing a battery, or if you get the error "Warning: Global Environment Variable Area is uninitialized, use gevInit" (after issuing the "gevInit" command). Now, we can save those steps so the processor can perform them automatically each time it restarts.
The MOTLoad firmware in Motorola processors makes use of environment variables to do various things. These variables retain their values between restarts, and when the power is off. They are stored in a reserved area of NVRAM.
In particular, the environment variable named mot-script-boot contains a string of characters that are interpreted as commands. These commands are executed each time the processor starts.
The gevEdit command is used to create or change an environment variable. These are different for each type of processor, because of the Flash memory address.
For the mvme5500, you would type the following:
MVME5500> gevEdit mot-script-boot
(Blank line terminates input.)
netShut
bmw -af2000000 -bf20fffff -c4000000
go -a4000000
Update Global Environment Area of NVRAM (Y/N)? Y
MVME5500>
On the mvme6100, you would type:
MVME6100> gevEdit mot-script-boot
(Blank line terminates input.)
netShut
bmw -af4000000 -bf40fffff -c4000000
go -a4000000
Update Global Environment Area of NVRAM (Y/N)? Y
MVME6100>
Confirm that the mot-script-boot variable is set correctly. You can type gevShow, and the contents of the environment variables will be printed. Reboot the processor:
Reboot the Processor
You can power cycle the crate or if you have a "Cexp>" prompt, you can type rtemsReboot() and the processor will restart. It will boot up automatically, loading the rtems.exe file specified in the NVRAM. Change that filename to boot another file as your IOC development proceeds.
Reprogramming FLASH
Development:
Cexp> BSP_flashWriteEnable(0)
Cexp> BSP_flashWriteFile(0,0,"/boot/package/rtems/4.10.2/target/rtems_p3/ssrlApps_p2/powerpc-rtems/beatnik/img/netboot.flashimg.bin")
Production:
Cexp> BSP_flashWriteEnable(0)
Cexp> BSP_flashWriteFile(0,0,"/boot/lcls/rtems/rtems-4.10.2/target/ssrlApps/powerpc-rtems/beatnik/img/netboot.flashimg.bin")
LCLS Node NVRAM Settings
Till's MVME README.mvme5500 file
README.mvme5500
