Search/Navigation:
Related:
SLAC![]() /EPP
/EPP![]() /HPS Public
/HPS Public![]()
Jefferson Lab![]() /Hall B
/Hall B![]() /HPS Run Wiki
/HPS Run Wiki![]()
S30XL-LESA/LDMX
From counting house as hpsrun (should already be done):
In terminal: daqvnc.py connect config hps-svt-2
In another terminal: daqvnc.py connect config hps-svt-3
Remotely (in Hall B gateway):
ssh -Y clonfarm2
vncviewer :2
ssh -Y clonfarm3
vncviewer :2
Remotely (outside jLab network):
|
Then:
![]() Any crate related command should be issued by SVT experts only
Any crate related command should be issued by SVT experts only
SDK software installation to talk to the atca crate
.... INFO : clonfarm2 go..... |
SVT software is installed in
|
On clonfarm2 start the rogue server
|
The "epicsEn" flag is necessary to enable controls via Epics.
On clonfarm3 start the dummy server
|
If opening the Rogue GUIs for the first time, make sure all of the FEBs are turned off.
To take a CODA run, both the rogue server and a dummy server need to be started. To start the rogue server, first ssh into clonfarm2 and issue the following commands
source /usr/clas12/release/1.4.0/slac_svt_new/anaconda3/etc/profile.d/conda.sh
conda activate rogue_5.9.3
cd /data/hps/slac_svt/server/heavy-photon-daq/software/scripts/
python SvtCodaRun.py  --local --env JLAB --epicsEn
The dummy server runs on clonfarm3 and can be brought up as follows after ssh'ing into that machine
source /usr/clas12/release/1.4.0/slac_svt_new/anaconda3/etc/profile.d/conda.sh
conda activate rogue_5.9.3
cd /data/hps/slac_svt/server/heavy-photon-daq/software/scripts/
python SvtCodaDummy.py  --local --env JLAB --epicsEn
At this point, the FEBs and hybrids can be brought up via the medm GUIs.
Once the hardware has been powered up, you can initialize a run in CODA using the configuration PROD77_SVT and the config file hps_v2_svtOnly_noThresh.
![]() CODA run control should be running in a VNC on clondaq7. If not, contact the DAQ expert.
CODA run control should be running in a VNC on clondaq7. If not, contact the DAQ expert.
The online monitoring can be started by
startSvtCheckout
Which is in the hpsrun user path.
We experience few issues with the DAQ infrastructure during run cycles. In particular, it's advised to reset the DPMs in these cases:
Usually it's done before anything else.
heavy-photon-daq/software/scripts/resetDataDpm.sh
If the DPMs do not come up after several resets, one might try a cold reset (but might create issues in the recovery)
heavy-photon-daq/software/scripts/coldResetDataDpm.sh
At this point, the FEBs and hybrids can be brought up via the medm GUIs.
Trigger diagnostics
tcpClient hps11 tdGStatus
tcpClient hps11 tsStatus
Switch SLOT B ***BUSY***
This is the link to the Hall B run Database to find all the necessary run specifications
This is in the event builder and indicates that we are dropping packets.
This is raised in RssiContributor.cc in the event_builder by acceptFrame thread
Effect:
rol BUSY
Causes: Dropped frames.
Fix: Reset COBs
This usually indicates that the FEBs lost clock
Effect: not possible to run
Causes: FEBs lost clock
Fix: Recycle FEBs and run control
1) If it is running, kill Rogue by deleting the GUI SvtCodaRun.py that is running in hpsrun-clonfarm2 (TigerVNC window). If doesn't come down, ctrl+c on the terminal where rogue is running
2) In a terminal on hpsrun-clonfarm2: source resetDataDpms.sh
This is in clonfarm2:/data/hps/slac_svt/srver/heavy-photon-daq/software/scripts
if you want to issue this in a new terminal do
Usually it's done before anything else.
bash
sconda
crogue
cd $SSVT
cd heavy-photon-daq/software/scripts/
source resetDataDpm.sh
3) In the terminal in which Rogue had been running, execute "cob_dump --all atca1
In the resulting print-out, look for all codes to be 0xea. If they do not all go
to 0xea, then execute cob_cold_reset atca1 and then cob_rce_reset atca1.
4) Check if Flange boards are ON or OFF. If FEBs are powered on, power them off in the GUI window svtFebMain.adl as follows:
At the top of the window next to "ALL FEB" do in this order
a) Turn ANAN off
b) Turn ANAP off
c) Turn DIGI off
5) Start Rogue (SvtCodaRun.py)
6) In the TigerVNC window where RunControl is (CODA), execute the Configure and Download. Doing this early, at this state, can prevent problems that sometimes occur if this is done after the SVT startup.
7) In svtFebMain.adl, at the top, next to ALL FEB, turn DIGI on. Then wait until all the digi currents exceed 1.0 amp (about 10 seconds). Then in quick succession turn on in this order: ANAP followed by ANAN.
8) In the Rogue GUI SvtCodaRun.py Variables tab, set "Poll Enable" to True.
Watch below there for all of the links to turn "True".
To be sure, click "FebArray->AXIVersion->Uptime and watch to see that the Uptime is
incrementing every few seconds
9) Go to the HpsSVTDAQRoot tab in Rogue and click "Load Settings". Select the file
rce-test-eel.yml. Wait for that to complete (takes a few seconds).
10) Go back to the variables tab in Rogue and set "GlobalHybridPowerSwitch" to "On"
Wait for all the ANAP currents to settle.
If a FEB is not responding at this point, in Rogue set Poll Enable to "False" and
then power cycle just the bad FEB in the same sequence as described above, again
waiting for DIGI to go above 1 amp before turning on ANAP and ANAN.
11) Go again to the HpsSVTDAQRoot tab in Rogue and repeat the "Load Settings".
11a) If HV Bias is OFF, turn it ON before data taking.
12) If all the FEBs look good (green) and SVT bias is on, then CODA should be ready
for "Prestart" followed by "Go"
Very often the "End Run" procedure doesn't end cleanly and one needs to restart the run from CODA Configure. The worst step of the procedure is the Download stage as the clock sent to the FEBs get reset and the FEBs might lose clock and communication to the Rogue server.
This is the smoother procedure I have found.
1) Close Rogue
2) Reset the DPMs (see paragraph above)
3) Start Rugue after the DPMs are up
4) Keep PollEn to False
5) CODA Configure, followed by CODA Download
6) Check the Flange Epics adl screen
7) Set PollEn to True and wait for all FEB links to become True
8) If all True and no errors in Rogue, LoadSettings (see previous section)
9) Turn on the Hybrids with the global button
10) LoadSettings (see previous section)
11) If all went well ==> Prestart and GO.
There are two procedures to compute the baselines and thresholds for the HPS.
1) If open, close Rogue Gui2) Reset the data DPMs before doing a baseline run
heavy-photon-daq/software/scripts/resetDataDpm.sh
3) CODA Configure: PROD77_SVT
4) CODA Download: trigger/HPS/Run2021/Before_Sep16/hps_v2_svtOnly_noThr.trg
5) CODA Prestart
6) CODA Go and take ~2000 events
At the start of the run clonfarm2 and clonfarm3 terminals on CODA runControl (ROCs) might output a large amount of messages which differ with respect to the normal run. This is expected and won't affect the run.
7) The data will end up on clondaq7, so move the data (via scp) from clondaq7 to clonfarm1
scp clondaq7:/data/stage_in/hpssvt_<run_number>/hpssvt_<run_number>.evio.00000 clonfarm1:/data/hps/slac_svt/server/thresholds/run/
8) Next process this data to produce a threshold file. Thresholds require the fw channel mapping so use (as hpsrun):
bash
sconda
crogue
source /data/hps/src/setupHpstrEnv.sh
cd /data/hps/slac_svt/server/thresholds/run
hpstr /data/hps/src/hpstr/processors/config/evioSvtBl2D_cfg.py -i hpssvt_<run_number>.evio.00000 -o hpssvt_<run_number>_bl2d_fw.root -c fw
python makeSvtThresholds.py -i hpssvt_<run_number>_bl2d_fw.root -o svt_<run_number>_thresholds2pt5sig_1pt5sigF5H1
cp svt_<run_number>_thresholds2pt5sig_1pt5sigF5H1.dat ../
9) The Thresholds are loaded in CODA by the following configuration (accessible from any clonfarmX machine)
/usr/clas12/release/1.4.0/parms/trigger/HPS/Run2021/svt/svt_config.cnf
Change the line to point to the new threshold file corresponding to the line starting with RCE_THR_CONFIG_FILE, and make a new log entry
The baselines are produced by
bash
sconda
crogue
source /data/hps/src/setupHpstrEnv.sh
cd /data/hps/slac_svt/server/thresholds/run
hpstr /data/hps/src/hpstr/processors/config/evioSvtBl2D_cfg.py -i hpssvt_<run_number>.evio.00000 -o hpssvt_<run_number>_bl2d_sw.root -c sw
python makeSvtCond.py -i hpssvt_<run_number>_bl2d_sw.root -o svt_<run_number>
The output svt_<run_number>_cond.dat is in the format needed to upload to the database.
This file should be moved to ifarm:/work/hallb/hps/phys2021_svt_calibrations
cd /work/hallb/hps/phys2021_svt_calibrations
./load_calibrations.py -f svt_<run_number>_cond.dat -r <run_number>
After changing the baselines in the online reconstruction and database, change the baselines in the online monitoring application
/home/hpsrun/hps_software/reconMonitoringSettings/SvtCheckout2021.settings
/home/hpsrun/hps_software/reconMonitoringSettings/KFTrkAndReconOnMon2021.settings

#the line is
UserRunNumber=14335

==>And change that to the appropriate run
Finally restart the Online monitoring applications for the svt expert and remote shifter vncs
===> REMOTE SHIFTER: vnc running on clonsl1.
#This will kill both svt and ecal monitoring
killall -9 java

#In one terminal:
startSvtCheckout

#In another terminal (check actual script name):
startEcalMonitoring
Same operation for the EXPERT VNC on clonfarm2
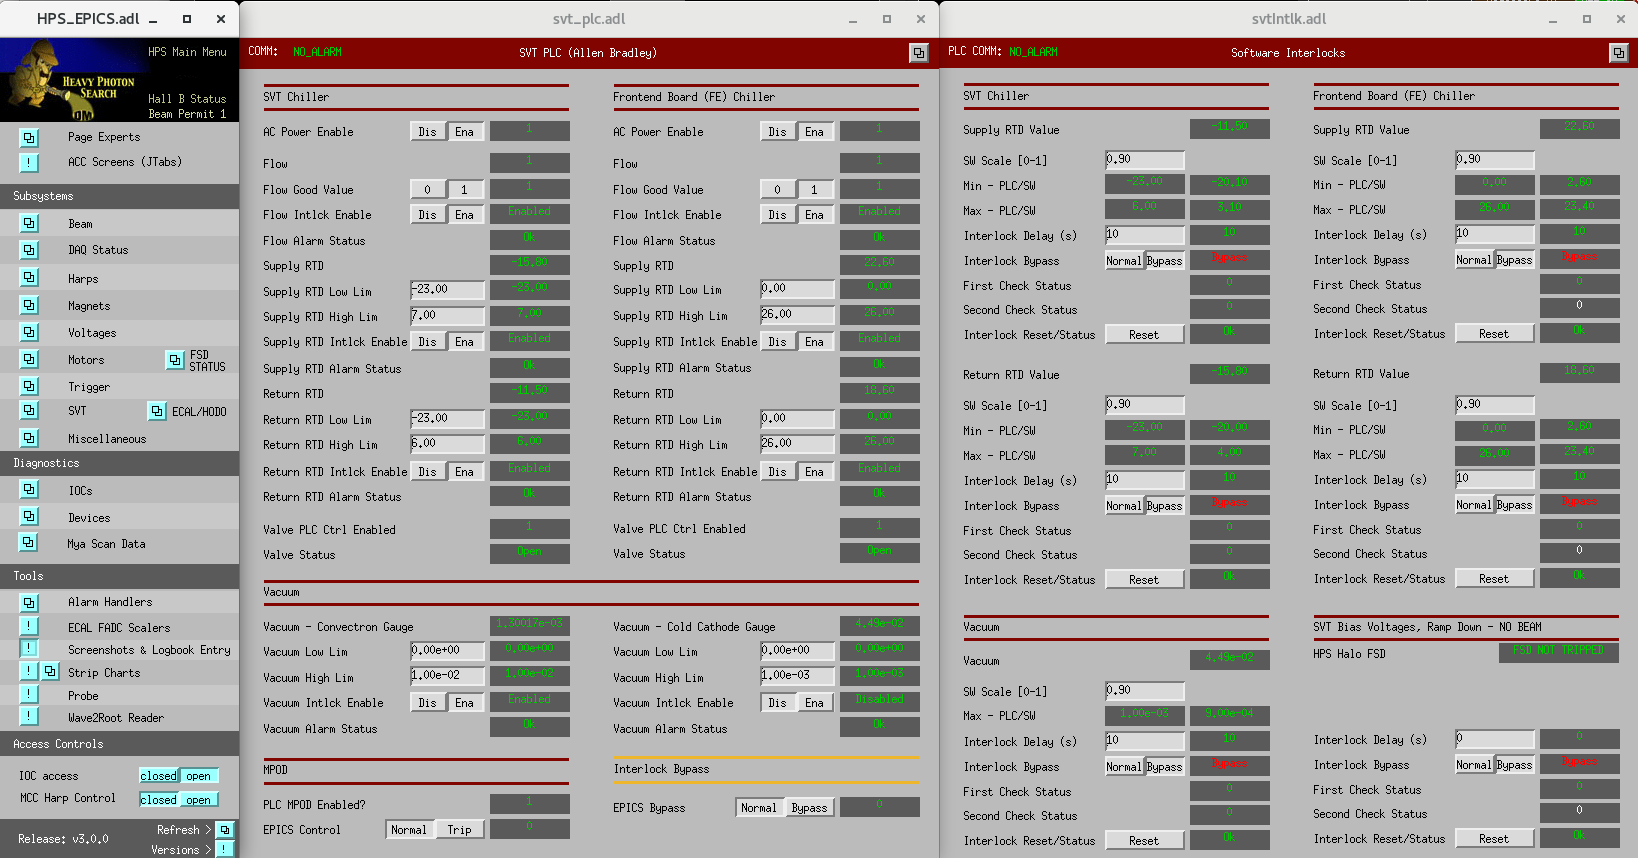
Please be very careful when touching the interlocks, both hardware and software. A wrong setting of the interlocks might cause the hardware to go in ERROR state and require a Power Cycle causing bigger problems. Be very attentive about the limits and the conditions before activating the interlocks.
AS OF October 2021 ALL SOFTWARE INTERLOCK ARE DISABLED. DO NOT ACTIVATE THEM
IN PARTICULAR VACUUM SOFTWARE INTERLOCK ***MUST*** BE KEPT IN BYPASS BECAUSE THE GAUGE IS NOT PROVIDING RELIABLE READINGS
In the case of a failure of the Cooling system (or vacuum or other hardware failures) interlocks might need to be re-enabled. On the night of 2nd October 2021, we experienced a failure of the SVT Chiller and we had to reset the interlocks. Below there is a screenshot of the Hardware (PLC) and Software interlocks for HPS.
AS OF October 2021 ALL SOFTWARE INTERLOCK ARE DISABLED. DO NOT ACTIVATE THEM
IN PARTICULAR VACUUM SOFTWARE INTERLOCK ***MUST*** BE KEPT IN BYPASS BECAUSE THE GAUGE IS NOT PROVIDING RELIABLE READINGS
After an SVT Chiller failure the following hardware (PLC) interlocks will probably trip. In order to restart the system the interlocks that tripped or an in a fault state. Above each interlock State (marked with the flag Disabled/Enabled), there is the current reading, the good value (which is checked against the current reading to kick the interlock) and the interlock state.
In order to restart the system, the interlock need to be disabled if the current measurement do not match the Good Value
In the case of a chiller failure we saw the RTDs interlocks in Disabled state. They were re-enabled when the RTD readings were back in the interlock safe range.
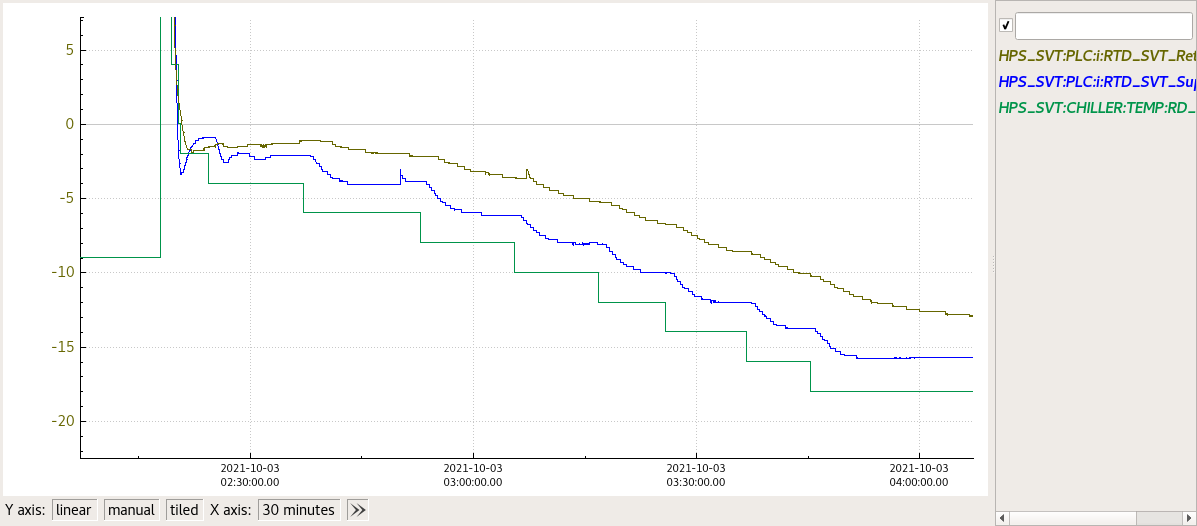
An example of the temperature ramp-down procedure can be found on :
https://logbooks.jlab.org/entry/3916838
Do not go directly to -18C. It is recommended to bring the detector to the setpoint temperature step by step.
In this figure is shown the ramp down of the SVT Temperature as described in the procedure above.
After an SVT Chiller failure the Power Supplies for HV will interlock. To check the status of the SVT LV/HV Power supplies go to
http://hpsmpod/ (Accessible behind the hall-b firewall)
If you see "Interlock" in the last column, means that the Power Supplies are interlocked and need to be reset. It can be done on the expert hps_epics adl of SVT Bias.
On top of the page there is "Reset MPOD interlocks" in red. Click on it and then check if the interlocks are cleared on the the hpsmod webpage