Search/Navigation:
Related:
SLAC![]() /EPP
/EPP![]() /HPS Public
/HPS Public![]()
Jefferson Lab![]() /Hall B
/Hall B![]() /HPS Run Wiki
/HPS Run Wiki![]()
S30XL-LESA/LDMX
An Integrated Development Environment (IDE) should be used to develop source code. Eclipse is a good choice, as it is free, widely used, and well supported.
Before you start to setup Eclipse, you should follow the instructions at Installing HPS Java to install locally the HPS Java trunk, which contains the various modules that will be loaded as projects.
You can download an installation bundle from the Eclipse downloads site.
There are many different Eclipse configurations provided here, and you will probably want the Eclipse IDE for Java Developers, which provides a Java IDE and built-in support for Maven. (The link is specifically for the Luna release.)
To install the IDE, simply download the correct file for your operating system by following the links, and then use unzip or tar to unpack it into a local directory.
You should see a directory called eclipse and the script at eclipse/eclipse will start the application.
This program can also be setup as an application shortcut in your window manager, which on my Linux system looks something like this.

The actual paths will, of course, depend on where you have installed Eclipse on your system.
The Subversive Plugin provides a graphical Subversion client within Eclipse, implementing commands like commit, update, etc.
To install Subversive, follow these steps.
Under the Work with field, paste in the appropriate URL for your release, e.g. for Luna this is the following.
http://download.eclipse.org/releases/luna
When you go to use this plugin, a window will appear with the title Install Connectors. The easiest way to trigger this wizard is by going to Window > Open Perspective > Other and selecting SVN Repository Exploring, then clicking the OK button.

In order to pick the right connector, you will need to figure out what version you already have installed on the command line.
For instance, this is the Subversion information on my Linux system.
[$] svn --version
svn, version 1.8.10 (r1615264)
You need to match up the first two numbers in the command line client with this connector version. Since I have a "1.8" client, I checked SVN Kit 1.8.6 for my connector and then Finish. (The JavaHL connectors should be ignored.)
Subversion Versions
Subversion clients are unfortunately not forward or backward compatible between minor releases. In other words, you cannot checkout a project using a 1.6 client and then switch to using a 1.7 or 1.8 client. For this reason, it is strongly recommended that the Subversive Connector you install matches the version which is installed already on your system.
To create a new project in Eclipse, you can select File > New > Java Project from the main menu. This will start a wizard for creating the new project.
We will create a project for the users module where miscellaneous user analysis code is located in HPS Java.
In the New Java Project window, you need to do the following.
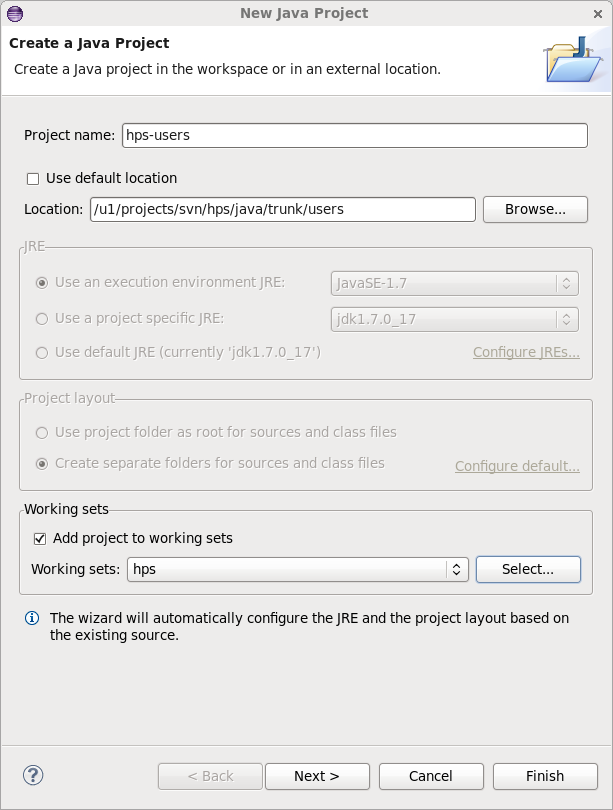
Then click on the Finish button and the project should now show up in the Package Explorer within the Java View.
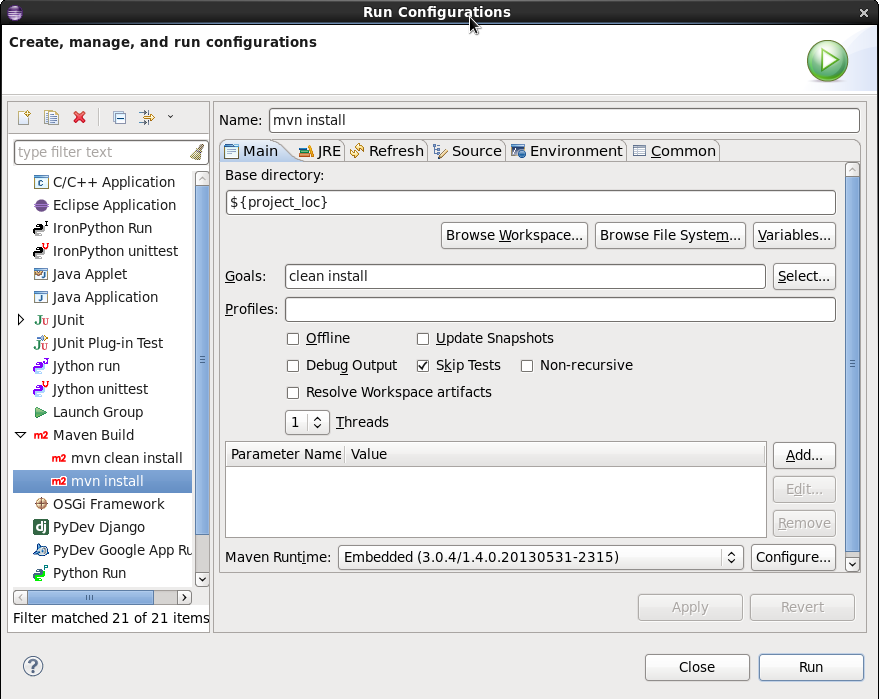
It is useful to create a custom build configuration for executing Maven on the project.
Open the window Run > Run Configurations.
Right click on Maven Build and select New.
Setup the new configuration to look like this.
In order to use this configuration, automatic builds should be turned off, which can be done by deselecting Project > Build Automatically from the application menu.
To execute this build configuration, select the project in the Package Explorer or Project Explorer by left clicking on it, and then go to Run > Run Configurations, click on your Maven configuration, and finally click the Run button there.
The build log should show up in the console window as the project compiles.
Resolving Dependencies in Eclipse
Should Eclipse be unable to resolve a project's dependencies, try right-clicking on the project icon and selecting Maven > Update Project from the menu or hitting Alt + F5 while the project is selected. This should force Eclipse to update its index of jar files against your local Maven repository, and hopefully this will make all the red errors in your editor go away.
The HPS collaboration uses a standard Java code formatting convention based on the Java Code Conventions.
To set this up for your projects, right click on a project in Eclipse, then select Properties.
Navigate to Java Code Style > Formatter to edit the settings for this project.
Check the box marked Enable project specific settings and then click the New button.
Name the profile e.g. "My Java Settings" and select "Java Conventions" from the drop-down menu.
This configuration will appear something like the following now.

Then click OK to edit the settings.
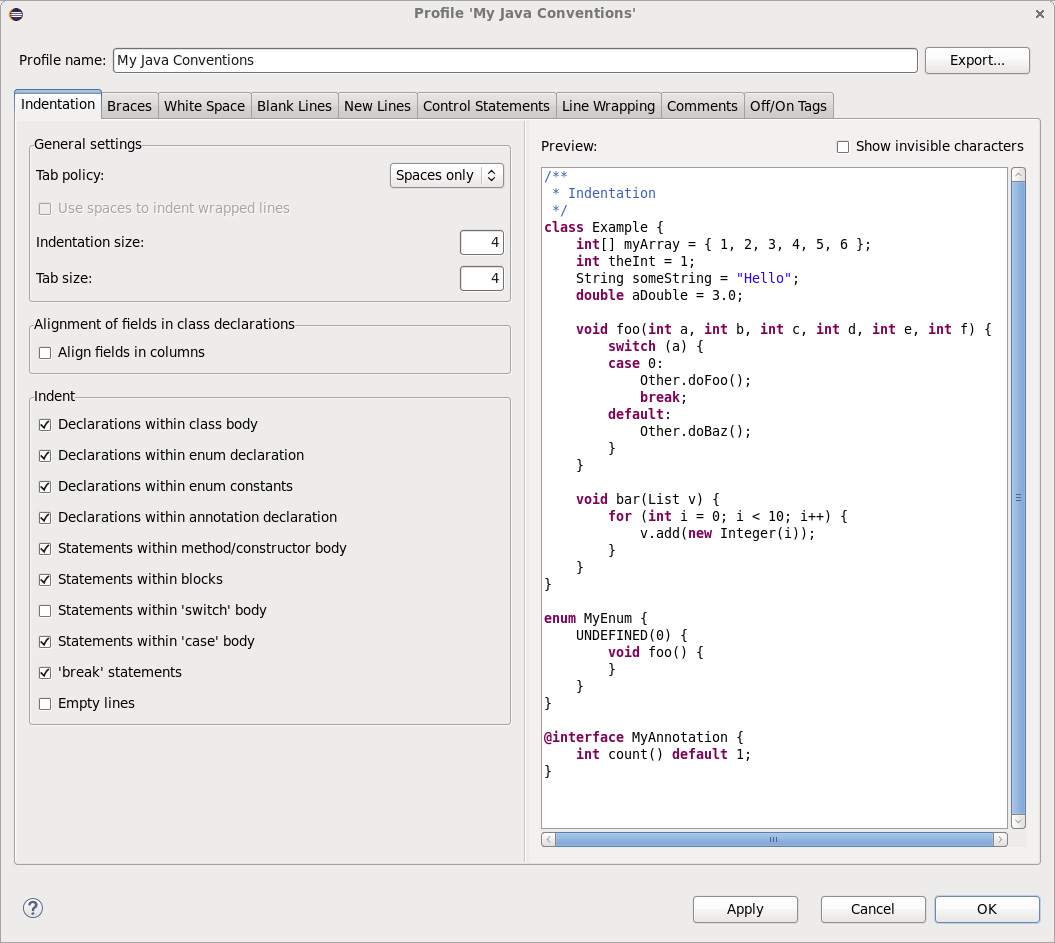
You will now edit the specific formatting settings which will be used for Java projects.
There are only a few changes which will be made to the defaults.
Under Tab policy, select "Spaces only".
For Tab size, put 4 instead of 8.
Now your window should look something like this.
Next click Apply and then OK.
Formatting Source Code
You can apply the formatting on Java files a few different ways. From the Package Explorer, you can select one or more files, and then right click and select Source > Format.
Within an editor window, you can format an entire file by right clicking and selecting Source > Format. This will also work on a section of selected code.
Tabs are Evil
As a general rule, tabs should never be used in any files within the SVN. Mixing tabs and spaces creates a formatting mess. And tabs may appear differently depending on how someone has their editor configured (e.g. tab indentation could be 4 or 8 spaces). For these reasons, we stick to a rule of spaces only in all source code.
An extensive set of Subversion commands are available under the Team and Compare with sub-menus when you right click on a Java file or package in the project.
To update a file to its current version in the trunk, you can select Team > Update.
You may compare a file against its current remote copy by going to Compare With > Latest from repository.
You can add a file to SVN by selecting Team > Add to version control.
To commit a file or select of files, you can use Team > Commit.
Using Team Commit from Eclipse
Using Eclipse to commit files can be convenient. But you need to very careful about this. When you select commit, Eclipse will show a window with the list of files to be committed. Make absolutely sure that this list only contains the files which you actually want included into the commit. By default, when executing a commit from a project without any files selected, Eclipse will add every file which is not in the global ignore list to the commit. You absolutely do not want this. So if there is a huge list of files there, then click cancel and execute the command only with the correct files selected. Or you may uncheck the boxes next to files which should not be committed.
When you remove a file using Delete from the right-click menu, Eclipse will remove the file and automatically mark it for deletion in the next SVN commit.
You should also setup some of the other editors in Eclipse to use spaces instead of tabs.
This is done through the menu under Window > Preferences.
For text editors, go to General > Editors > Text Editors > Insert spaces for tabs and check it.
For XML files, go to XML > XML Files > Editor and select Indent using spaces and set Indentation size to 4.
There are other places where this can be configured as well, for various types of editors. This link provides useful answers on where all these settings are located and how they can be configured to use spaces only.