Search/Navigation:
Related:
SLAC![]() /EPP
/EPP![]() /HPS Public
/HPS Public![]()
Jefferson Lab![]() /Hall B
/Hall B![]() /HPS Run Wiki
/HPS Run Wiki![]()
S30XL-LESA/LDMX
An Integrated Development Environment (IDE) should be used to develop source code. Eclipse is a good choice, as it is free, widely used, and well supported.
You will also want to install the m2eclipse plugin for Maven support and Subversive which provides a Subversion client interface.
The "Eclipse Standard" distribution can be downloaded from the Eclipse downloads area.
The Subversive plugin provides SVN access through the IDE and can be installed through this URL:
http://download.eclipse.org/technology/subversive/1.1/update-site/
When Eclipse reboots select and install an appropriate SVN connector for your system, which should be the pure Java version matching the version of the SVN client that you have installed on your operating system (either 1.6, 1.7 or 1.8).
After this, install the m2e plugin for Maven support using this update site URL:
http://download.eclipse.org/technology/m2e/releases
TODO
This section needs to be re-written according to the current best practice, which is creating a New Java Project from a module in the trunk, which has already been checked out.
In order to import source code from SVN into Eclipse, select the menu item Window > Open Perspective > SVN Repository Exploring.
Right click in the SVN Repositories pane on the right-hand side of the screen and select New > Repository Location.
Configure the New Repository Location wizard as follows:

The User value should be your actual SVN account username and the Password field should be your password.
Click Finish to save this location.
Next, expand the new repository until you find the module that should be checked out, right click on it, and select Find/Checkout Out As.

Click the Finish button in the Check Out As window that appears.
In the New Project window that comes up, select Java Project from the list (should be at the top), and click Next.
Put a name for the project under Project name, according to your preference, and then click Finish.
Switch back to the Java perspective where the project should show with the name you selected in the left-hand Project Explorer tab.
Right-click on the project and select Properties from the drop down list. In the Properties window, click on Java Build Path and configure it to look like this.

First, the existing folder should be removed so that there is nothing listed in the Source folders on build path area.
Then the two folders src/main/java and src/test/java should be added using Add Folder.

Click OK in both windows and the project should be reconfigured so that the correct Java packages are found successfully now.
The project, e.g. hps-java, should look something like the following now.

Finally, enable Maven builds for this project by right-clicking on it in the project pane and selecting Configure > Convert to Maven Project.
It is useful to create a custom build configuration for executing Maven goals on the project.
Open the window Run > Run Configurations.
Right click on Maven Build and select New.
Setup the new configuration to look like this:
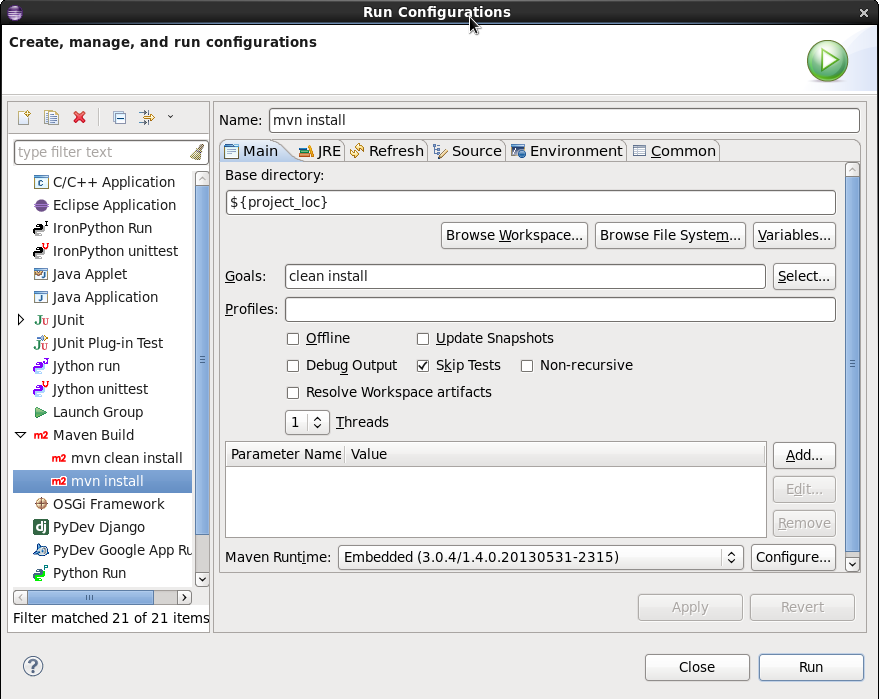
In order to use this, automatic builds must be turned off, which can be done from the menus by deselecting Project > Build Automatically.
To execute this, select the project by left clicking on it, and then go to Run > Run Configurations, click on your configuration, and then click the Run button.
The build log should show up in the console window.
Resolving Dependencies in Eclipse
Should Eclipse be unable to resolve a project's dependencies, try right-clicking on the project in the "Project Explorer" pane and selecting Maven > Update Project OR hitting Alt + F5 while the project is selected. This should force Eclipse to update its index against your local repository of jar files, and hopefully this will make all the red errors in your editor go away.