Content
Introduction
The re-implementation of the LogBookGrabber was intended keeping in mind a few goals for improvement:
- use
pyqt4in stead oftkas a GUI backend - add loading of graphical files from disk
- add the region editor of graphical files
- selection of tags from the list of available in db
- enable submission of the message copy to the instrumental ELog
- generate child message with results of processing the command in option "-c"
- make properly re-sizable GUI: the graphic window should be the only re-sizable object
- Save/restore the configuration file defined by the option "-f" with parameters:
- tag
- description of image
- input and output file names for loading and saving images, respectively
GUI layout
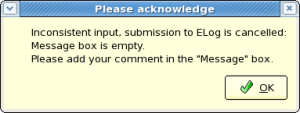
Application uses a minimal set of windows and popping-up boxes. At first start of the application with default configuration parameters, it shows the short version of the main GUI. A couple of check boxes may extend the number of control fields. Optional windows appear at click on "Help" and "Logger" buttons. These windows live as long as they needed. Warning message box may appear in case of incomplete or in-consistent input parameters, when
- the message box is empty
- the run number is shown together with response ID number.
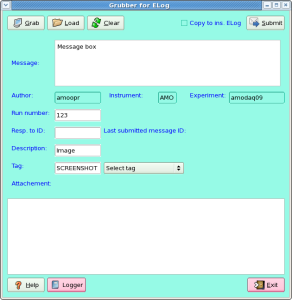
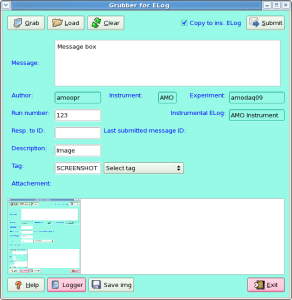
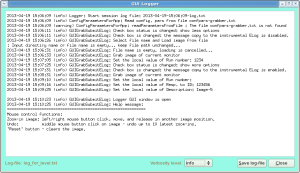
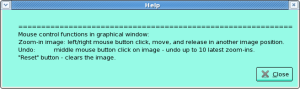
The typical layout of all windows is shown in plots for - Default GUI
- Extended GUI
- Internal logger
- Help box
- Warning message box
Functionality
LogBookGrabber main GUI contains buttons, check boxes, edit and info fields, graphical viewer/editor window, which functionality is explained below.
Buttons
Buttons in short GUI (default):
Grab– click on this button activates cursor to select the window or grab any rectangular area on monitor.Load– activates the file selection menu to load the image from file. Image will appear in theAttachementwindow.Reset– clears the graphicalAttachementwindow.Submit– submits entire message in ELogClose– closes the window, save current configuration parameters, and exit application.Select tag– activates the drop-down menu to select the tag from the list of known in the DB.
Additional buttons in extended GUI:
Save img.– saves the image in file. Image is saved in full format in limits as displayed inAttachementwindow.Logger– open the internal logger window.Help– displays in theLoggerhelp message about navigation in graphical window.
Check boxes
More optionson/off extended GUI buttonsHelp,Logger, andSave img.Copy to ins. ELogon/off the message copy to the instrumental ELog.
Edit fields
Message:– window for message which will be sent to ELog.Run number:– run number, which will be associated with this message (theResp. to ID:should be empty).Resp. to ID:– previous message ID number, which will be used for response(theRun number:should be empty).Description:– image will be saved in ELog with this file name.Tag– tag associated with message, which can be used in ELog for filtering.
Information filds
Author– user ID, who is an author of this message.Experiment– experiment name, for exampleamodaq09Instrument– instrument name, one of the listAMO,XPP,SXR,XCS,CXI,MECLast submitted message ID:the last successfully submitted message ID number.Instrumental ELog– instrumental ELog name for submission of the message copy, if theCopy to ins. ELogcheck box is on.
Image viewer/editor
Attachement– graphical window for image which will be attached to the message and will show-up in ELog. This window has a simple graphical editor, which allows to crop the significant part of the image. To crop - press left or right mouse button on image, drag, and release it on other point of the image. During mouse dragging, the rectangular with dashed-line boarder will show the selected region for zoom-in. Selected box should be at least 5x5 pixels size in order to be accepted. Click on middle mouse button undo zoom-in and restores previous image. Up to 10 earlier zoomed-in images can be returned by this undo method.
How to run application
Code location
Code resides in the directory: /reg/g/pcds/pds/grabber/bin/ and consists of modules:
LogBookGrabber_qt.py
LogBookWebService.py
icons/*
Command line
To start the LogBookGrabber application use commands:
setenv PYTHONPATH ${PYTHONPATH}:/reg/g/pcds/pds/grabber/lib/python2.7/site-packages

/reg/g/pcds/pds/grabber/bin/LogBookGrabber_qt.py -i <INSTRUMENT>[:<station>] -e <experiment-name> -u <user-name> -p <password> -w <web-service> -f <configuratin-file> -c <child-message-command>
For example:
/reg/g/pcds/pds/grabber/bin/LogBookGrabber_qt.py -i AMO:0 -e amodaq09 -u amoopr -p <password> -w https://pswww.slac.stanford.edu/ws-auth -f config-pars.txt -c "ls -l"
Optional parameters
Optional parameters can be seen using option "-h":
/reg/g/pcds/pds/grabber/bin/LogBookGrabber_qt.py -h
Options:
  -h, --help              show this help message and exit
  -i INSSTA, --ins=INSSTA the name of an instrument and station <INS>[:<station-number>]
  -e EXP, --exp=EXP       the name of some specific experiment
  -w URL, --url=URL       the base URL of the LogBook web service
  -u USR, --usr=USR       the user name to connect to the web service
  -p PAS, --pas=PAS       the password to connect to the web service
  -c CMD, --cmd=CMD       the command for child message
  -f CFNAME, --cfg=CFNAME the file name with configuration parameters
Overview
Content Tools