...
This tutorial shows how to write a JUnit test case using the Netbeans IDE.
Test Case Skeleton
| Tip | ||
|---|---|---|
| ||
You can automatically generate a test class with complete test cases in Netbeans. With the class open in the editor, go to the "Tools" menu and select "Create JUnit Tests" or use the shortcut Ctrl+Shift+U. Alternatively, you can right-click on a class in the Files browser and follow the same path, "Tools -> Create JUnit Tests". |
Below is minimal code that can be used as a template for writing org.lcsim test cases. It is not meant as an example, working test case but as an illustration of the essential parts of a JUnit test case. Each section will be covered in detail.
| No Format |
|---|
import junit.framework.Test;
import junit.framework.TestCase;
import junit.framework.TestSuite;

public class TestCaseExample extends TestCase
{
    public void TestCaseExample() throws Exception
    {}

    public static Test suite()
    {
        return new TestSuite(TestCaseExample.class);
    }

    protected void setUp() throws Exception
    {
        // DO SETUP HERE
    }

    public void testIt() throws Exception
    {
        // DO TEST HERE
    }
}
|
...
Maven establishes an organization for tests. These go into the directory tests in the project root area. The test should have the same package as the class it is testing in order that classes in the package can be accessed easily without a lot of import statements. All classes that extend junit.framework.TestSuite will be executed when Maven builds the project.
Accessing Test Data
...
Class Resources
Test data can be embedded into the test classes package directory and then accessed as a stream. (This is built-in Java functionality.)
For example, here is an example of accessing an XML file as a stream, based on org.lcsim.geometry.GeometryReaderTest in the GeomConverter package.
| No Format |
|---|
InputStream in = GeometryReaderTest.class.getResourceAsStream("GeometryReaderTest.xml");
GeometryReader reader = new GeometryReader();
detector = reader.read(in);
|
This technique should be used for data that is small (< 1 MB). Generally, we only embed text files such as XML into the jar files.
File Cache
For data that is too large to embed into the org.lcsim jar file, the file cache can be used to download and access files.
| No Format |
|---|
import org.lcsim.util.cache.FileCache;
|
This shows how to download an LCIO file from an example URL.
| No Format |
|---|
URL url = new URL("http://www.example.com/mytestdata/someTestData.slcio");
FileCache cache = new FileCache();
File file = cache.getCachedFile(url);
|
Now use the Java File object as usual, as it should point to a local file on the user's system.
Actual test data is kept at http://www.lcsim.org/datasamples, which can be browsed. Your test data can also be added here. Contact jeremy@slac.stanford.edu if you want to upload your own test data.
Using the Event Loop
Many test cases need to use the org.lcsim event loop to execute a driver over some events.
Assuming that the file variable points to a cached Lcio file, an event loop can be setup and executed as follows.
| No Format |
|---|
LCSimLoop loop = new LCSimLoop();
loop.setLCIORecordSource(file);
loop.add(new MyTestDriver());
loop.loop(-1);
loop.dispose();
|
Replace "MyTestDriver" with an actual driver you are trying to test.
Passing -1 to the loop command will process all the events in the Lcio file.
A Real Example
For an example test case, look at HitPositionTest in the org.lcsim package. It illustrates a number of the concepts covered in this document.
Adding from Netbeans
To add a test case from Netbeans, expand the project navigation window to the "Test Sources" folder. Right-click on the package where the test case should be added. In this case, the base package area is used, but you should use the actual package of the class being tested.
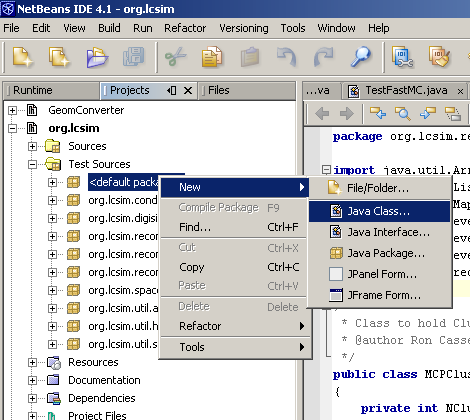
Now type in the name of the class and click "Finish". Follow the template given previously to write the actual test case.