...
Download and install the FermiBottle container following the Installation instructions.
Start and attach to the container following the usage instructions.
Once in the container.
Check that X-windows works by, e.g., launching ds9 (or xeyes for more fun).
Check that you can see the shared directory in both the container and system OS.
Activate the 'fermi' environment with conda.
Check that Fermitools work.
- Check that the GBM Data Tools work.
To help, we've created a run through below and short Jupyter notebook you can download to demonstrate these steps.
Fermitools Example Run Through
Here's an example session on a Mac. I created a directory called fermi_summer_school the shared directory and a file in it called this_is_the_share_directory just so something shows up in a directory listing. Note that its name does not matter, and you can create it wherever you like or use an existing directory. This directory will be visible from the container. I then pulled the FermiBottle image from Docker and started it.
| Code Block | ||
|---|---|---|
| ||
(base) user@host % mkdir fermi_summer_schoolshared (base) user@host % cd fermi_summer_schoolshared (base) user@host fermi_summer_school % touch this_is_the_share_directory (base) user@host fermi_summer_school % ls this_is_the_share_directory (base) user@host fermi_summer_school % docker pull fssc/fermibottle Pulling from fssc/fermibottle Digest: sha256:f041b634d1b3a6d3a4e3276c8bac486de47a1839365c0a0826569da40c5a9b4710c84c7355b26fdb2dba3ff312028033ac7089868715992cbf0c77fba3bc369e Status: Image is up to date for fssc/fermibottle docker.io/fssc/fermibottle (base) user@host fermi_summer_school % xhost + 127.0.0.1 && \ docker create -it --init \ -e HOST_USER_ID=`id -u $USER` \ -e DISPLAY=host.docker.internal:0 \ -v "`pwd`$HOME/shared":/datashared \ -p 8888:8888 \ fssc/fermibottle 127.0.0.1 being added to access control list be68136958ad303810707e78b08080c20490fcdc2ee4b061fb46f464b997e7a4 (base) user@host fermi_summer_school % docker ps -a CONTAINER ID IMAGE COMMAND CREATED STATUS PORTS NAMES be68136958ad fssc/fermibottle "/opt/docker/bin/ent…" 19 seconds ago Created silly_pasteur (base) user@host fermi_summer_school % docker start be68136958ad be68136958ad (base) user@host fermi_summer_school % docker attach be68136958ad |
You can use either the container id or name of the container to start and attach to it.
This puts me in the container. You should notice that the prompt is now the "fermi" user and the container ID. Note that you only have to run the xhost command once. If you quit the container, you will just have to run the start and attach commands to return to it.
I launched ds9 to make sure X-windows are working. Quit it (assuming it works) and change to the shared directory, which is under /datashared in the container.
| Code Block | ||
|---|---|---|
| ||
(base) [fermi@be68136958ad ~]$ ds9 (base) [fermi@be68136958ad ~shared]$ cd /datashared (base) [fermi@be68136958ad datashared]$ ls this_is_the_share_directory |
...
| Code Block |
|---|
(base) user@host fermi_summer_schoolshared % unzip Quick_Test.zip Archive: Quick_Test.zip creating: Quick_Test/ inflating: Quick_Test/Quick_Test.ipynb inflating: Quick_Test/SC00.fits inflating: Quick_Test/3C279_1deg_gti.fits (base) user@host fermi_summer_school % ls Quick_Test/ Quick_Test.zip this_is_the_share_directory |
...
| Code Block | ||
|---|---|---|
| ||
(base) [fermi@be68136958ad datashared]$ ls Quick_Test Quick_Test.zip this_is_the_share_directory |
...
| Code Block |
|---|
(base) [fermi@be68136958ad datashared]$ conda activate fermi (fermi) [fermi@be68136958ad datashared]$ cd Quick_Test (fermi) [fermi@be68136958ad Quick_Test]$ ls 3C279_1deg_gti.fits 3C279_1deg_lc.fits Quick_Test.ipynb SC00.fits (fermi) [fermi@be68136958ad dataQuick_Test]$ notebook [I 19:02:00.683 NotebookApp] Loading IPython<various parallel extension [I 19:02:00.685 NotebookApp] Serving notebooks from local directory: /data [I 19:02:00.685 NotebookApp] Jupyter Notebook 6.3.0 is running at: [I 19:02:00.685 NotebookApp] http://00.00.00.00:8888/?token=f1c9ca8c84b17e3ebbd6394eaab36aab1a9ee52d61092436 [I 19:02:00.685 NotebookApp] or http://127.0.0.1:8888/?token=f1c9ca8c84b17e3ebbd6394eaab36aab1a9ee52d61092436 [I 19:02:00.685 NotebookApp] Use Control-C to stop this server and shut down all kernels (twice to skip confirmation). [C 19:02:00.689 NotebookApp] output not shown> To access the notebookserver, open this file in a browser: file:///home/fermi/.local/share/jupyter/runtime/nbserverjpserver-606328-open.html Or copy and paste one of these URLs: http://00.00.00.00:8888/?token=f1c9ca8c84b17e3ebbd6394eaab36aab1a9ee52d61092436 or http://127.0.0.1:8888/tree?token=f1c9ca8c84b17e3ebbd6394eaab36aab1a9ee52d610924362d13b3d5a3c4e69177742f8df5ebeaba475c8a5703042327 |
You can paste one of the http URLs into the browser (I used the 00.00.00.00 one) on your host machine and should see something like:


Click on the Quick_test.ipynb file to open it. You can then run the notebook by select Cell->Run Run→Run All Cells from the menu bar. It runs one of the Fermitools (gtbin) and then creates a lightcurve. You should then end up with a notebook that looks like this:
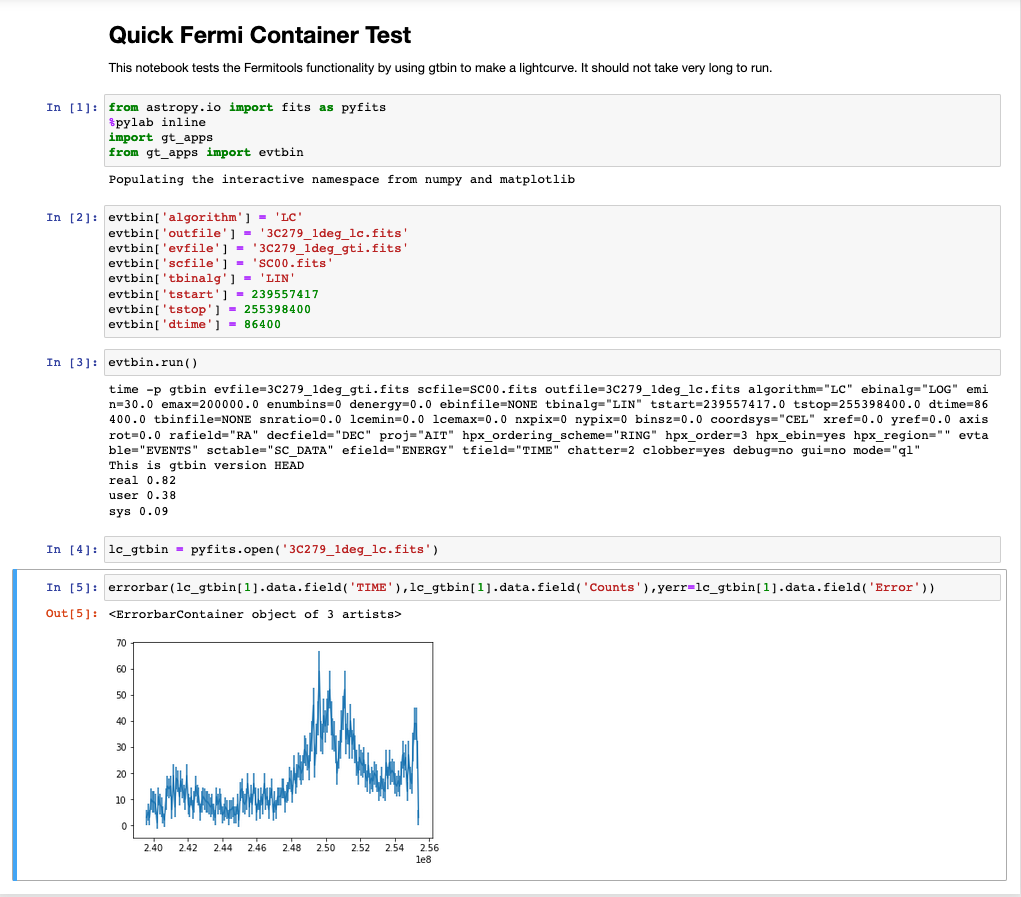

Congratulations, things seem to be working!
GBM Data Tools Example
The GBM Data Tools tutorials are in Jupyter notebooks. If you did the example above, you already have a notebook running, but you can't have more than one Jupyter notebook running at a time in FermiBottle by default. You can use the "Quit" button in the upper right of the Jupyter notebook start page or hit to ctrl-c in the terminal window, which will then prompt you to shut it down.
The GBM Data Tools are in separate conda environment from the Fermitools. The GBM team provides the gbm-demos command to launch a list of the tutorial notebooks.
| Code Block | ||
|---|---|---|
| ||
(fermi) [fermi@be68136958ad Quick_Test]$ conda deactivate
(base) [fermi@be68136958ad Quick_Test]$ conda activate fermigbm
(fermigbm) [fermi@be68136958ad Quick_Test]$ gbm-demos |
Like before, you will need to paste the URL into an external browser and will then find a list of notebooks. Open the index.ipynb one, which gives more descriptive list of the available tutorials. Try the first one on the list "GBM Science Data: Time History Spectra" and do Run→Run All Cells. It should run quickly and make some plots. You may see a warning that Basemap is not installed. That shouldn't be a problem for now.