Page History
...
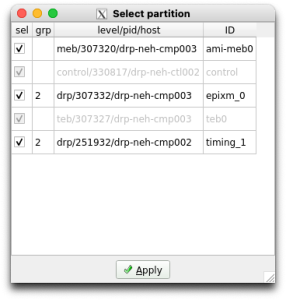

From this you can see that the ePixM detector is named epixm_0 and runs on drp-neh-cmp003 (in the FEE test-stand). The timing DRP is named timing_1 and runs on drp-neh-cmp002. These names are set up in the .cnf file. Note that changing them also requires corresponding changes to the configuration database (configDb). To access and modify an entry, click on the Edit button in the Configuration section of the Control GUI. Leave the Type at BEAM and use the Select pull-down to choose a detector. You'll see the two detector names currently in this DAQ instance in the configDb list, similar to the second screen-shot above.
You may find you need to modify the epixm_0 and/or timing_1 database instances to adjust various parameters. As an example, below is a screen-shot of the epixm_0 DB configDb instance, highlighting the run_trigger_group parameter. You might want to change its value if it conflicts with another detector's or DAQ's usage.
...
In the expert section, parameters can be found with which to initialize the ePixM device's registers. The DB configDb has been initialized with data from the .yml files supplied with the epix-hr-m-320k project. It is organized in a way similar to what one sees with the device's devGui. The values are applied to the hardware when the DAQ goes through the Configure transition, so remember to re-Configure (unwind the state machine to at least Connected) when you make a change.
In the timing_1 DB configDb section, one can find the parameters for setting up the trigger. Take care to modify only the groups appearing in the Select partition pop-up (above) so as not to interfere avoid interfering with other DAQ instances. As an example, the second screen-shot above shows that group 2 has been set up to trigger at a fixed rate if 10 Hz, and group3 has been set up to trigger on eventcode 261.
Sometimes a group is used implicitly, as with the ePixM's (and Sometimes a group is used implicitly, as with the ePixM's (and ePixHR's) Run Trigger group. Its parameters are not governed by the ConfigDb configDb instance, but instead are manipulated directly using the groupca GUI and a script. The Beam Test Trigger Setup section of the EpixHR page describes one such script and how to run it. With groupca, one then enters values on the appropriate group tab to set up rates, event codes, etc., as shown in the first screen-shot below:
...
Note that which tabs groupca displays is governed by the launch line for it in the .cnf file. On the Groups/EventCodes tab of the xpmpva GUI (second screen-shot above), one can see what event codes already exist and what their parameters are. Once the settings are dialed in, switch to groupca's Events tab to verify that the Run Trigger's group is running (L0InpRate not equal to 0). If it isn't running, click the Run checkbox to start it. Unfortunately, this will also start the other group (DAQ Trigger), which may confuse the DAQ. To recover, either restart the DAQ with:
| Code Block | ||
|---|---|---|
| ||
procmgr restart epixM.cnf |
or move the Target State in the Control GUI to RESET. Then Apply the detector selection again.
The Control GUI is built around a Finite State Machine. The configDb values are applied to the hardware when the DAQ goes through the Configure transition. Remember to re-Configure (unwind the state machine to CONNECTED or below) when you make a change.
Once the parameters have been set up as desired, a run can be taken. Decide whether you want to run with or parameters have been set up as desired, a run can be taken. Decide whether you want to run with or without recording and click the Record button on the Control GUI, as appropriate (must be done when the state machine is in a state lower than BeginRun). Then move the Target State to Running RUNNING to start the run. When done, move the Target State to Paused PAUSED (or lower, e.g., Configured CONFIGURED) to stop the run.
Alternatively, there are scripts with which to run a scan. Available scans are timing, pedestal and charge injection. These can be run by first putting the DAQ in the Allocated ALLOCATED state (procmgr start followed by Applying the detectors chosen in the Select partition pop-up) and running one of the following scripts:
...
Overview
Content Tools