Page History
...
As of April 1, 2024, another detector (0016778240-0176075265-0452984854-4021594881-1962934296-0177446913-0402653206) is being readied for an upcoming beam test. With the delays provided by the detector-specific .yml file and the automatic bad lane disablment done by the Root class on Configure, the third and (later) fourth images above were obtained.
Running the DAQ
To run the DAQ with the ePixM, a recent (to April 2, 2024) version of the build is necessary. The following needs to be done only when a new release must be installed.
| Code Block | ||||
|---|---|---|---|---|
| ||||
ssh psbuild-rhel7 -l detopr
cd ~/git
git clone ssh://github.com/slac-lcls/lcls2 lcls2_240402
cd lcls2_240402
. ./setup_env.sh
./build_all.sh

cd ..
git clone ssh://github.com/slac-lcls/ami ami_240402
cd ami_240402
./build_all.sh

cd ~/scripts
rm setup_env.sh
ln -s ~/git/lcls2_240402/setup_env.sh
cp ~/git/lcls2_240402/psdaq/psdaq/cnf/epixM.cnf .
# Modify epixM.cnf as needed |
The beam-test ePixM is currently in the FEE test stand. To run the DAQ there, log into one of the nodes on the FEE network, e.g., drp-neh-ctl002.
| Code Block | ||||
|---|---|---|---|---|
| ||||
ssh drp-neh-ctl002 -l detoprrixopr cd scripts . ./setup_env_epixm.sh procmgr start epixM.cnf -p 2 -o /cds/group/pcds/pds/det/logfiles start fee_epixM.cnf |
A bunch of windows will come up after the procmgr start command is given. Usually the first thing to do is to click the Select button in the Partition area of the DAQ Control GUI. It may take a few moments before the Select partition window pops up (called Rollcall), depending on previous history and the state of the system. Once the window appears, select the detectors you want to include in your run. The detectors will by default be assigned to the readout group (grp) for the platform on which you launched the DAQ (the procmgr start -p option valuenominally 2). Under some circumstances, this must be changed, but can be left alone for now. Optionally select ami-meb0 if you plan /want to use AMI. It should look like the first screen-shot below:
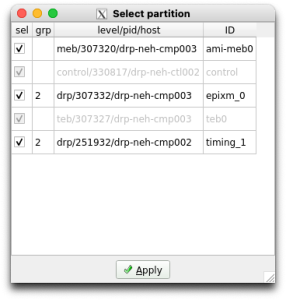

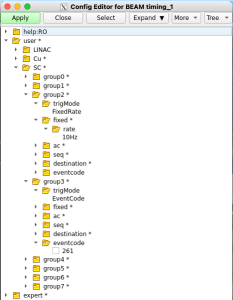
From this you can see that the ePixM detector is named epixm_0 and runs on drp-neh-cmp003 (in the FEE test-stand). The timing DRP is named timing_1 and runs on drp-neh-cmp002. These names are set up in the epixM.cnf file. Be careful about Note that changing them because they also correspond to the names of the configuration entries in requires corresponding changes to the configuration database. To access and modify an entry, click on the Edit button in the Configuration section of the Control GUI. Leave the Type at BEAM and use the Select pull-down to choose a detector. You'll see the two detector names currently in this DAQ instance as shown in the configDb list, similar to the second screen-shot above. You may find you need to modify the epixm_0 and/or timing_1 database instances to adjust various parameters. As an example, below is a screen-shot of the epixm_0 DB instance (ignore the tst_epixm_0 instance), highlighting the run_trigger_group parameter. You might want to change its value if it conflicts with another detector's or DAQ's usage.
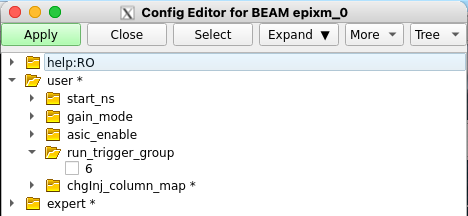
In the expert section, parameters can be found with which to initialize the ePixM device's registers. The DB has been initialized with data from the .yml files supplied with the epix-hr-m-320k project. It is organized in a way similar to what one sees with the device's devGui. The values are applied to the hardware when the DAQ goes through the Configure transition, so remember to re-Configure (unwind the state machine to at least Connected) when you make a change.
In the timing_1 DB section, one can find the parameters for setting up the trigger. Take care to modify only the groups appearing in the Select partition pop-up (above) so as not to interfere with other DAQ instances.
...
Overview
Content Tools