Page History
...
A number of the data lanes from the ASICs are intermittent on the device we're testing with (0016778240-0000000000-0000000000-4032267777-3204448280-0177427457-3053453334). After disabling these lanes, the current detector interface provides images in AMI like the lefthand first image below. After Dawood adjusted various App.SspMonGrp[*].UsrDlyCfg[*] values, more lanes became reliable (middle second image). This configuration was tested with Run/DAQ triggers set to 100/100, 5000/100, 5000/5000, 5000/2500, and 4000/2000 Hz.
...
As of April 1, 2024, another detector (0016778240-0176075265-0452984854-4021594881-1962934296-0177446913-0402653206) is being readied for an upcoming beam test. With the delays provided by the detector-specific .yml file and the automatic bad lane disablment done by the Root class on Configure, the righthand third image above was obtained.
Running the DAQ
To run the DAQ with the ePixM, a recent (to April 2, 2024) version of the build is necessary. The following generally needs to be done only once.
| Code Block | ||||
|---|---|---|---|---|
| ||||
ssh psbuild-rhel7 -l detopr
cd ~/git
git clone ssh://github.com/slac-lcls/lcls2 lcls2_240402
cd lcls2_240402
. ./setup_env.sh
./build_all.sh

cd ..
git clone ssh://github.com/slac-lcls/ami ami_240402
cd ami_240402
./build_all.sh

cd ~/scripts
rm setup_env.sh
ln -s ~/git/lcls2_240402/setup_env.sh
cp ~/git/lcls2_240402/psdaq/psdaq/cnf/epixM.cnf .
# Modify epixM.cnf as needed |
The beam-test ePixM is currently in the FEE test stand. To run the DAQ there, log into one of the nodes on the FEE network, e.g., drp-neh-ctl002.
| Code Block | ||||
|---|---|---|---|---|
| ||||
ssh drp-neh-ctl002 -l detopr
cd scripts
. ./setup_env.sh
procmgr start epixM.cnf -p 2 -o /cds/group/pcds/pds/det/logfiles |
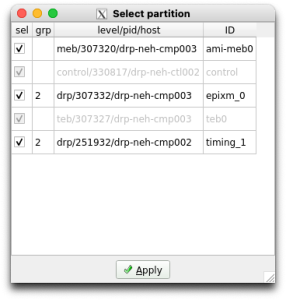
A bunch of windows will come up after the procmgr start command is given. Usually the first thing to do is to click the Select button in the Partition area of the DAQ Control GUI. It may take a few moments before the Select partition window pops up, depending on previous history and the state of the system. Once the window appears, select the detectors you want to include in your run. The detectors will be assigned to the readout group (grp) for the platform on which you launched the DAQ. Optionally select ami-meb0 if you plan/want to use AMI. It should look like this:
Overview
Content Tools