Content
- Software Environment
- Data Generation
- Codewords Generation
- CPU
- GPU
- Support Vector Machine
- Convolutional Neural Network (pending)
- Results
- Raw Images
- Processed Images
- Discussion
- Links for my code, data, and other files related to this project
1.Software Environment
The required software are listed below:
- python 2.7
- ipython
- scipy
- numpy
- matplotlib
- pillow
- h5py
- scikit-learn
- tensorflow
It is recommanded to use linux or mac osx operating sytem. I use ubuntu 16.04. If you use different version of operating system, the command lines below may not work.
To set up software environment, you might need additional packages:
- pip
- git
You can get all these packages installed easily via command line "sudo apt-get install ...(name of the packages) " or "sudo pip install ... (package names)". It may also help to protect your system from unexpected mistakes by setting up a virtual environments. The simple tutorial for setting up a virtual environment can be found in the link:
http://docs.python-guide.org/en/latest/dev/virtualenvs/
2.Data Generation
Currently we don't have many images available for training. Thus I use two ways to generate new images.
- For images with a beam, first shift the beam spot to the center of the image, then rotate the image around the center, then cut out a small patch of images that contains the beam. Then arbitrarily chose a position paste the small patch to the new position. Cut out the small patch of image that is covered by the beam spot, and paste it to the original position of the beam spot. This proccedure aims to minimize the influence of our manipulation. It should be notice that to do this, one have to choose a large enough patch. Otherwise, it may not be able to cover the original beam spot.
- For all images, one can merely shift the whole images one or two pixels along x or y axis. In this way, one can create 24 times more data.
3.Codewords Generation
To generate codewords, one can do with CPU or GPU. But it is one hundred times faster to run on GPU.The original program come from blog:
https://www.cs.toronto.edu/~frossard/post/vgg16/
After you follow the steps described there and successfully run the prediction for the example animal, you only need to make minor modifications to get it produce your own codewords.
- CPU
- Change mean value
find the lines
- Change mean value
# zero-mean input
with tf.name_scope('preprocess') as scope:
mean = tf.constant([123.68, 116.779, 103.939], dtype=tf.float32, shape=[1, 1, 1, 3], name='img_mean')
images = self.imgs-mean
Replace the 'mean = tf.constant([123.68, 116.779, 103.939]' part with 'mean = tf.constant([0., 0., 0.]' . Because our data are not included in the ImageNet, so we have to do mean subtraction by hand. Our data mean are also different than their general mean.
b. Load target Image with zeros mean
Find line
img1 = imread('laska.png', mode='RGB')
img1 = imresize(img1, (224, 224))
Replace them with
middle_result_1=np.zeros((224,224,3))
mean_values_image[i]=np.mean(vcc_original_images[i,::,::])
img=vcc_original_images[i,::,::]-mean_values_image[i]
img=middle_result_1+img[::,::,np.newaxis]
img1=img.astype(np.float32)
In this way you successfully loaded your data in to a suitable form with zero mean. Of course there are other ways to do this, and this is not what I really write in the code due to the context. Real code are in file 'vgg16_modified_1.py'
c. Extract the codewords
Replace line
prob = sess.run(vgg.probs, feed_dict={vgg.imgs: [img1]})[0]
preds = (np.argsort(prob)[::-1])[0:5]
With
codewords_1[i,::] = sess.run(vgg.fc1, feed_dict={vgg.imgs: [img1]})[0]
codewords_2[i,::] = sess.run(vgg.fc2, feed_dict={vgg.imgs: [img1]})[0]
After this, codewords_1 and codewords_2 becomes will contain the codewords for the target images.
- GPU
GPU works in a similar way, you only have to make an extra change. Replace 'sess = tf.Session()' withwith tf.device('/gpu:0'):
config = tf.ConfigProto()
config.gpu_options.allow_growth = True
config.allow_soft_placement = True
with tf.Session(config=config) as sess:
You will be able to run the codewords generation program on GPU0. The aim of this part is to constrain the program to a single GPU to improve the memory usage efficiency.
4.Support Vector Regression
For an elementary tutorial for support vector machine, please refer to the first three Notes on webpage: http://cs229.stanford.edu/materials.html
For a tutorial of doing support vector regression, please refer to the article on webpage: https://alex.smola.org/papers/2004/SmoSch04.pdf
Certainly you can implement the support vector machine youself. But it is kind of time consuming. So you can refer to the package: scikit-learn. It is very user-friendly. However, it is designed to do computation on CPU and it can be extremely slow when you have a moderate data set. So perhaps in the future, the next student on this project may want to write the SVR program with tensorflow, and use GPU to accelerate the computation.
Currently I use function
svr_rbf=SVR(kernel='rbf', C=1e3, gamma=0.1)
pca=PCA(n_components=num_pca)
to construct the model and reduce the dimension of the feature space. But I have not tuned the parameters carefully. These parameters come from the demonstration example of these function.
Note that because we have a huge feature dimension, I think it is necessary to prevent over-fitting. The results also confirm my decision.
5.Convolutional Neural Network (pending)
I have considered two ways to use CNN to improve the performance, but did not finish either of them.
- Transfer training. In the last several programs in folder 'cnn', I have implemented the VGG16 with tensorflow in a way that it can work on a single GPU. The next work for this approach should be
- rewrite it in a way that is capable of running on multiple GPUs
- or train different copy of the models on different GPUs and average over different copy of models after training.
- rewrite the loss function. About this, you should consult with David. The general idea is to include classification and regression in a single loss function. One way to realize this is to minimize the expectation of loss funcitons, i.e. we set two loss function respectively for the case of one beam spot and zero beam spot. We first predict the possibility distribution of whether there is a beam. Then minimize the expectation of the loss function.
- Remember we should start with the pre-trained parameters rather than randomly initialized parameters. But I have written that part of code.
- New convolutional neural network.
- Daniel has some idea of constructing a new convolutional neural network. But honestly I still don't understand what he wants to do. Not even the rough idea. So if you would like to create a new convolutional neural network, you should talk with him first.
6.Results
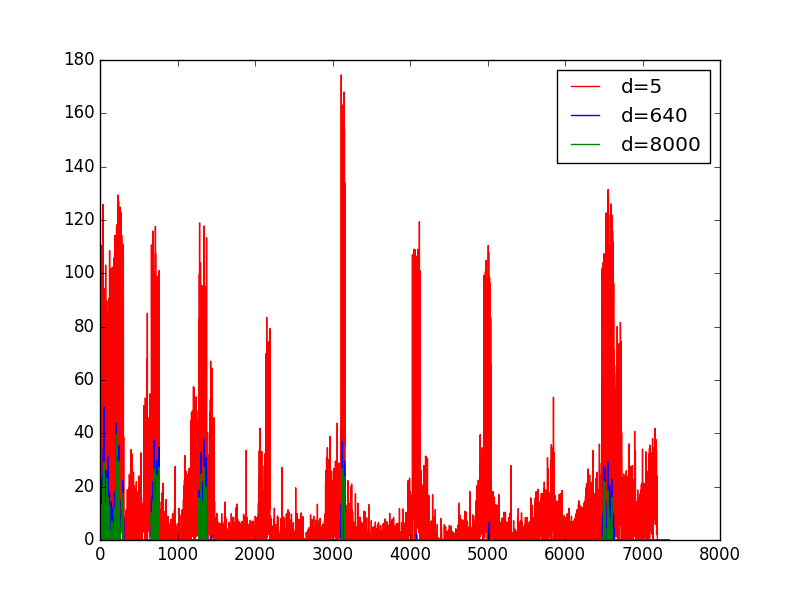
Results for raw images

The above images is the collection of all predictions of the raw images. It is hard to see on this images. But it is large enough actually, so you can download it and see it one by one. Or better you can just see individuals in links below . But is is already obvious that most of the prediction are bed and has nothing to do with the true position.
https://drive.google.com/open?id=0B-tdhSV_wzITVXhHaWNZbkNwUE0
I also considered the training error and the performance. The training error is the difference between the predicted y_min and the true y_min.
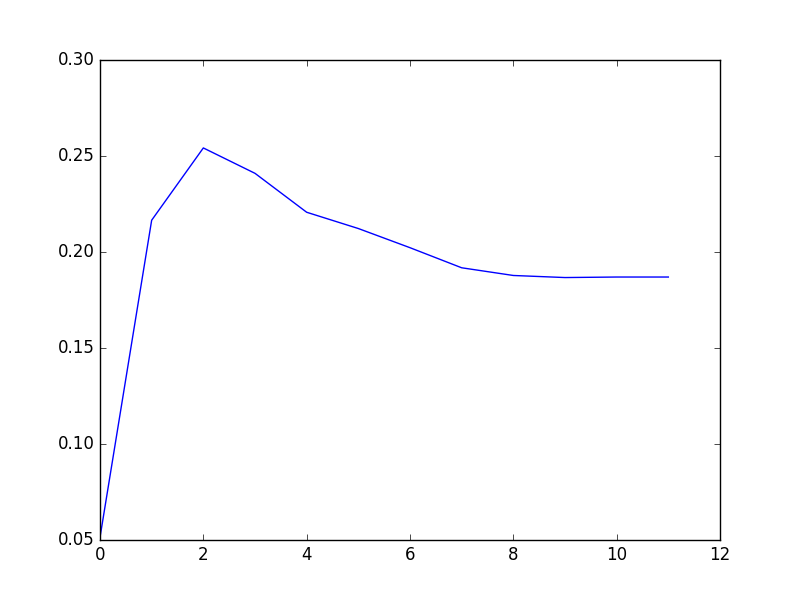
The left the training error. d in the legend indicated the PCA dimension I keep. The right one indicates the overall overlap ratios over all images. The x-axis is a indication of the PCA dimension where
0 corresponds to d=5,
1 d=10
2 d=20
3 d=40
4 d=80 ..... until 10 corresponding to d= 5120 and 11 corresponding to d=8000.
The predictions in the first figure come from d=1280. But actual it doesn't matter. Because whatever dimension I chose, the performance looks equally bad.
Results For Processed Images
Because I have done exact the same thing to these two kinds of images. I just post the results here.


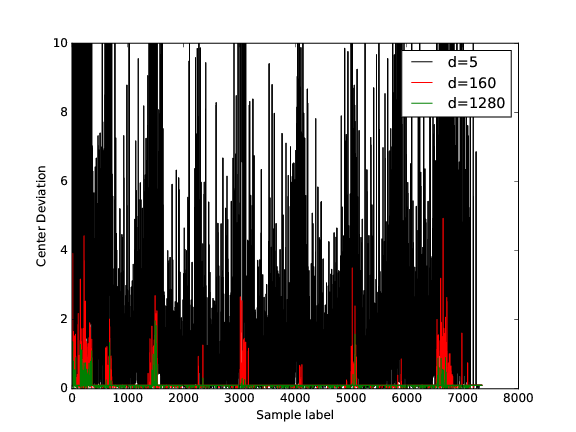
Again, it's hard to find the beam on the spot. But if you see the individual images in the following link, you see that this time, we have got much better result. Only 20 images do not have precise predictions.
https://drive.google.com/open?id=0B-tdhSV_wzITMm92c0M4bjRXRlE
Another thing needed to mention is that because I plot the above huge images all in once. Thus this time it shows the absolute intensity of the beam rather than the relative intensity as is in the individual images.
We expect that with much more data now, we would have better performance. But when I review the predictions of svm trained on only the 162 raw images. There seems to be no apparent improvement. So perhaps we need other way to improve the performance.
7. Discussion
Discussion is contained in my report to Daniel and David:

8. Links to Related Files
The following link contains three different files, ' beam_detection.tar.gz ' is the compressed file of ' beam_detection ' folder. 'beam_detection' folder contains essential codes and results of my projects. Even though I am new to python and these codes and resutls may not be of value to professional user, I think it may help if you are want to know how I got the results. ' First_Quarter_Project_All_Files.tar.gz ' contains nearly all files I used and generated in the project. But unfortunately, i accidently deleted the file that contains the newly generated raw images for vcc screen.
There is a 'folder_may.txt' in folder 'beam_detection' which describes the structure of the folder.
https://drive.google.com/open?id=0B-tdhSV_wzITcWMzVm45a0RFNWs