To initiate the project, please submit a project creation request to the administrator via the provided form. Upon approval, the administrator will grant access to a Git repository hosted on GitHub. Authorized users will then have the capability to create branches within this repository, facilitating collaborative development and version control.
Remember: the 'main' branch cannot be modified directly, each developer need to use branches and create a github Pull Request(PR) to merge desidere branches into main |
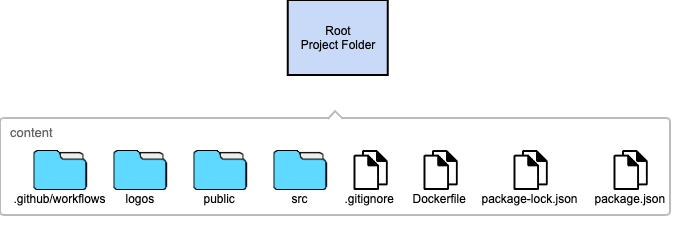
The cloned repository will have a structure like this:
.gitignore is a file that tells Git which files and folders to ignore. You typically wouldn't document this file.Dockerfile is a file that contains instructions for how to build a Docker image. You can include instructions on how to build and run the Docker image in your documentation, this file is principally used by the predefined github workflow that use it to build the docker image that will be deployed on EED kubernetes cluster.package-lock.json is a file that contains information about the exact versions of dependencies that are installed in your project. You typically wouldn't document this file.package.json is a file that contains information about your project, such as its name, version, and dependencies. You can include information from your package.json file in your documentation, such as how to install the dependencies and how to run the project.src
This folder likely contains the source code for your React components and application logic.
src often also contains subfolders, each corresponding to a part of your UI (e.g.,componentsorpages`). Document each subfolder's contents.
public
public folder in your documentation and explain how they are used.logos
content and .github/workflows: These folders are not typical of a basic React UI demo folder, so their purpose and contents will depend on your specific project. Document them accordingly.
here we are going to give an overview of the file that has been created for the startup project:
Purpose: The App.js file defines the central component of your React application. It's often considered the root or entry point from which other components will be nested within.
Imports:
React from 'react'; Imports the core React library. This is essential for working with JSX syntax and creating React components../App.css'; Imports the styling definitions for the App component from the App.css file.App Component: Defines a functional React component named App. Functional components are a simpler way to define components, especially for presentational purposes.return statement defines the structure of the visual elements your component will render. Here's how it breaks down:div (className="App"): Represents the top-level container element of the App component. The styling rules from App.css will influence its appearance.App.css.App component as the default export of the module. This makes the component available for import and use in other parts of your React project (usually in the index.js file).import React from 'react';
import './App.css'; // Importing styles from App.css
function App() {
return (
<div className="App">
<header className="App-header">
<h1>Hello World</h1>
</header>
</div>
);
}
export default App; |
The test case is designed to ensure that the App component of a React application correctly renders the text "Hello World" somewhere in its output. This is a basic test to verify that the component renders as expected and that essential content is present on the page.
Before implementing this test, ensure that the following dependencies are installed in your project:
@testing-library/react for testing React components in a way that simulates user interaction with the DOM.render is imported from @testing-library/react and is used to render the component into a virtual DOM for testing.screen is also imported from @testing-library/react and provides utility functions to query the virtual DOM.App is the component being tested, assumed to be located in the same directory as the test file.test function defines a new test case named "renders Hello World".render function is called with <App /> as its argument, which renders the App component into the virtual DOM.screen.getByText(/Hello World/i) queries the virtual DOM for any element that contains the text "Hello World", ignoring case (/i indicates case-insensitive search). This function returns the first matching element.expect(linkElement).toBeInTheDocument(); asserts that the queried element (linkElement) is present in the document. This assertion passes if the "Hello World" text is found, indicating that the App component renders the text as expected.
import { render, screen } from '@testing-library/react';
import App from './App';

test('renders Hello World', () => {
  render(<App />);
  const linkElement = screen.getByText(/Hello World/i);
  expect(linkElement).toBeInTheDocument();
}); |
To run this test run the following command:
npm test |
With the preparatory steps completed, you are now ready to embark on the development of your application. To ensure a smooth and efficient workflow, it is recommended to adhere to the following guidelines:
Branch Creation:
feature/, fix/, or improvement/ to provide clear context. The name of the branch will be incorporated into the PR (Pull Request) merge message and will be recorded in the source code history.Commit and Push:
Testing:
Pull Request and Merge:
The execution of a merge workflow upon PR creation or modification, which includes running all tests located in the test folder. Should any issues arise, the PR will be blocked until these are resolved. This workflow acts as a critical checkpoint.
| Check the log for each github action job in case of errors |
Deployment Workflow:
Following these steps not only ensures a systematic approach to application development but also fosters a culture of testing and continuous integration, thereby enhancing the quality and reliability of your application. Upon completion, the cycle can recommence with the creation of a new branch for additional features, returning to the beginning of this guide.
|