...
Start SVT DAQ VNC
Software installation locations
Start rogue servers
Taking a CODA run
Online Monitoring
DAQ known issues
- CODA stuck in Download phase
Hall B run Database
Coda / Rogue Errors
SVT Start-up Procedure
SVT Baseline/Threshold Procedure
SVT Chiller Recovery
Interlocks status
Motor recovery procedure
Start SVT DAQ VNC
From counting house as hpsrun (should already be done):
...
source /usr/clas12/release/1.4.0/slac_svt_new/V3.4.0/i86-linux-64/tools/envs-sdk.sh
examples:
cob_dump --all atca1 => dumps the RCE status (booted is 0xea)
cob_rce_reset atca1 ==> resets all the RCEs
cob_rce_reset atca1/1/0/2 ==> resets a particular dpm (in this case dpm1)
cob_cold_data_resreset
et atca1 ==> "power cycles" the RCEs (sometimes they do not come back up nicely so rce_reset might be needed after)
....
INFO : clonfarm2 go.....
|
...
The online monitoring can be started by
| Code Block |
|---|
startSvtCheckoutstartSVTCheckout |
Which is in the hpsrun user path.
...
tcpClient hps11 'tsDisableTriggerSource(0)'
tcpClient hps11 'tsEnableTriggerSource()'
Hall B run Database
This is the link to the Hall B run Database to find all the necessary run specifications
Notes:
- the "tcpClient" commands above will also pause and restart data taking! This is relevant for the Stepan's instructions on the run TWiki regarding the beam pause for under 40 min.
- According to Cameron: the commands can be run on any clon machine when logged in as hpsrun.
Hall B run Database
This is the link to the Hall B run Database to find all the necessary run specifications
https://claswebhttps://clasweb.jlab.org/rcdb
Coda / Rogue Errors
...
3) In the terminal in which Rogue had been running, execute "cob_dump --all atca1
In the resulting print-out, look for all codes to be 0xea. If they do not all go
to 0xea, then :
– re-doing the dump command may help, since the status can change in a few seconds (VF)
– otherwise: execute cob_cold_data_reset atca1 and then cob_rce_reset atca1.
...
2) Reset the DPMs (see paragraph above)
3) Start Rugue Rogue after the DPMs are up
4) Keep PollEn to False
...
6) Check the Flange Epics adl screen (I think this meant to be SVT - > "FEB Main" GUI instread. --VF)
- If some FEBs show red values of voltages / currents it's likely they lost clock. Power-cycle those FEBs only.
- Turn off the Febs DIGI, ANAP and ANAN
- When OFF, turn up DIGI and wait until it comes to ~1A (Additionally some output will be shown in the terminal where Rogue process is running, confirming that communication is established)
- When DIGI is UP and connection to Rogue is established, turn on ANAP and ANAN
- If all FEBs are green proceed with (7)
7) Set PollEn to True and wait for all FEB links to become True9) Turn on the Hybrids with the global buttonTrue
8) If all True and no errors in Rogue, LoadSettings (see previous section)
...
Compute Online Thresholds
1) If open, close Rogue Gui2Gui
2) Reset the data DPMs before doing a baseline run, and then restart the Rogue GUI
| Code Block |
|---|
sdk
/data/hps/slac_svt/server/heavy-photon-daq/software/scripts/resetDataDpms.sh |
...
At the start of the run clonfarm2 and clonfarm3 terminals on CODA runControl (ROCs) might output a large amount of messages which differ with respect to the normal run. This is expected and won't affect the run.
6a) Reminder: need to restart the DPMs after taking the baseline run!
7) The data will end up on clondaq7, so move the data (via scp) from clondaq7 to clonfarm1
...
| Code Block |
|---|
#This will kill both svt and ecal monitoring
killall -9 java

#In one terminal:
startSvtCheckoutstartSVTCheckout

#In another terminal (check actual script name):
startEcalMonitoring |
...
https://logbooks.jlab.org/entry/3916838
| Note |
|---|
Do not go directly to If > 20' were lost before restarting the chiller, do not go directly to -18C. It is recommended to bring the detector to the setpoint temperature using the step by step procedure.
|
- Prepare a myaPlot of the following quantities (from hps_epics click on the ! next to StripCharts and select myaPlot
- HPS_SVT:PLC:i:RTD_SVT_Return-Value ===> This is the return temperature from the SVT measured by an RTD (During a run is usually 4C higher than the Supply. 2C higher if not running)
- HPS_SVT:PLC:i:RTD_SVT_Supply-Value ===> This is the supply temperature read from the RTD. Usually 2C higher than the Chiller temperature
- HPS_SVT:CHILLER:TEMP:RD_ ===> The chiller temperature setpoint
- The SVT temperature at the restart of the chilling procedure will be unknown. One can try to find a good starting point by setting a temperature of the Chiller such that the Supply-Value is about 1 - 2 C below the Return Value and one can see the Return-Value decreasing. If the Return-Value RTD is increasing, it means that the Chiller setpoint temperature needs to be lowered. (see figure below at around 2:10 AM we were trying to find the proper setpoint temperature (green) and trying to put the Supply (blue) below the Return (gold)
- Gradually bring the setpoint temperature down trying to maintain about ~2C spread (ideally) between the Return and the Supply. In the figure below a spread of about 4C was used. One can notice that the supply temperature flattens faster at fixed setpoint but keeps bringing the return down. Try to go down in temperature to more or less maintain the temperature gradient more or less constant to optimise time
- At the end of the procedure, wait a bit to have the SVT at around -13.8C – -14C.
- At that point the Various interlocks can be restored
In this figure is shown the ramp down of the SVT Temperature as described in the procedure above.
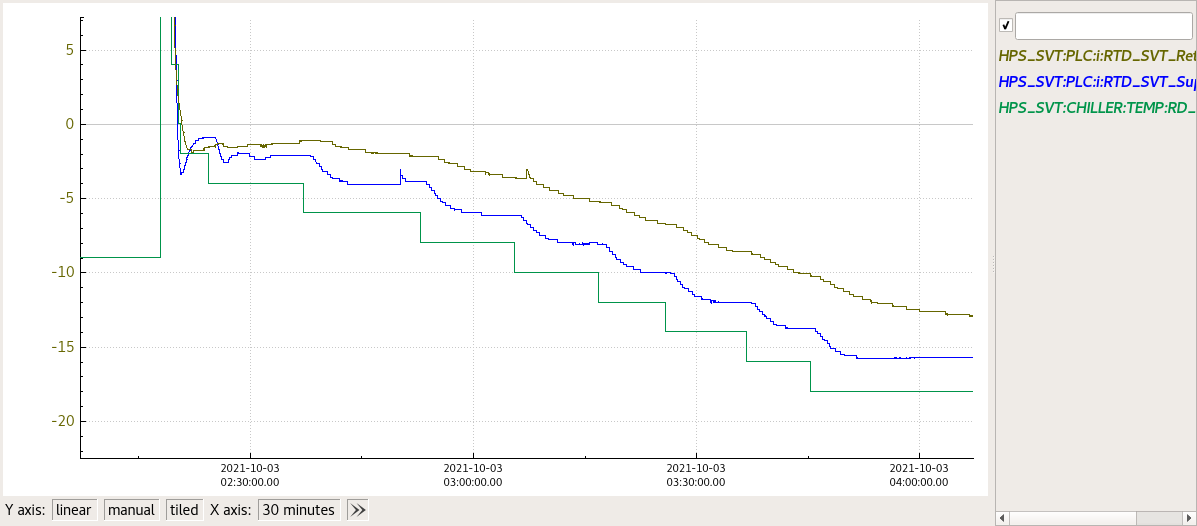 Image Removed
Resetting MPOD Interlocks after SVT Chiller failure
After an SVT Chiller failure the Power Supplies for HV will interlock. To check the status of the SVT LV/HV Power supplies go to
http://hpsmpod/ (Accessible behind the hall-b firewall)
...
Remember to put a - (minus) sign at the chiller setpoint temperature and press enter when the set point temperature is changed in EPICS.
|
Fast recovery of the chiller
1) Open HPS_EPICS => Devices => SVT PLC
2) Ac power DIS (turns off the AC box)
3) Ac power ENA (turns on the AC box)
4) Disable the SVT Chiller interlocks (for example if flow = 0 and flow interlock is enable you won't be able to start the chiller. HEnce disable the interlock)
5) Chiller Ctrl Stop
6) Chiller Ctrl Start
7) Set the setpoint temperature (if needed. See Step-by-step if the chiller was off from bit of time) and press ENTER
8) Re-enable the interlocks (when all is Green) in the SVT-PLC
Step-by-step procedure
- Prepare a myaPlot of the following quantities (from hps_epics click on the ! next to StripCharts and select myaPlot
- HPS_SVT:PLC:i:RTD_SVT_Return-Value ===> This is the return temperature from the SVT measured by an RTD (During a run is usually 4C higher than the Supply. 2C higher if not running)
- HPS_SVT:PLC:i:RTD_SVT_Supply-Value ===> This is the supply temperature read from the RTD. Usually 2C higher than the Chiller temperature
- HPS_SVT:CHILLER:TEMP:RD_ ===> The chiller temperature setpoint
- The SVT temperature at the restart of the chilling procedure will be unknown. One can try to find a good starting point by setting a temperature of the Chiller such that the Supply-Value is about 1 - 2 C below the Return Value and one can see the Return-Value decreasing. If the Return-Value RTD is increasing, it means that the Chiller setpoint temperature needs to be lowered. (see figure below at around 2:10 AM we were trying to find the proper setpoint temperature (green) and trying to put the Supply (blue) below the Return (gold)
- Gradually bring the setpoint temperature down trying to maintain about ~2C spread (ideally) between the Return and the Supply. In the figure below a spread of about 4C was used. One can notice that the supply temperature flattens faster at fixed setpoint but keeps bringing the return down. Try to go down in temperature to more or less maintain the temperature gradient more or less constant to optimise time
- At the end of the procedure, wait a bit to have the SVT at around -13.8C – -14C.
- At that point the Various interlocks can be restored
In this figure is shown the ramp down of the SVT Temperature as described in the procedure above.
Image Added
Resetting MPOD Interlocks after SVT Chiller failure
After an SVT Chiller failure the Power Supplies for HV will interlock. To check the status of the SVT LV/HV Power supplies go to
http://hpsmpod/ (Accessible behind the hall-b firewall)
If you see "Interlock" in the last column, means that the Power Supplies are interlocked and need to be reset. It can be done on the expert hps_epics adl of SVT Bias.
On top of the page there is "Reset MPOD interlocks" in red. Click on it and then check if the interlocks are cleared on the the hpsmod webpage
Motor recovery procedure
On Oct 07 2021 we experienced an issue with moving the target from 20um to 8um.
The issue was that the target would not move to 8um when selected from the Epics gui. From the epics gui we saw no indication of problem
To check the status of the motors (SVT TOP, SVT BOT and TARGET) on the motor controller
1) Connect to hpsxps.jlab.org from browser.
2) Login with username and password.
3) Front Panel → Move
4) Check the screen for errors.
5) If one motor says "Uninitialized" click on Initialize and then Home. The motor will be sent home and re-calibrated
6) If was just a transient error, this should clear up and recover the motor functionality.
Offline Baseline+Thresholds Procedure
APV25 channel pedestals shift with occupancy, and can significantly change after beam is introduced, in comparison to an online baseline run (no beam) in channels close to the beam, especially in the first 2 layers. Additionally, the pedestals can change over time with radiation exposure, so the more time that elapses between online baseline runs, the more likely the high occupancy channel pedestals may no longer be consistent. For these reasons, we have an offline baseline fitting tool to extract the pedestals from production run data.
TO FIT OFFLINE BASELINES AND GENERATE A BASELINE AND THRESHOLD DATABASE FILE FOR A RUN:
1) SETUP OFFLINE FIT RUN DIRECTORY ON CLONFARM1
- From behind the hall gateway → 'ssh -XY -C clonfarm1'
- Access bash tools required for running environment scripts → 'scl enable devtoolset-8 bash'
- Setup environment to run fit jobs → 'source /data/hps/src/setupHpstrEnv.sh'
- Check setup → Enter 'which hpstr' into terminal. Should return "/data/hps/src/hpstr/install/bin/hpstr" if successfully setup.
- Navigate to offline fit job run directory → 'cd /data/hps/slac_svt/server/offlinePedestals'
- Inside this, make evio storage directory to hold data from clondaq7→ 'mkdir hps_0<run_number>'
2) COPY 10 EVIO FILES FROM IFARM CACHE TO CLONFARM1
- In the clonfarm1 terminal
- Copy 10 cache files to Clonfarm1 → 'scp <user>@ftp.jlab.org:/cache/hallb/hps/physrun2021/data/hps_0<run_number>/hps_0<run_number>.evio.000{40..49} /data/hps/slac_svt/server/offlinePedestals/hps_0<run_number>/'
3) COPY ONLINE BASELINE FROM IFARM TO CLONFARM1
- Open new terminal and ssh into ifarm
- Navigate to online baselines → 'cd /work/hallb/hps/phys2021_svt_calibrations/'
- Find the "svt_<online_run_number>_cond.dat" file with <online_run_number> closest to, but less than, the current run being fit.
- For example, if you're trying to offline fit "Run 14596", locate online baseline file "svt_014581_cond.dat"
- From Clonfarm1 terminal, copy online baseline to clonfarm1 → 'scp <user>@ftp.jlab.org:/work/hallb/hps/phys2021_svt_calibrations/svt_0<number>_cond.dat /data/hps/slac_svt/server/offlinePedestals/online_baselines/'
- File may already by available in online_baselines, so check first.
4) SETUP AND RUN JOBS ON CLONFARM1
- In Clonfarm1 terminal
- Run evio → rawsvthits_hh jobs to create sample 0 histograms to fit baselines
- Locate run thresholds file that was used for the current run
- Find file with <number> closest to but less than <run_number> being fit → '/data/hps/slac_svt/server/thresholds/svt_0<number>_thresholds<settings>.dat'
- Copy this file path to be used in next step.
- Modify 'vars.json' → 'vim /data/hps/slac_svt/server/offlinePedestals/vars.json'
- update "run_number" to match the current run
- update "thresh" to match file from step 2.a.i.
- save changes and close file
- Create jobs → 'source /data/hps/slac_svt/server/offlinePedestals/mkjobs.sh'
- Run jobs → 'source run_pool.sh'
- When jobs finish, combine histograms into one file → 'hadd output/rawsvthits_<run_number>_hh.root output/rawsvthits_0<run_number>*.root'
- NOTE the '0' before <run_number> has been removed from the hadded file name. You must do this!
- Wait for jobs to finish before proceeding to step 3.
- Run offline_baseline_fit jobs
- Create jobs → 'source /data/hps/slac_svt/server/offlinePedestals/mkjobs_blfits.sh'
- Run jobs → 'source run_pool_blfits.sh'
- When jobs finish, combine layer fits into one file → 'hadd output/hps_<run_number>_offline_baseline_fits.root output/hps_<run_number>_offline_baseline_layer*.root'
5) GENERATE OFFLINE BASELINE AND THRESHOLD DATABASE FILES
- Run python analysis script
- From clonfarm1 terminal directory /data/hps/slac_svt/server/offlinePedestals/
- Run python analysis → 'python3 offlineBaselineFitAnalysis.py -i output/hps_<run_number>_offline_baseline_fits.root -o output/hps_<run_number>_offline_baseline_fits_analysis.root -b online_baselines/svt_<online_run_number>_cond.dat -dbo output/hps_<run_number>_offline_baselines.dat -thresh output/hps_<run_number>_offline_thresholds.dat'
- new offline baselines are located → output/hps_<run_number>_offline_baselines.dat
- new offline thresholds are located → output/hps_<run_number>_offline_thresholds.dat
- Cleanup the output directory
- 'rm -rf ./scratch/*' to clear job scratch dir
- 'mkdir output/<run_number>' and move "output/rawsvthits_0<run_number>_hh.root", "output/hps_<run_number>_offline_baseline_fits_analysis.root" and ALL of the "<file>.dat" files into that output/<run_number> directory for safe-keeping.
- Remove all of the loose files associated with this run inside of output/