Page History
...
- Make sure your environment is setup correctly:
- Log into a SLAC machine.
- If you are using ssh, you will need to have X11 forwarding enabled (the -X or -Y option if not enabled by default).
- Using the necessary GUI via X11 can be very slow. SLAC has a remote desktop service called FastX that should work better. It has web and desktop clients. See their web page for setup and usage instructions.
- The GUI will not run on a FastX server. From a terminal session on a FastX server, you will need to "ssh -Y rhel6_64".
- The GUI does not run on fermilnx01 or fermilnx02. It will fail with a message like: error while loading shared libraries. If you get this, try running on a different machine. The rhel6-64 pool machines seem to work fine.
- If one is not already sourced in your .bashrc or .cshrc then:
- bash:
source /afs/slac.stanford.edu/g/glast/ground/scripts/group.sh - (t)csh:
source /afs/slac.stanford.edu/g/glast/ground/scripts/group.cshrc
- This will set environment variables like $GLASTROOT and the path to the GUI you will use below.
- Make sure that you have write permissions to the $LATCalibRoot directory.
- If not, ask Tom Glanzman.
- Log into a SLAC machine.
- Copy files to the "normal" place (if the instrument people haven't already):
- TKR: $LATCalibRoot/TKR
- CAL: $LATCalibRoot/CAL/p7repro
- Figure out the transition time:
- Go to the data processing page.
- Find the most recent run. It will be at the top, unless deliveries have arrived out of order.
- Click on the run number.
- Note the start time.
- Go to the mission planning timeline
- Find the first SAA passage that is still in the future processing wise.
- Pick a time that is in the middle of the SAA passage. That is when we will start the new calibration.
- You may also want to note the start time of the next run after the SAA. You will want to send that information to the data monitors list (see below) when you inform them of the new calibration.
- Go to the data processing page.
- Start the
rdbGUI: type "rdbGUI" at the command prompt. - Go to the "File" menu and select "Open DB Schema".
- Navigate to the directory
/afs/slac/g/glast/applications/dbSchemas/calib- You can paste this into the
File Namebox. NOTE: to "paste" from clipboard into a Qt GUI window, using a Mac: ctrl-click-v - You can bookmark this location for future sessions by clicking on the small red flag icon, and retrieve the bookmark by clicking on the red flag icon.
- You can paste this into the
- Open the calib.xml file
- select the file "calib.xml" and click on "OK".
- then click on
metadata_v2r1under the Tables box.
- Under the
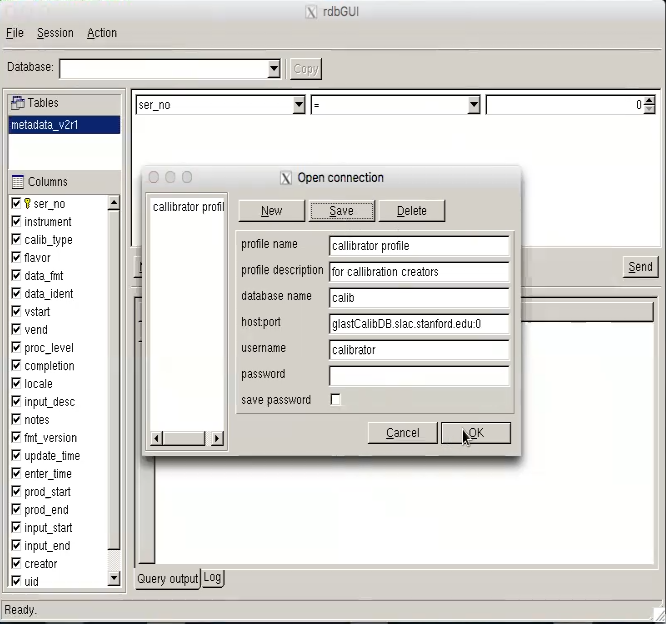
Sessionmenu, click on "Open connection". This will open a pop up box. - Fill in the box like the image below. The "profile name" and "profile description" boxes can be anything. The password is the same as the user name but with an "8" in place of the second "a". If you click "Save", then the connection information will be stored as a profile (e.g., "calibrator profile") that you can load next time from the box on the left instead of typing everything in.
- Click "OK". Then verify that the chosen database appears in the Database window in the top left corner of the GUI.
- Once connected, click on the drop down where is says "ser_no" (serial number) and set it to "instrument". It will fill in "LAT" in the box on the right.
- Click on the "More" button at the bottom of the upper box. This will add another drop down menu row.
- Select "flavor" from the "ser_no" pull-down menu.
- In the right hand box (that may say "vanilla"), type in "L1current". There is no menu choice for it.
- Click on the "More" button again.
- Select "calib_type" (calibration type) from the "ser_no" pull-down menu.
- In the right hand box, select the type, e.g., 'TKR_DeadChan'.
- If you don't know the type that corresponds to the file you have, you can pick an option from the menu and hit "Send" to see what the current/previous calibration files are used for that type.
For easier reference, here's a table with some example files and the calib_type for them.
file name example calib_type Notes fit_gcrhists_lkhd_568m_572m_bigsum.gcr_asym_hist.xml CAL_Asym the "568m_572m" should increment by 6m for each new calibration fit_proton_calib_568m_572m_bigsum.calMPD.xml CAL_MevPerDac the "568m_572m" should increment by 6m for each new calibration pedavr_568m_572m.xml CAL_Ped
the "568m_572m" should increment by 6m for each new calibration LAT_BadStrips_45.xml TKR_DeadChan the "45" should increment by 1 for each new calibration
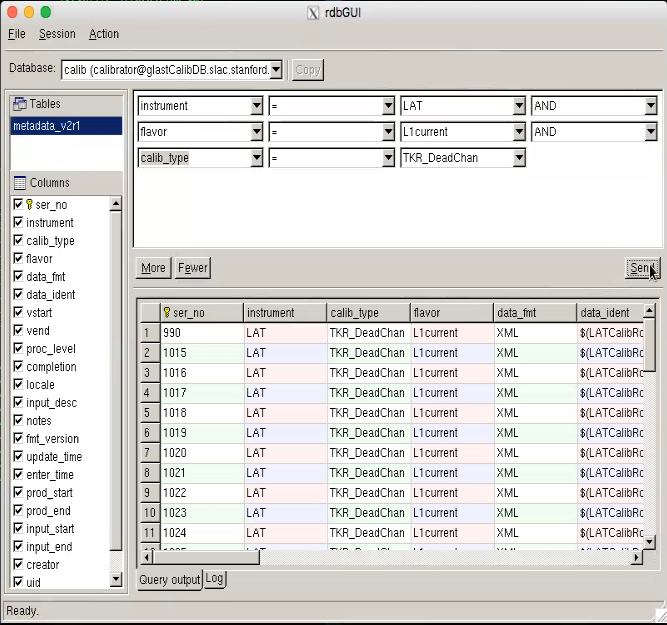
- Then click the "Send" button on the right hand middle of the main rdbGUI window.
- You will get something that looks like this:
- Add the new calibration file.
- Select the last row in the bottom box.
- Right-click on a field (not the row number) in the last row and select "Copy Latest" from the menu. NOTE: to right-click on a Mac laptop, do a 2-finger tap on the trackpad, or use a 3-button mouse
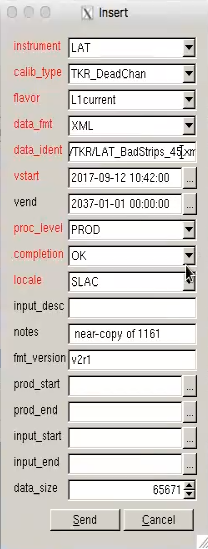
- In the pop-up box that comes up, change the "vstart" time to the middle of the SAA passage chosen earlier.
- Change "data_ident" field to the file name for the XML file:
- Click "Send" on the tall and narrow "insert" pop-up and it will disappear.
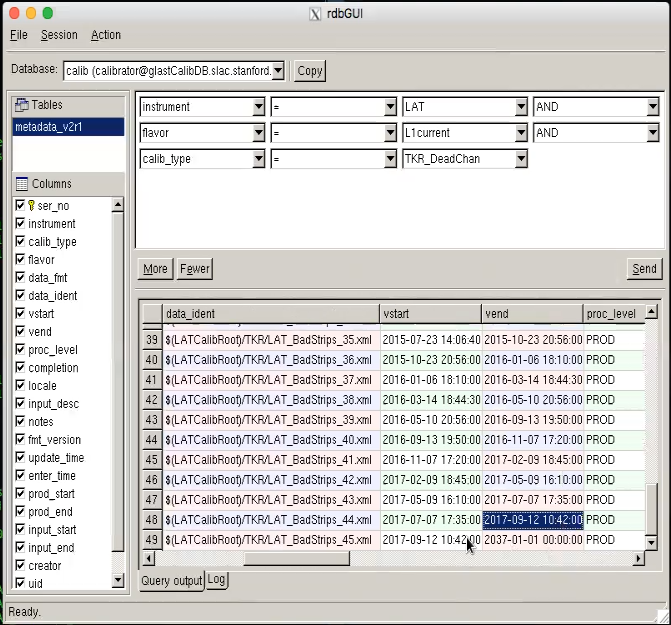
- To show the new record in the calibration database that you have just added: click the "Send" button on the right hand middle of the main rdbGUI window.
- There should be a new last line. Scroll over and check that the "vstart" time is correct and that the "vend" field of the previous line is the same.
- Do this for each of the calibration files that need to be updated. You are basically done.
- To quit from the rdbGUI, select "Quit" from the "File" pull-down menu at the top left of the GUI window.
- Send an email to whoever created the calibration files and cc the data monitor list (datamonlist@glast2.stanford.edu) to let them know when the calibration should take effect.
- Get the ID of the next run by using XTime or similar tool to convert start time of the next run after the SAA pass into MET.
- Include the start time and first run in the email, e.g., "vstart is 2018-09-28 03:43. First run should be 559799706."
- Update the JIRA issue with the same information.
- Later check that the new calibration has been used.
- Go to data processing page and click on the L1Proc bar for the run after the change should have happened.
- Go to the "Substreams" table in the middle of the page and click on one of the streams for the "doChunk" task.
- Go down to the "Substreams" table and click on any one of the "doCrumb" streams.
- Click on the log file link for the "recon" process.
- Search in the log for appropriate XML file(s):
- you can search for the string "BadStrips" in the log file, to find the TKR bad strips XML file.
- NOTE: the XML file(s) are selected by a command of the form:
SELECT ser_no FROM metadata_v2r1 WHERE ((completion="OK") AND (instrument="LAT") AND (calib_type="TKR_DeadChan") AND (flavor="L1current")
AND ("2021-05-22 12:57:20">=vstart) AND ("2021-05-22 12:57:20"<vend) AND ("PROD"=PROC_LEVEL)) ORDER BY update_time desc
so in the event that the "vend" field of the previous record does not update, then the XML file might be selected by the "update_time" value. So you might want to confirm that the desired new XML calibration file has the latest "update_time".
- Assuming everything is good, update and close the JIRA issue.
...
Overview
Content Tools


