...
- SDF guide and documentation, particularly on using Jupyter notebooks interactively or through web interface (runs on top of nodes managed by SLURM)
- Training dataset dumper (used for producing h5 files from FTAG derivations) documentation and git (Prajita's fork, bjet_regression is the main branch)
- SALT documentation, SALT on SDF, puma git repo (used for plotting), and Umami docs (for postprocessing), also umami-preprocessing (UPP)
- SLAC GitLab group for plotting related code
Code Block export PATH="/sdf/group/atlas/sw/conda/bin:$PATH"FTAG1 derivation definition (FTAG1.py)
Documents and notes
- GN1 June 2022 PUB note, nice slides and proceedings from A. Duperrin
- Jannicke's thesis (chapter 4 on b-jets)
...
- Understanding bias in JES in low truth-jet pT
- Truth-jet matching (Brendon)
- Check different truth jet matching schemes for response definition
- Performance as a function of dR quality cut
- Check different truth jet matching schemes for response definition
- Evaluating the impact of soft lepton information (Prajita)
- Performance with LeptonID
- Apply additional selection on soft electron
- Auxiliary tasks (Brendon)
- Fixing weights of TruthOrigin classes
- Add TruthParticleID
- Model architecture (Brendon)
- Attention mechanisms
- Hyperparameter optimization
...
| Code Block |
|---|
### Trained on UPP_1 # No auxiliary tasks /gpfs/slac/atlas/fs1/d/bbullard/BjetRegression/models/GNX-bjr-ftag1_1p5mil_NoAux_21param_20230918-T082841 /gpfs/slac/atlas/fs1/d/bbullard/BjetRegression/models/GNX-bjr-ftag1_1p5mil_NoAux_21param_20230918-T174839 ### Trained on UPP_2 # No auxiliary tasks, trained in 2 separate batches /gpfs/slac/atlas/fs1/d/bbullard/BjetRegression/models/GNX-bjr-physval_80mil_NoAux_21param_v1_20231013-T121459 /gpfs/slac/atlas/fs1/d/bbullard/BjetRegression/models/GNX-bjr-physval_80mil_NoAux_21param_v2_20231013-T121459 # With auxiliary tasks /gpfs/slac/atlas/fs1/d/bbullard/BjetRegression/models/GNX-bjr-physval_80mil_Aux_21param_20231023-T080935 ### Trained on UPP_3 /gpfs/slac/atlas/fs1/d/bbullard/BjetRegression/models/GNX-bjr-physval_80mil_NoAux_21param_PtResampled |
...
SDF preliminaries
Migration to S3DF
In Jan/Feb 2024, we migrated from SDF to S3DF. Here are some helpful documentations:
Note that our installation of conda is at /sdf/group/atlas/sw/conda.
Compute resources
SDF has a shared queue for submitting jobs via slurm, but this partition has extremely low priority. Instead, use the usatlas partition or request Michael Kagan to join the atlas partition.
...
atlas has 2 CPU nodes (2x 128 cores) and 1 GPU node (4x A100); 3 TB memoryusatlas has 4 CPU nodes (4x 128 cores) and 1 GPU node (4x A100, 5x GTX 1080. Ti, 20x RTX 2080 Ti); 1.5 TB memory
Environments
For sdf
An environment needs to be created to ensure all packages are available. We have explored some options for doing this.
Option 1: stealing instance built for SSI 2023. This installs most useful packages but uses python 3.6, which leads to issues with h5py.
Starting Jupyter sessions via SDF web interface
...
| Code Block |
|---|
export PATH="/sdf/group/atlas/sw/conda/bin:$PATH"
export TMPDIR="${SCRATCH}" |
Producing H5 samples with Training Dataset Dumper
Introduction
~~~~~~~~~~~~~~~~~~~~~~~~~~~~~~~~~~~~~~~~~~~~~~~~~~~~~~~~~~~~~~~~~~
Overview (FTag Workshop Sept. 2023): presentation by Nikita Pond
Tutorial: TDD on FTag docs
General introduction to Athena in Run 3 (component accumulator): ATLAS Software Docs
~~~~~~~~~~~~~~~~~~~~~~~~~~~~~~~~~~~~~~~~~~~~~~~~~~~~~~~~~~~~~~~~~~
TDD productions:
v2.1: TDD code, BigPanda
Run with grid-submit -c configs/PHYSVAL_EMPFlow_jer.json -e AntiKt4EMPFlow_PtReco_Correction_MV2c10_DL1r_05032020.root -i BTagTrainingPreprocessing/grid/inputs/physval-jer.txt bjer
NOTE: you will need to copy the PtReco histogram into the top level of training-dataset-dumper
- Issue with datasets not being available on the grid.. need to request a new production
~~~~~~~~~~~~~~~~~~~~~~~~~~~~~~~~~~~~~~~~~~~~~~~~~~~~~~~~~~~~~~~~~~
We are using a custom fork of training-dataset-dumper, which is used to extract h5 files from derivations - we are currently using FTAG1 / PHYSVAL / JETM2.
The fork in slac-bjr has our working code to dump datasets based on the AntiKt4TruthDressedWZJets container and EMPFlow as well as UFO jets.
The main pieces of code that we are developing for the dumper are:
...
For S3DF
Setting up the conda environment has steps similar to those of SDF. To use the atlas group conda, use following steps
1.) Add the following in your .bashrc
| Code Block |
|---|
export PATH="/sdf/group/atlas/sw/conda/bin:$PATH" |
2.) Add the following to your .condarc
| Code Block |
|---|
pkgs_dirs:
  - /fs/ddn/sdf/group/atlas/d/<user>/conda_envs/pkgs
envs_dirs:
 - /fs/ddn/sdf/group/atlas/d/<user>/conda_envs/envs
channels:
  - conda-forge
  - defaults
  - anaconda
- pytorch |
3.) source conda.sh
| Code Block |
|---|
> source /sdf/group/atlas/sw/conda/etc/profile.d/conda.sh |
4.) cross check if conda is set correctly
| Code Block |
|---|
> which conda
#following should appear if things went smoothly
conda ()
{
   \local cmd="${1-__missing__}";
   case "$cmd" in
       activate | deactivate)
           __conda_activate "$@"
       ;;
       install | update | upgrade | remove | uninstall)
           __conda_exe "$@" || \return;
           __conda_reactivate
       ;;
       *)
           __conda_exe "$@"
       ;;
   esac
} |
5.) Now follow the same steps as SDF to create and activate the conda environment
...
Producing H5 samples with Training Dataset Dumper
Introduction
~~~~~~~~~~~~~~~~~~~~~~~~~~~~~~~~~~~~~~~~~~~~~~~~~~~~~~~~~~~~~~~~~~
Overview (FTag Workshop Sept. 2023): presentation by Nikita Pond
Tutorial: TDD on FTag docs
General introduction to Athena in Run 3 (component accumulator): ATLAS Software Docs
~~~~~~~~~~~~~~~~~~~~~~~~~~~~~~~~~~~~~~~~~~~~~~~~~~~~~~~~~~~~~~~~~~
TDD productions:
v2.1: TDD code, BigPanda
Run with grid-submit -c configs/PHYSVAL_EMPFlow_jer.json -e AntiKt4EMPFlow_PtReco_Correction_MV2c10_DL1r_05032020.root -i BTagTrainingPreprocessing/grid/inputs/physval-jer.txt bjer
NOTE: you will need to copy the PtReco histogram into the top level of training-dataset-dumper
- Issue with datasets not being available on the grid.. need to request a new production
- GSC pre-recommendation (gitlab), jet calibrations in Athena
~~~~~~~~~~~~~~~~~~~~~~~~~~~~~~~~~~~~~~~~~~~~~~~~~~~~~~~~~~~~~~~~~~
We are using a custom fork of training-dataset-dumper, which is used to extract h5 files from derivations - we are currently using FTAG1 / PHYSVAL / JETM2.
The fork in slac-bjr has our working code to dump datasets based on the AntiKt4TruthDressedWZJets container and EMPFlow as well as UFO jets.
The main pieces of code that we are developing for the dumper are:
| Function | AntiKt4EMPFlowJets | AntiKt4UFOCSSKJets |
|---|---|---|
| Executable/Athena interface | BTagTrainingProcessing/bin/ca-dump-regression | |
| Top level configuration | configs/regression_EMPFlow*.json | configs/regression_UFO.json |

Class definitions:
- SingleBTagAlg.*: C+
Class definitions:
- SingleBTagAlg.*: C++ entry point, called by dumper.py
- processSingleBTagEvent.*: templated method to apply tools based on config file
- SingleBTagTools:
- SingleBTagConfig:
...
To install umami, clone the repository (which is forked in the slac-bjr project):git clone ssh://git@gitlab.cern.ch:7999/slac-bjr/umami.git
Now setup umami and run the singularity image:
| Code Block |
|---|
source run_setup.sh
singularity shell /cvmfs/unpacked.cern.ch/gitlab-registry.cern.ch/atlas-flavor-tagging-tools/algorithms/umami:0-19 |
Plotting exercises can be followed in the umami tutorial.
Plotting with puma standalone
Puma can be used to produce plots in a more manual way. To install, there was some difficulty following the nominal instructions in the docs. What I (Brendon) found to work was to do:
| Code Block |
|---|
conda create -n puma python=3.11
pip install puma-hep
pip install atlas-ftag-tools |
This took quite some time to run, so (again) save yourself the effort and use the precompiled environments.
Pre-processing
SALT likes to take preprocesses data file formats from Umami (though in principle the format is the same as what's produced by the training dataset dumper).
An alternative (and supposedly better way to go) than using umami for preprocessing is to use the standalone umami-preprocessing (UPP).
Follow the installation instructions on git. This is unfortunately hosted on GitHub, so we cannot add it to the bjr-slac GitLab group ![]() A working fork
A working fork
is available under Brendon's account and contains UPP configs for each sample configuration (bjr branch). These do not yet implement resampling, but there are 2 methods that can be explored (resampling and reweighting).
You can cut to the chase by doing conda activate upp, or follow the docs for straightforward installation.
To do the preprocessing to make the training, validation, and test sets, do:
| Code Block |
|---|
preprocess --config configs/bjr.yaml --split all |
Notes on logic of the preprocessing config files
There are several aspects of the preprocessing config that are not documented (yet). Most things are self explanatory, but note that:
- within the FTag software, there exist flavor classifications (for example lquarkjets, bjets, cjets, taujets, etc). These can be used to define different sample components. Further selections
based on kinematic cuts can be made through theregionkey. - It appears only 2 features can be specified for the resampling (nominally pt and eta).
- The binning also appears not to be respected for the variables used in resampling.
Model development with SALT
The slac-bjr git project contains a fork of SALT. One can follow the SALT documentation for general installation/usage. Some specific notes can be found below:
Creating conda environment
One can use the environment salt that has been setup in /gpfs/slac/atlas/fs1/d/bbullard/conda_envs,
otherwise you may need to use conda install -c conda-forge jsonnet h5utils. Note that this was built using the latest master on Aug 28, 2023.
SALT also uses comet for logging, which has been installed into the salt environment (conda install -c anaconda -c conda-forge -c comet_ml comet_ml).
Follow additional instructions for configuration on the SALT documentation.
If using the latest main branch from Dec 11 2023, after SALT model refactoring has occurred, there are some issues with CUDA version compatibility with SDF.
PyTorch v2.0.1 used in SALT requires newer CUDA version than is available (11.4). One may need to do the following:
| Code Block |
|---|
conda uninstall pytorch
conda install pytorch torchvision torchaudio cudatoolkit=11.4 -c pytorch |
Note that the following error may appear if following the normal installation:
| Code Block |
|---|
ImportError: cannot import name 'COMMON_SAFE_ASCII_CHARACTERS' from 'charset_normalizer.constant' |
To solve it, you can do the following (again, this is already available in the common salt environment):
| Code Block |
|---|
conda install chardet
conda install --force-reinstall -c conda-forge charset-normalizer=3.2.0 |
Interactive testing
It is suggested not to use interactive nodes to do training, but instead to open a terminal on an SDF node by:
- Starting a Jupyter notebook (with a conda environment that has jupyter notebook installed, not necessarily the SALT conda env).
A singularity container used in the jupyter notebook will propagate to the terminal session, which is incompatible with SALT. - New > Terminal. From here, you can test your training configuration.
There are some additional points to be aware of:
- Running a terminal on an SDF node will reduce your priority when submitting jobs to slurm
- Be careful about the number of workers you select (in the PyTorch trainer object) which should be <= the number of CPU cores you're using (using more CPU cores parallelizes the data loading,
which can be the primary bottleneck in training) - The number of requested GPUs should match the number of devices used in the training.
- The number of jets you use in the test training should be larger then the batch size (2x works fine)
The following code can be used to test SALT training (it's basically the same thing you have in the slurm submission script):
| Code Block |
|---|
salt fit -c configs/<my_config>.yaml --data.num_jets_train <small_number> --data.num_workers <num_workers> |
For training on slurm
See the SALT on SDF documentation (also linked at the top of this page) and example configs in the SALT fork in the slac_bjr GitLab project.
For additional clarity, see the following description of the submission scripts. Change the submit_slurm.sh script as follows
| Code Block | ||
|---|---|---|
| ||
#SBATCH --output="<your_output_path>/out/slurm-%j.%x.out"
#SBATCH --error="<your_output_path>/out/slurm-%j.%x.err

export COMET_API_KEY=<your_commet_key>
export COMET_WORKSPACE=<your_commet_workspace>
export COMET_PROJECT_NAME=<your_project_name>

cd <your_path_to_salt_directory> |
from top level salt directory can use following command to launch a slurm training job in sdf
| Code Block | ||
|---|---|---|
| ||
sbatch salt/submit_slurm_bjr.sh |
Both slurm-%j.%x.err andslurm-%j.%x.out files will start to fill up
You can use standard sbatch commands from SDF documentation to understand the state of your job.
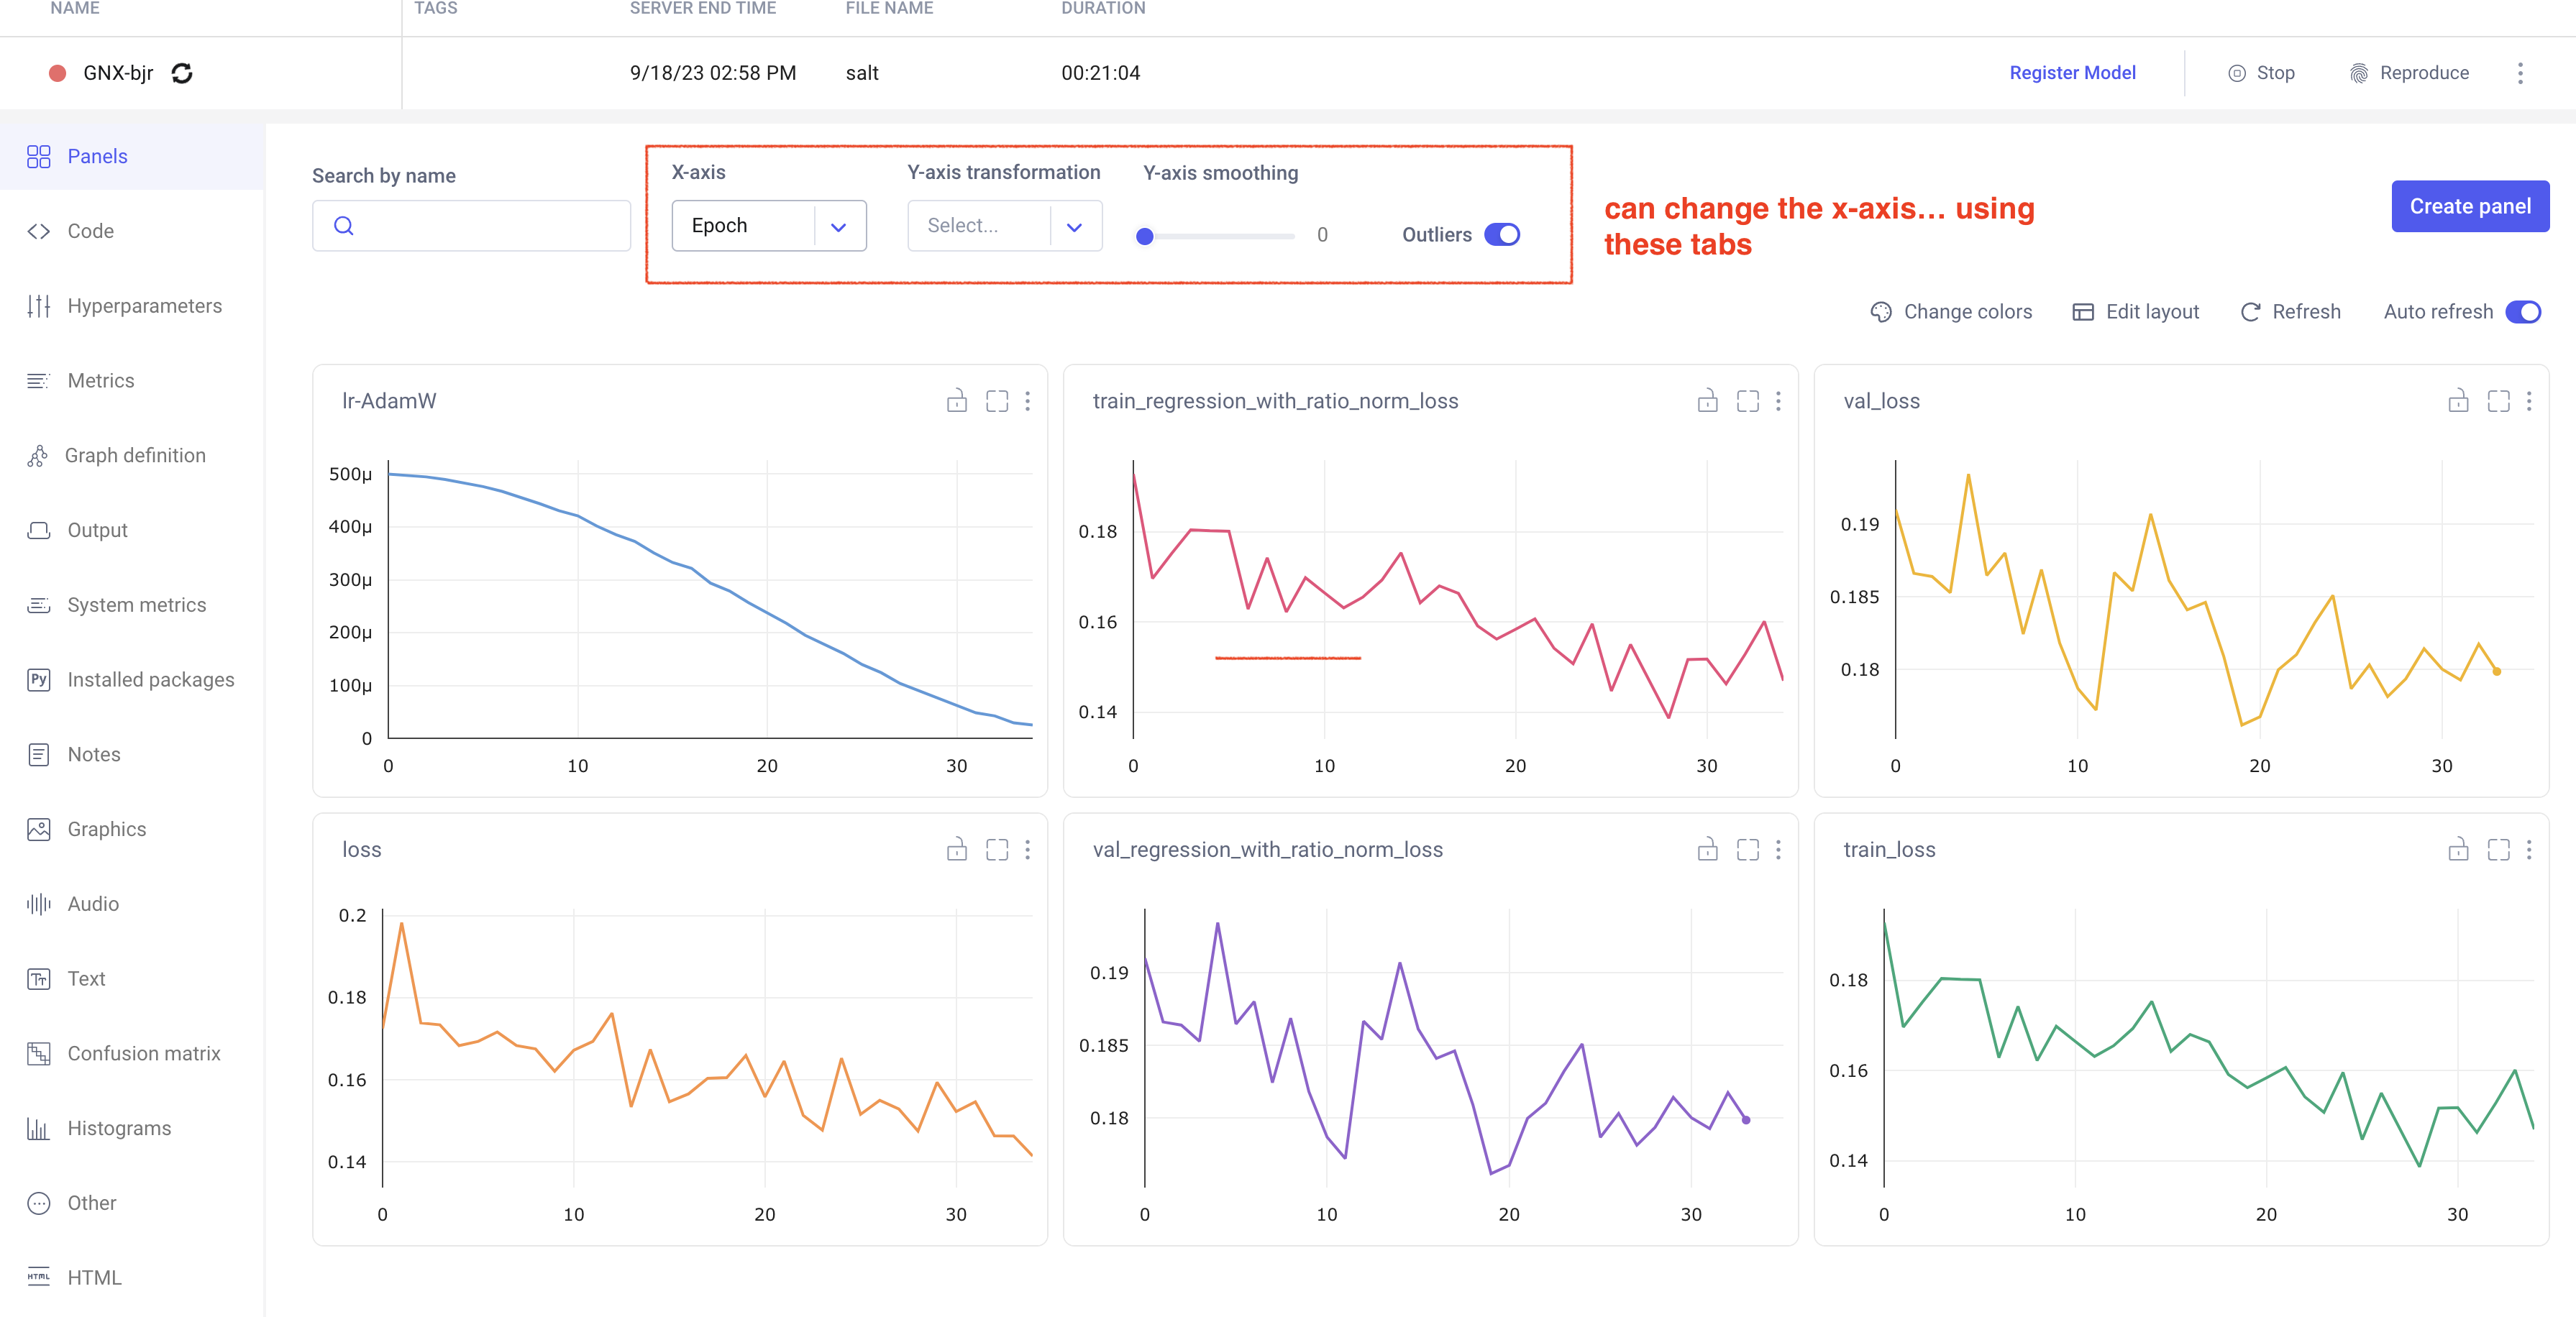
Comet Training Visualization
In your comet profile, you should start seeing the live update for the training which looks as follows. The project name you have specified in the submit script appears under your
workspace which you can click to get the graphs of live training updates.
Training Evaluation
Follow salt documentation to run the evaluation of the trained model in the test dataset. There is a separate batch submission script used for the model evaluation, but is very similar to what is used in the model training batch script.
The main difference is in the salt command that is run (see below). It will produce a log in the same directory as the other log files, and will produce a new output h5 file alongside the one you pass in for evaluation.
The important points are the following:
- --data.test_suff: Specify a suffix for the sample that is produced from the PredictionWriter callback specified in the model config. There is a separate list of features to be saved to this new file, along with the model output,
that can be used for studies of the model performance - --data.num_workers: you should use the same number of workers for the evaluation as for the training, since both are bottlenecked by the loading of the data
- --data.test_file: technically can be either the training, testing, or evaluation h5 file. In principle the testing file is created for this purpose. Philosophically, you want to keep this dataset separate so that you don't induce some kind of bias as you manually determine the hyper parameter optimization
- --ckpt_path: the specific model checkpoint you want to use. Out of the box, SALT should be picking the checkpoint with the lowest validation loss, but this has been found to not be very reliable. So always do it manually to be sure you know what model state you are actually studying.
| Code Block |
|---|
srun salt test -c logs/<model>/config.yaml --data.test_file <path_to_file_for_evaluation>.h5 --data.num_jets_train <num_jets> --data.num_workers 20 --trainer.devices 1 --data.test_suff eval --ckpt_path logs/<model>/ckpts/epoch=<epoch>.ckpt |
We are developing some baseline evaluation classes in the analysis repository to systematically evaluate model performance.
To do: develop this, and add some notes on it (Brendon/Prajita)
Miscellaneous tips
You can grant read/write access for GPFS data folder directories to ATLAS group members via the following (note that this does not work for SDF home folder)
...
Now setup umami and run the singularity image:
| Code Block |
|---|
source run_setup.sh
singularity shell /cvmfs/unpacked.cern.ch/gitlab-registry.cern.ch/atlas-flavor-tagging-tools/algorithms/umami:0-19 |
Plotting exercises can be followed in the umami tutorial.
Plotting with puma standalone
Puma can be used to produce plots in a more manual way. To install, there was some difficulty following the nominal instructions in the docs. What I (Brendon) found to work was to do:
| Code Block |
|---|
conda create -n puma python=3.11
pip install puma-hep
pip install atlas-ftag-tools |
This took quite some time to run, so (again) save yourself the effort and use the precompiled environments.
...
Pre-processing
SALT likes to take preprocesses data file formats from Umami (though in principle the format is the same as what's produced by the training dataset dumper).
An alternative (and supposedly better way to go) than using umami for preprocessing is to use the standalone umami-preprocessing (UPP).
Follow the installation instructions on git. This is unfortunately hosted on GitHub, so we cannot add it to the bjr-slac GitLab group ![]() A working fork
A working fork
is available under Brendon's account and contains UPP configs for each sample configuration (bjr branch). These do not yet implement resampling, but there are 2 methods that can be explored (resampling and reweighting).
You can cut to the chase by doing conda activate upp, or follow the docs for straightforward installation.
To do the preprocessing to make the training, validation, and test sets, do:
| Code Block |
|---|
preprocess --config configs/bjr.yaml --split all |
Notes on logic of the preprocessing config files
There are several aspects of the preprocessing config that are not documented (yet). Most things are self explanatory, but note that:
- within the FTag software, there exist flavor classifications (for example lquarkjets, bjets, cjets, taujets, etc). These can be used to define different sample components. Further selections
based on kinematic cuts can be made through theregionkey. - It appears only 2 features can be specified for the resampling (nominally pt and eta).
- The binning also appears not to be respected for the variables used in resampling.
...
Model development with SALT
The slac-bjr git project contains a fork of SALT. One can follow the SALT documentation for general installation/usage. Some specific notes can be found below:
Creating conda environment
One can use the environment salt that has been setup in /gpfs/slac/atlas/fs1/d/bbullard/conda_envs,
otherwise you may need to use conda install -c conda-forge jsonnet h5utils. Note that this was built using the latest master on Aug 28, 2023.
SALT also uses comet for logging, which has been installed into the salt environment (conda install -c anaconda -c conda-forge -c comet_ml comet_ml).
Follow additional instructions for configuration on the SALT documentation.
If using the latest main branch from Dec 11 2023, after SALT model refactoring has occurred, there are some issues with CUDA version compatibility with SDF.
PyTorch v2.0.1 used in SALT requires newer CUDA version than is available (11.4). One may need to do the following:
| Code Block |
|---|
conda uninstall pytorch
conda install pytorch torchvision torchaudio cudatoolkit=11.4 -c pytorch |
Note that the following error may appear if following the normal installation:
| Code Block |
|---|
ImportError: cannot import name 'COMMON_SAFE_ASCII_CHARACTERS' from 'charset_normalizer.constant' |
To solve it, you can do the following (again, this is already available in the common salt environment):
| Code Block |
|---|
conda install chardet
conda install --force-reinstall -c conda-forge charset-normalizer=3.2.0 |
Interactive testing
It is suggested not to use interactive nodes to do training, but instead to open a terminal on an SDF node by:
- Starting a Jupyter notebook (with a conda environment that has jupyter notebook installed, not necessarily the SALT conda env).
A singularity container used in the jupyter notebook will propagate to the terminal session, which is incompatible with SALT. - New > Terminal. From here, you can test your training configuration.
There are some additional points to be aware of:
- Running a terminal on an SDF node will reduce your priority when submitting jobs to slurm
- Be careful about the number of workers you select (in the PyTorch trainer object) which should be <= the number of CPU cores you're using (using more CPU cores parallelizes the data loading,
which can be the primary bottleneck in training) - The number of requested GPUs should match the number of devices used in the training.
- The number of jets you use in the test training should be larger then the batch size (2x works fine)
The following code can be used to test SALT training (it's basically the same thing you have in the slurm submission script):
| Code Block |
|---|
salt fit -c configs/<my_config>.yaml --data.num_jets_train <small_number> --data.num_workers <num_workers> |
For training on slurm
See the SALT on SDF documentation (also linked at the top of this page) and example configs in the SALT fork in the slac_bjr GitLab project.
For additional clarity, see the following description of the submission scripts. Change the submit_slurm.sh script as follows
| Code Block | ||
|---|---|---|
| ||
#SBATCH --output="<your_output_path>/out/slurm-%j.%x.out"
#SBATCH --error="<your_output_path>/out/slurm-%j.%x.err

export COMET_API_KEY=<your_commet_key>
export COMET_WORKSPACE=<your_commet_workspace>
export COMET_PROJECT_NAME=<your_project_name>

cd <your_path_to_salt_directory> |
from top level salt directory can use following command to launch a slurm training job in sdf
| Code Block | ||
|---|---|---|
| ||
sbatch salt/submit_slurm_bjr.sh |
Both slurm-%j.%x.err andslurm-%j.%x.out files will start to fill up
You can use standard sbatch commands from SDF documentation to understand the state of your job.
Comet Training Visualization
In your comet profile, you should start seeing the live update for the training which looks as follows. The project name you have specified in the submit script appears under your
workspace which you can click to get the graphs of live training updates.
Training Evaluation
Follow salt documentation to run the evaluation of the trained model in the test dataset. There is a separate batch submission script used for the model evaluation, but is very similar to what is used in the model training batch script.
The main difference is in the salt command that is run (see below). It will produce a log in the same directory as the other log files, and will produce a new output h5 file alongside the one you pass in for evaluation.
The important points are the following:
- --data.test_suff: Specify a suffix for the sample that is produced from the PredictionWriter callback specified in the model config. There is a separate list of features to be saved to this new file, along with the model output,
that can be used for studies of the model performance - --data.num_workers: you should use the same number of workers for the evaluation as for the training, since both are bottlenecked by the loading of the data
- --data.test_file: technically can be either the training, testing, or evaluation h5 file. In principle the testing file is created for this purpose. Philosophically, you want to keep this dataset separate so that you don't induce some kind of bias as you manually determine the hyper parameter optimization
- --ckpt_path: the specific model checkpoint you want to use. Out of the box, SALT should be picking the checkpoint with the lowest validation loss, but this has been found to not be very reliable. So always do it manually to be sure you know what model state you are actually studying.
| Code Block |
|---|
srun salt test -c logs/<model>/config.yaml --data.test_file <path_to_file_for_evaluation>.h5 --data.num_jets_train <num_jets> --data.num_workers 20 --trainer.devices 1 --data.test_suff eval --ckpt_path logs/<model>/ckpts/epoch=<epoch>.ckpt |
We are developing some baseline evaluation classes in the analysis repository to systematically evaluate model performance.
To do: develop this, and add some notes on it (Brendon/Prajita)
...
Miscellaneous tips
You can grant read/write access for GPFS data folder directories to ATLAS group members via the following (note that this does not work for SDF home folder)
| Code Block |
|---|
groups <username> # To check user groups
cd <your_directory>
find . -type d|xargs chmod g+rx # Need to make all subdirectories readable *and* executable to the group |
You can setup passwordless ssh connection following this page to create an ssh key pair. Then add this block to your ~/.ssh/config file (allows to tunnel directly to iana, but you can adapt to other hosts):
| Code Block |
|---|
Host sdfiana
  HostName iana
  User <yourusername>
  IdentityFile ~/.ssh/<your private key>
  proxycommand ssh s3dflogin.slac.stanford.edu nc %h %p
  ForwardX11 yes
Host s3dflogin.slac.stanford.edu |
Discussion Summary
Suggestions from M. Kagan Jan 23, 2023
- Not to regress the neutrino pT directly, as the pT distribution might not be unimodal. Instead, try two different approaches
- Quantile regression with the median
- Auxilary task based on classification of neutrino pT class prediction, i.e., predict the bin 0-1 for the ratio of neutrino pT & jet pT. Also, add overflow bin
- loss function based on median rather than mean square error, ie, MAE rather than MSE
...