...
Page
...
to
...
describe
...
the
...
setup
...
and
...
use
...
of
...
the
...
teststand.
...
Furthermore
...
to
...
provide
...
documentation
...
for
...
all
...
external
...
teststands.
...
CERN teststand
I include a few images of the setup of the CERN test stand to serve as a useful guide to those reading through the documentation to familiarize themselves with these setups, or to those interested in making a similar setup at their home institute.

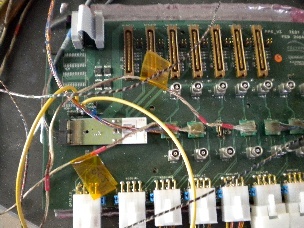
The teststand provides experienced users with a way to perform quick tests of software using a standalone infrastructure without relying onlarge scaling testing in the PIT or the TOOTHPIX setup. We provide the same infrastructure to setup the partititon as with the PIT and SR1 and this can be brought up with minimal overhead as compared to the other systems. The teststand is meant to be updated with each new, validated release of the PixelDAQ code such that any tests that need to be done with the newest version can be performed immediately on this setup. It is further meant to serve as a way to develop code without recourse to using the PIT for the purpose of testing. Once the code is deemed validated and improved it can then be easily ported to the SR1 or PIT setup from the LabDb infrastructure where it will remain.
Example start up procedure - Start Infrastructure.
There are a number of steps necessary to start up the teststand at CERN. Herein I outline how a user can login as pixeldaq, start the partition and prepare to run a simple scan. This should serve as a manual for any user who is fresh to this setup, but experienced with doing similar work in SR1, and wishes to use the teststand to perform simple calibration tests.
login to the machine as pixeldaq:
> ssh pixeldaq@pixdaq02 (ask your administrator for the password)
>daq_setup
>The test stand Db's are in this directory: /home/pixeldaq/daq/Applications/Pixel/LabDb
...
>ssh
...
pixrcc01
...
>source
...
/home/pixeldaq/daq/Applications/Pixel/LabDb/setup.sh
...
>pmgserver
...
>....back
...
on
...
pixdaq02
...
>source
...
/home/pixeldaq/daq/Applications/Pixel/LabDb/setup.sh
...
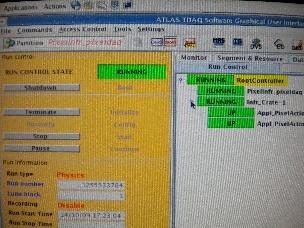
>start_infr
...
>This
...
should
...
bring
...
up
...
the
...
PixelInfr_pixeldaq
...
partition
...
as
...
shown
...
in
...
the
...
image
...
above.
...
You
...
can
...
then
...
BOOT->CONFIG->INITIALIZE->START
...
the
...
partition.
...
Some
...
expert
...
operations
...
To
...
change
...
SLAVE
...
image
...
path
...
(when
...
partition
...
is
...
initialized)
...
$PIX_LIB
...
/Examples/ChangeCfg
...
--dbPart
...
PixelInfr_pixeldaq
...
--idTag
...
LAB --save
...
--setBinPref
...
/home/pixeldaq/DSP
...
--connTag
...
LAB_1
...
--cfgTag
...
LAB_1
...
--pendTag
...
OnDb
...
***
...
*
...
This
...
should
...
write
...
it
...
permanently
...
to
...
DB,
...
but
...
doesn't
...
work
...
for
...
unknown
...
reasons.
...
Conventionally
...
DSP
...
images
...
are
...
linked
...
from
...
this
...
directory:
...
/home/pixeldaq/DSP/
...
master.bin
...
->
...
../daq/RodDaq/NewDsp/MASTER/master.bin
...
sdsp6713_xcode.bin
...
->
...
../daq/RodDaq/NewDsp/SLAVE/slave.dld
...
On
...
pixrcc01
...
VME
...
drivers
...
are
...
not
...
loaded
...
after
...
reboot
...
(needs
...
fix)
...
As
...
root:
...
Load
...
Linux
...
modules
...
from
...
/lib/modules/daq
...
insmod cmem_rcc-2.6.9-55.0.2.EL.cernsbc.
...
ko io_rcc-2.6.9-55.0.2.EL.cernsbc.
...
ko vme_rcc-2.6.9-55.0.2.EL.cernsbc.ko
...
Run
...
vme_config
...
to
...
setup
...
VME
...
window
...
size,
...
etc.
...
/daq/slc4/tdaq/tdaq-02-00-01/installed/i686-slc4-gcc34-opt/bin/
...
vmeconfig -a
...
/lib/modules/daq/vmetab
...
Correct
...
VME
...
config
...
can
...
be
...
changes
...
with
...
vmeconfig
...
-i
...
filename
...
Master
...
map
...
decoder
...
0
...
Decoder number = 0
Master map decoder 0 Enabled = Yes
Master map decoder 0 VME base address= 0x00000000
Master map decoder 0 PCI base address= 0x90000000
Master map decoder 0 Window size = 0x20000000
Master map decoder 0 Write posting = No
Master map decoder 0 VME space = A32
Master map decoder 0 AM code = User / Data
for a new release one needs to check out the HEAD of
Applications/Pixel/PixRCD/PixRCD-00-01-00/PixRCDConfiguration/LAB
...
and
...
Applications/Pixel/LabDb
...
Paolo
...
doesn't
...
include
...
the
...
correct
...
tag
...
of
...
these
...
packages
...
in
...
a
...
new
...
release
...
For
...
PixelDaq-1-3-2:
...
cvs
...
co
...
-r CERN-teststand-1-3-2
...
Applications/Pixel/PixRCD/PixRCD-00-01-00/PixRCDConfiguration/LAB
...
cvs
...
co
...
-r CERN-teststand-1-3-2
...
Applications/Pixel/LabDb
...
The
...
teststand
...
setup.sh
...
is
...
now
...
sourced
...
for
...
pixeldaq.
...
To
...
run
...
pmgserver
...
on
...
pixrcc01:
...
***
...
*
...
ssh
...
pixrcc01
...
pmgserver
...
After
...
a
...
reboot
...
the
...
VME
...
isn't
...
configured.
...
The
...
drivers
...
are
...
loaded.
...
Run
/daq/slc4/tdaq/tdaq-02-00-01/installed/i686-slc4-gcc34-opt/bin/
...
vmeconfig -a
...
/lib/modules/daq/vmetab
...
is
...
sufficient.
...
***
...
*