| Warning | ||
|---|---|---|
| ||
This page is old and deprecated. Please use the current version of Netbeans. The built-in Maven plugin should function fine. |
Short Instructions
- Download Maven 2. The 2.0.10 release will probably work the best.
- Add the Maven 2 bin directory to the PATH variable.
- Download Netbeans.
- Install Netbeans
- Install the Maven Plugin in Netbeans at Tools > Plugins > Available Plugins.
- Checkout a project with Versioning > CVS > Checkout.
Long Instructions
Maven 2 Installation
On Linux, an appropriate version of Maven 2 can be installed as follows.
| No Format |
|---|
wget http://www.lcsim.org/dist/maven2/2.0.9/apache-maven-2.0.9-bin.zip
unzip apache-maven-2.0.9-bin.zip
|
Now, the environment needs to be setup so that Netbeans finds can find this external copy of Maven versioninstallation. The Also, the Maven bin directory must be added to the system path.
Setting Up the Linux Environment
...
In your command shell, go to the directory where maven was downloaded and execute this command.
| No Format |
|---|
unzip apache-maven-2.0.10-bin.zip
|
Then This will add the bin directory to the path on Linux using bash.. (This assumes a bash shell.)
| No Format |
|---|
export M2_HOME=/path/to/apache-maven-2.0.910 export PATH=$M2_HOME/bin:$PATH |
It These commands can be placed in the RC file for your shell so that this is these variables are setup automatically when you login.
Setting Up the Windows Environment
Navigate to the maven zip file, right click on it, and select Extract All from the menu.
Open the System menu under Control Panel > System (the icon looks like a computer).
Go to the Advanced tab under System and click on Environment Variables.
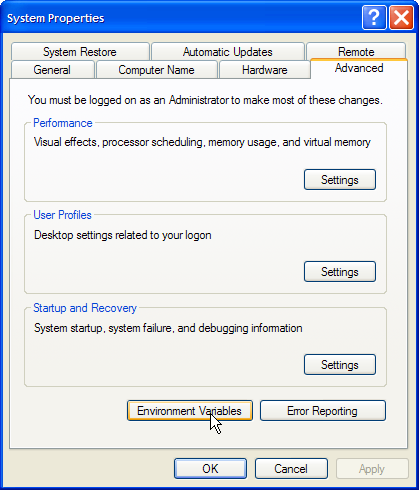
...